
Search the wiki
Shooting a HDRI Onset for CG Lighting
Introduction
In this tutorial, we’ll look at how to go about shooting a HDRI for CG lighting. A quick note before we begin: the bulk of this tutorial will focus on capturing a HDRI under onset shoot conditions. Therefore, we will assume you only have a few minutes onset to capture the HDRI.
A huge thanks to the fantastic team at Clear Angle Studios for providing all the kit and making this tutorial possible.
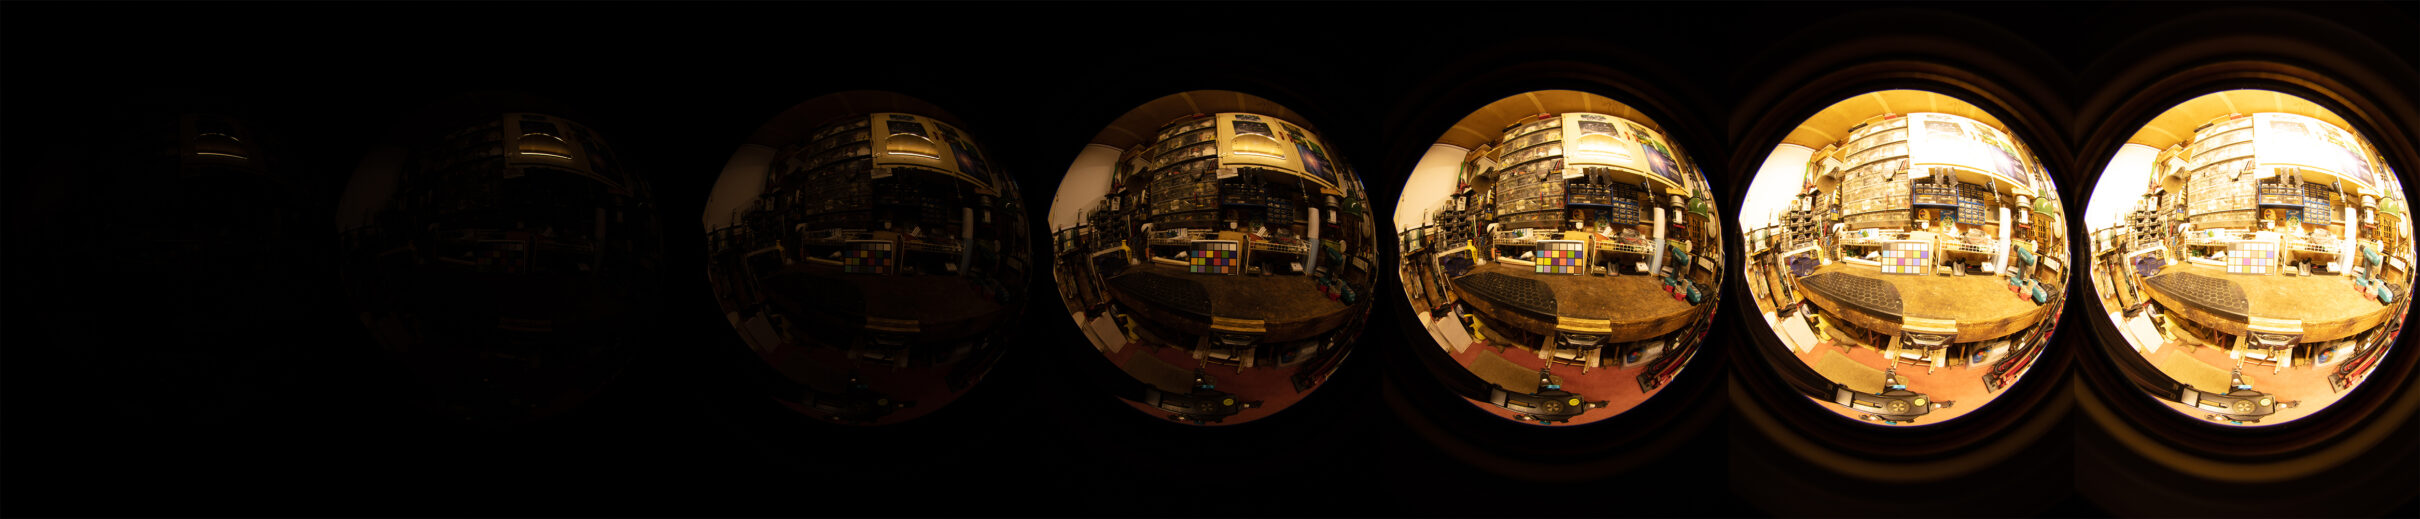
And lastly, a quick note before we begin. Using a HDRI for CG lighting alone does not get you a fully photo-realistic or believable result. A HDRI is a quick method to gather data onset and give the lighting team some idea of how the shot was lit. It is important to note that the real world does not behave like a HDRI. For example, for an interior room (let’s just say shaped like a box), the lights will have a position and orientation in that real space. If you capture a HDRI of the room, it will map the lights to a spherical dome. Therefore, you should use the HDRI as a reference, and extract as much info as you can from the HDRI to rebuild the set as accurtately as you can in CG. You could model the room, extract the light sources from the HDRI and map them to area lights, project the HDRI onto the geometry to get better bounced light and so on. You could also capture HDRIs of each light with a 24mm or a 50mm lens (for example, the ARRI lights omset or the softboxes). Don’t just use HDRIs as is, deconstruct and reverse engineer them to really get the best lighting possible.
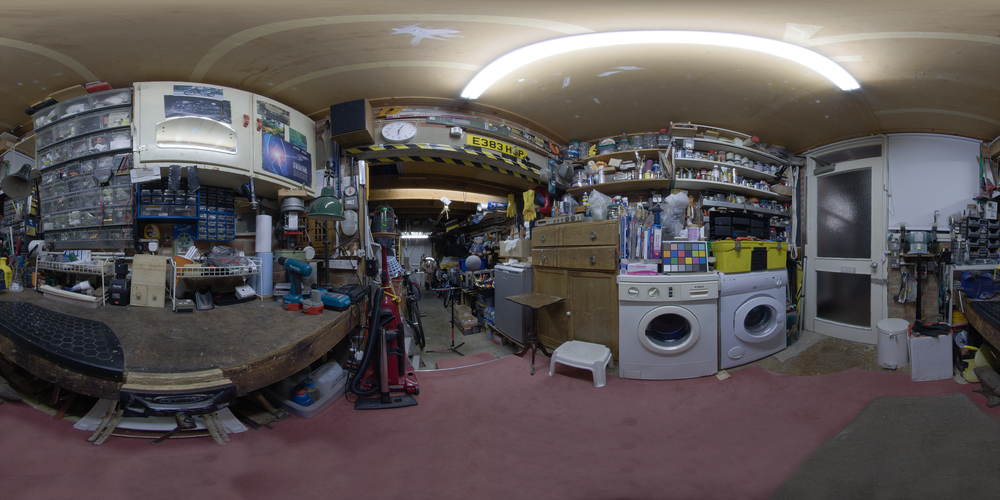
In the below image, you can see the photography of the set has been mapped to the geometry to get better bounced light and reflections.

…and for more info on this particular setup, check out this video:
Example Data
If you are looking for some test data, you can pick up a 7 bracketed RAW CR2 dataset here:
HDRI Shoot Kit
The following kit list is to give you an idea of what I generally use to shoot a HDRI. There are many other options, but I find this works for me and allows me to easily jump in and out to capture a HDRI. I like to use the 5Ds or 5D MkIII as it allows you to shoot 7 brackets with one click. If you would like more brackets, or your camera does not support 7 brackets out of the box, you could use the free firmware Magic Lantern. I’ve persoanally not used Magic Lantern as there seems to be a bit of confusion regarding warranty.
And one more quick note on shooting brackets. As mentioned above, I generally go for 7 brackets as the default, however, if you are aiming to capture the full beauty of the sun, then you’ll need to capture more shots. This means getting a camera that can shoot faster or using an ND filter of some kind.
- Canon 5Ds: a full frame camera that allows you to shoot 7 bracketed exposures with one click.
- 8mm Sigma fisheye lens: allows you to capture a 180 degree circular image when used on a full frame camera.
- Ninja Nodal 6 panoramic head: allows you to incrementally rotate the camera around the no-parallax point (the center of the lens’s entrance pupil).
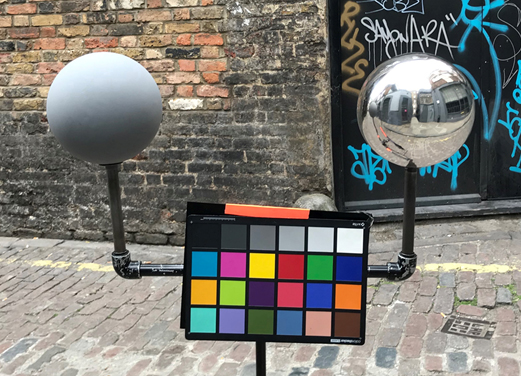
- Grey ball: for reference purposes. The 18% grey ball (mid grey) will allow you to match exposure in post.
- Chrome ball: for reference purposes. The chrome ball will give you a clear idea of where the lights were onset.
- Macbeth chart: for reference purposes. For colour calibration in post.
- Slate: for reference purposes. To give yourself (and the team back in the office) a reminder of when and where the HDRI was taken.
- Manfrotto Tripod: a solid tripod for shooting under difference environments.
- Shutter release cable: this is so you can fire the camera without touching it, allowing you to minimise camera shake.
- Batteries, memory cards, gaffer tape, etc.

001. Prepare your camera and the ninja nodal
The first thing we want to do is attach the ninja nodal onto the tripod. The following values described in this tutorial are for the positioning of the the Canon 5ds (or MkII or MkIII) and an 8mm Sigma fisheye lens on to a ninja nodal, therefore, if you are using a different camera and lens, you will need to figure out the no-parallax point for that specific camera and lens. For more information on this, check out the following links:
- https://wiki.panotools.org/No-parallax_point
- https://panosociety.com/pages/how-to-set-no-parallax-point
- https://wiki.panotools.org/Entrance_Pupil_Database
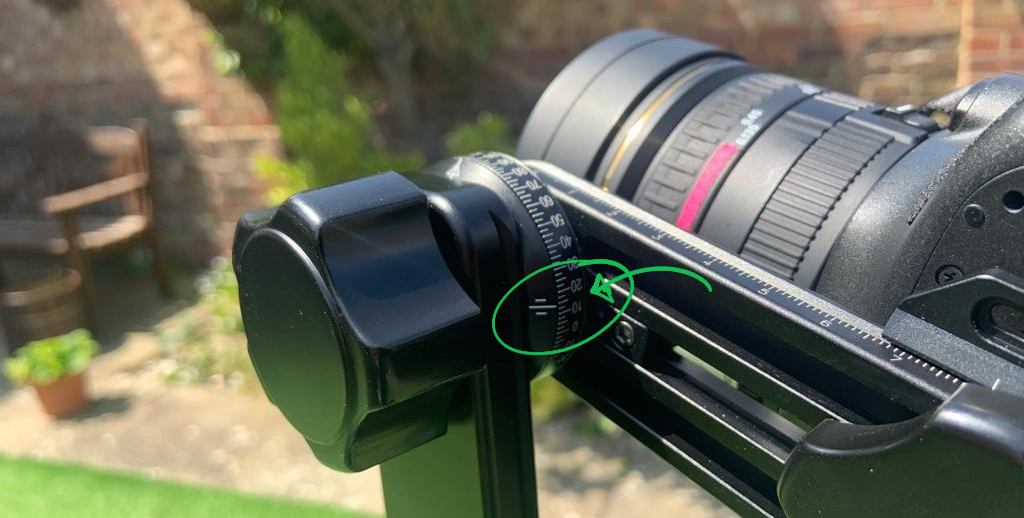
So let’s start by connecting the base arm of the ninja nodal to your tripod. We’ll refer to this horizontal arm as armA.

Then connect the second vertical arm (which we’ll refer to as armB) of the ninja nodal to armA and make sure the rotating tilt knob is pointing away from the no-parallax point (as illustrated in the image below). If this is not connected with the correct orientation, you will not be able to capture a HDRI that stitches well. With the arm connected, take the front ledge of armB and position it to 5.3 on armA.

Now take one of the blue knobs and make sure it is screwed into the 90-degree hole. Make sure this knob is screwed in quite tight. For the remaining 2 blue knobs, make sure they are loosely tightened. When you rotate teh ninja nodal now, every 90degrees, it should click into place.

Now attach your camera to armB using the provided plate and position the camera so the middle line on the plate lines up to a value of 8.95 (or 8.9) on armB of the ninja nodal.

Your camera should now be positioned correctly and rotate around the no-parallax point, and click in every 90-degrees. Next, tilt your camera 15-degrees looking up. This will allow you to capture the full sky. Sometimes, I will have this rotated at 0-degrees or -15d-egrees depending on the lighting. Also – we will need to adjust this to capture the reference.
If you are capturing panoramas with different lenses using the Canon 5ds, here is a table that breaks down where to position your camera/lens:
| Lens | Arm A | Arm B |
|---|---|---|
| Sigma 8mm f/3.5 | 5.3 | 8.95 |
| Canon 24mm f/2.8 | 5.3 | 6.7 |
| Canon 24mm f/1.4 L Series | 5.3 | 8.8 |
| Canon 35mm f/2.0 | 5.3 | 5.7 |
| Canon 50mm f/1.4 | 5.3 | 5.55 |
| Canon 50mm f/1.2 L Series | 5.3 | 5.7 |
| Canon 100mm f/2.0 | 5.3 | 5.7 |
| Canon 100mm f.2.8 Macro | 5.3 | 7.6 |
The last thing to do is attach the shutter release cable.

Your setup should look something like this:

002. Set your camera settings
Here we’ll look at the camera settings I use for shooting a HDRI in under 2 minutes. The settings will be for the Canon 5Ds but you should be able to match the settings to other cameras. Before you begin, make sure to set the camera to MANUAL mode, so we have full control of the shutter speed, the ISO and the F-Stop.
- If your camera allows it, set the Color Space to Adobe RGB. It is more than likely set to sRGB by default.
- Shoot a minimum of 5 brackets
- A maximum of 7 brackets is more than ideal
- Set the brackets 2 to 3 stops apart
- If you are shooting 5 exposures, set the brackets to 3 stops apart.
- If you are shooting 7 exposures, set the brackets to 2 stops apart.
- Set the bracketing sequence to go from under to over exposed (- 0 +).
- Shoot in Manual mode
- Shoot RAW
- Check the White Balance. If you know the White Balance of the main shoot cam, match that.
- Select an appropriate F-Stop (F8 – F12)
- Set an appropriate ISO (100 – 800)
- Set the shutter speed accordingly. I usually start with 1/125th
- Make sure to check your images
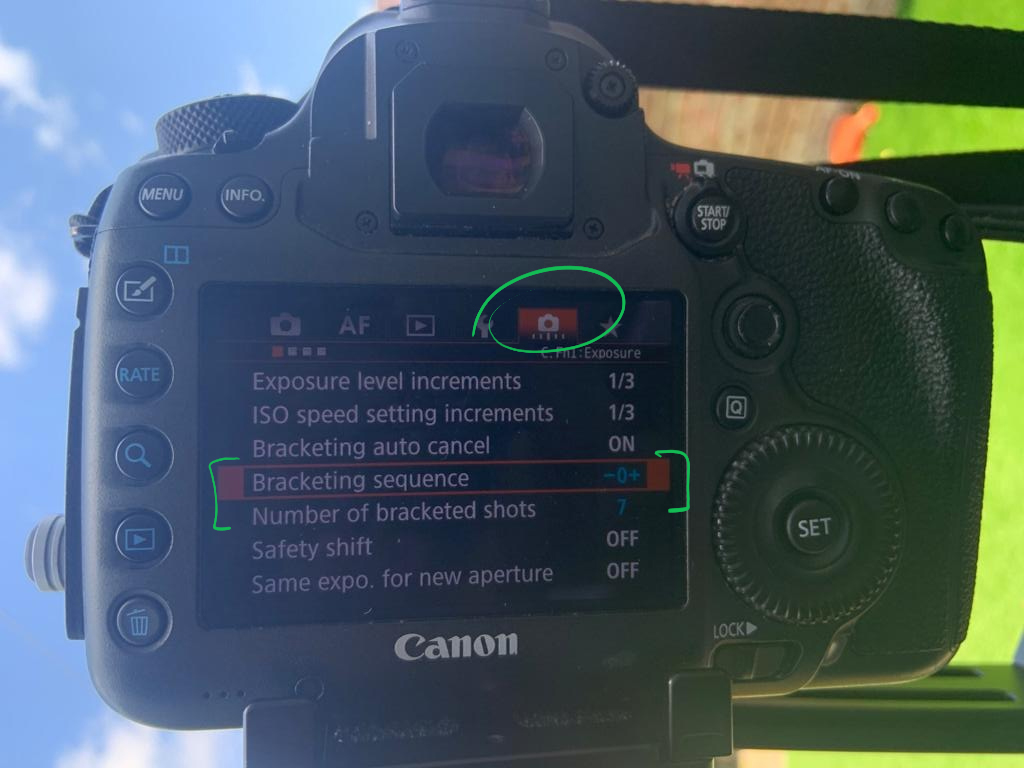
Taking all of the notes above, click on the MENU button and head to the Exposure menu and set the following:
- Exposure level increments: 1/3
- ISO speed setting increments: 1/3
- Bracketing auto cancel: 0N (never used/changed this)
- Bracketing sequence: – 0 +
- Number of bracketed shots: 7
- Safety shift: OFF (never used/changed this)
- Same expo. for new aperture: OFF (never used/changed this)
The important options above are that you are shooting 7 brackets, and that you are shooting the fastest exposures first, then the mid, and then the slowest (– 0 +).
Now we’ll need to set some additional settings which I tend to set using the Q (quick) button on the back of the camera. So hit the Q button and set the following:
- F-Stop: F8.0 (this is just a starting point and will need to be modified depending on the lighting condition).
- ISO: 200 (this is just a starting point and will need to be modified depending on the lighting condition).
- Shutter speed mid exposure: 1/125th (this is usually a good starting point for your shutter speed for the mid exposure shot. When shooting with 7 brackets, this will mean your fastest exposure is 1/8000th and your slowest exposure is 0.5 seconds.)

- Exposure comp.AEB Setting: -6, -4, -2, 0, +2, +4, +6

- White balance: set accordingly (Daylight/Cloudy for exterior, Tungsten for interior, etc.) but avoid AWB
- Single shooting: Self-timer: 2sec/remote (this will allow you to shoot 7 brackets with one click).
- Make sure to shoot RAW: This is extremely important as this will allow us to grade the images in post, and the RAW data contains a lot more information than jpegs. I usually shoot both RAW and JPEG as this will allow me to easily review the images when onset.

As you can see above, I’ve set some default starting settings for F-Stop, ISO and Shutter speed. Please do note that for every lighting condition, you will need to double check your settings to ensure you are getting the best possible result when shooting a HDRI. Below is a table of some settings I have found to be useful for a few different lighting environments, and you’ll find below in step 004 a little trick that I use to set the settings under tight time restrictions.
| Lighting condition | ISO | F-Stop | Shutter speed (mid exposure) |
|---|---|---|---|
| Interior studio shoot | 200 | F8.0 | 1/125th |
| Sunny day | 100 | F22 | 1/250th |
| Cloudy day | 100 | F22 | 1/125th |
For an example of how the folks at Weta capture HDRIs, especially when you need to capture the sun, check out the following:
- The Definitive Weta Digital Guide to IBL – if you want to capture HDRIs the Weta way – check this out!
003. Position your camera
At this stage, you should have your camera ready to go. If you are onset, you’ll be in some dark corner waiting for the First AD or the VFX Supervisor to give you the go-ahead to jump in and shoot your HDRI. At this stage, you’ll have a few minutes to capture the HDRI.
The first thing to do is position your camera. You’ll want to position the camera where the CG will go, so as you are working onset, make sure to keep a close eye on things. Pay attention to the actors in mocap suits or any props in tracking markers. These are usually good indicators of what will need to be replaced in CG. Also make sure to speak with your VFX supervisor or onset supervisor to have clarity on where you need to shoot the HDRI from.
As you position your camera, make sure to never, ever move any of the set around. Do not move a chair, a table, a prop, etc. If you cannot position your camera quite where you want it, just get as close as you can. The set itself should only be altered by the Set Dressers as they will want to ensure continuity between shots and takes.
Once you’ve placed your camera, check the level to ensure you do not grab a wonky set of photos. Even if you have levelled the camera offset, you may find the new position that you are in has a sliglty different elevation.
In the below image, I’ve got the grey/chrome balls as a standin to where the camera will go.
004. Final setting tweaks
Now that you are in place, you should do a quick check of your settings. On some occasions, you may be able to fire off several shots to test your settings, but usually, you’ll need to be in and out and will not have the luxury to do this.
The way I like to quickly set my settings is by doing the following.
- With the camera in position, remove the lens cap and press the shutter release button gently (not all the way) to do quick meter reading.
- Find the middle exposure on the Exposure comp.AEB setting and set it to 0.
- Next, play with the Shutter speed to reduce the exposure by 4 stops, but remember, do not go below 1/250th.
- That’s it.
This workflow on most occasions has usually done the trick for me. Sometimes you’ll have to tweak the F-Stop and the ISO but, on most occasions,, I’ve been able to leave the ISO at between 200 and 400, and the F-Stop between F8 and F11. In the short video below, as I was in full sunlight, I had the ISO set to 100 and the F-Stop at F22 as I wanted the camera to shoot as quickly as it can.
005. Shoot the slate and reference
Once you are in position and ready to go, make sure to create a new folder on the camera memory card. For each take, I recommend creating a new folder, so it is easy to manage your data back in the office.
Now position your slate. Before shooting, make sure to quickly check the focus. Your slate should contain the following info (not illustrated in the image below as these were non-project HDRIs):
- Project code name
- Shot ID (this is so we can match the HDRI to the shot later on in post)
- Date
- Time
- HDRI
- Position (if taking multiple HDRIs)
- Diagram (a quick sketch of the set and where you shot the HDRI from – this is not essential but nice to have)
With your slate captured, next shoot your reference (grey ball, chrome ball and Macbeth chart). Ideally, your reference would be shot from the same position as to where the camera/CG is as this will give you more accurate reference, however, this may not be possible, so just get it as close as possible. Try to get a good mix of light and shadow on the grey ball as this will give the lighting artist more info when tryng to match exposure.
When shooting the Macbeth chart, here is some very useful advice from Thomas Mansencal (which I’ll be implementing on future shoots):
I would suggest is to lay the ColorChecker flat where you are shooting the HDRI. A few reasons for that:
The Illumination captured by your HDRI is only right at the very single point where the lens entrance pupil was, anywhere else and you start to introduce error, thus the ColorChecker needs to be very close.
The ColorChecker to be useful in this context should be sampling as much of the same Illumination than the HDRI, given that we are mostly interested by the upper hemisphere, it makes sense to put it flat pointing to the sky so that there is no preferred angle in the upper hemisphere that would bias the measured values.
I do shoot a specific brackets series top-down to minimise reflections on the ColorChecker
Slate

Macbeth chart
Chrome ball

Grey ball

For the Macbeth chart, I tend to shoot this facing perpendicular to the camera and then another take (if I have the time) facing up. This will give me additional information on how the colour responds to the light.

For the slate, you only really need the one well exposed image and for the grey and chrome ball, and Macbeth chart, you need the full 7 exposures. I actually shoot 7 exposures of the slate as once the camera is set up and ready to go, I don’t like to change the settings.
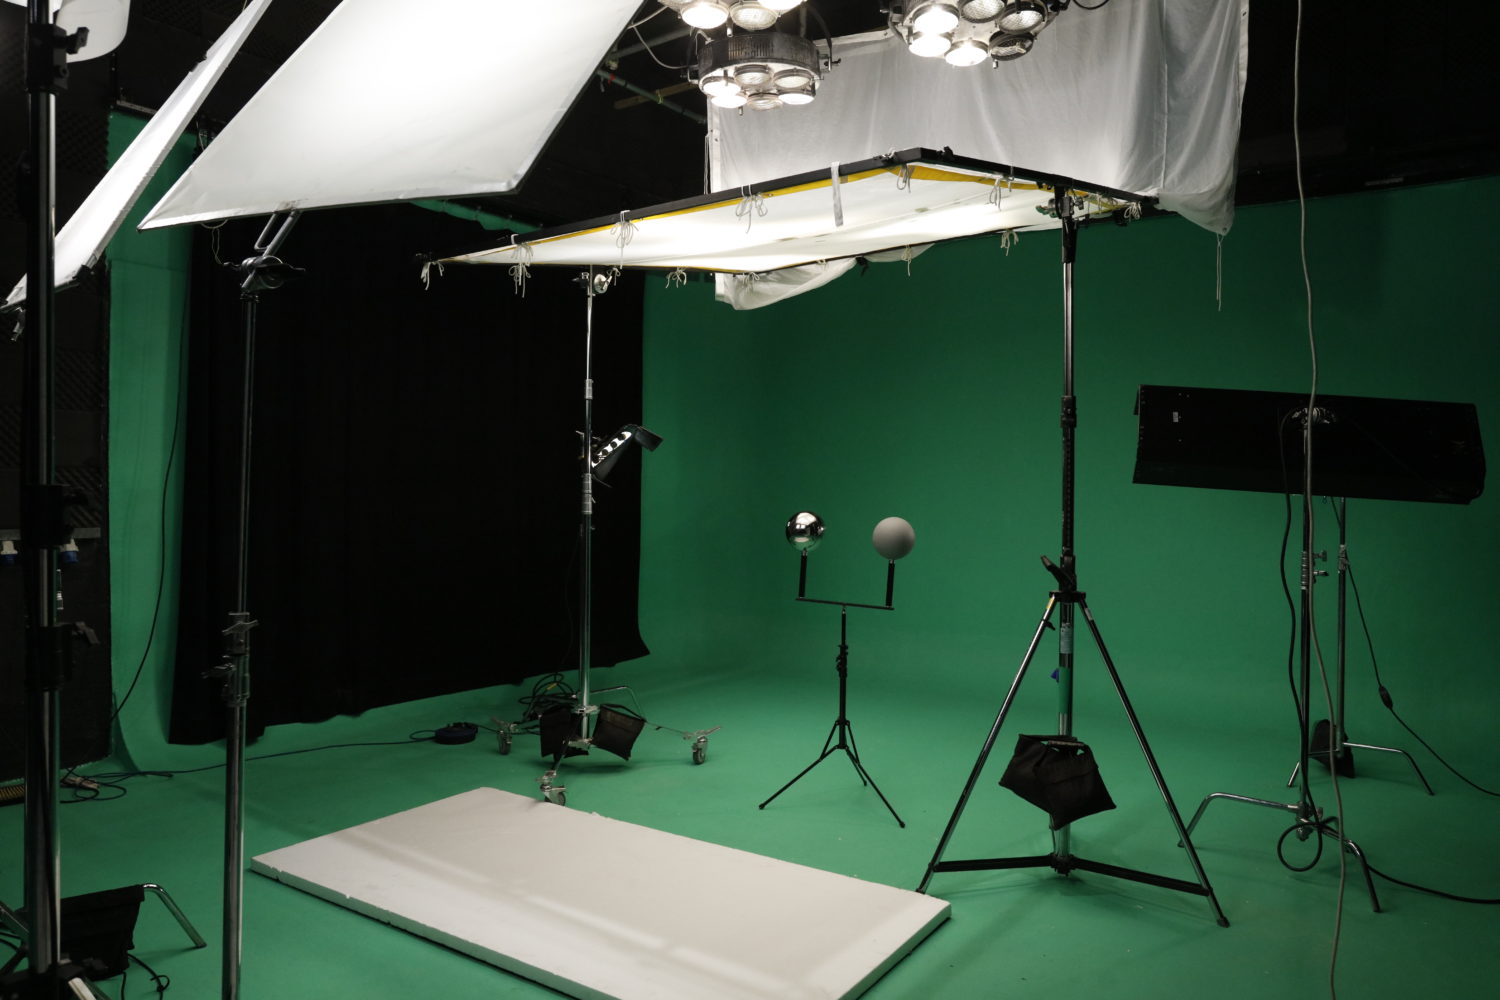
As you can see from the image below, we have created a custom balls and Macbeth stand so we can capture all the reference with as few shots as possible. If you are interested in the kit or a variation of the kit, give us a shout.
006. Shoot the HDRI
With your slate and reference captured, move them to one side and prepare to shoot your 360 HDRI. For the main HDRI, I tend to keep the reference balls and the Macbeth chart visible in the HDRI as it again gives me another reference point to what the lighting is doing. Just make sure it is not blocking any of the light sources. The same goes for the crew, before shooting the HDRI, you will need to ensure no-one is occluding the lights.
Once all looks good, make sure to tilt the camera back 15 degrees, check your focus and then set the lens to Manual focus.
Then line the camera up on the first 90-degree notch on the ninja nodal and click on the shutter release to take the first 7 exposures. Then rotate the camera 90-degrees and click again for position 2, then again for position 3, and then 4.
Postion 1
Postion 2

Postion 3

Postion 4

With an 8mm fisheye, you could shoot just 3 positions (every 120-degrees), or every 2 positions (180-degrees), however, I like to shoot 4 positions as it will mean that they’ll be less clean up in post and you’ll get a series of images that will stitch together very easily.
If you have time, rotate the camera on armB by 90-degrees and shoot straight up (zenith) and then -90-degrees to shoot straight down (nadir). Usually, I only have time to grab 4 x 90-degree positions with the 15-degree tilt, but again, if you can, the more data, the better.
Zenith

Nadir

Additional reference

And that’s it. You should now have enough data to process to create a HDRI for CG lighting.
Quick Summary
- Attach the ninja nodal to the tripod.
- Attach your camera to the ninja nodal.
- Check the position of the camera on the ninja nodal.
- Check your camera settings.
- Position your camera where the CG will go.
- Double check your settings
- Create a new folder.
- Focus on the slate and shoot the slate.
- Focus on the grey/chrome balls and the Macbeth chart and shoot.
- Tilt the camera 15-degrees up
- Check your focus
- Shoot 4 positions (every 90-degrees)
- Shoot nadir and zenith positions if you have time.
Links
- Processing a HDRI for Lighting in ACES – This series of docs covers the process of create a HDR panorama for lighting in ACES.
- The Definitive Weta Digital Guide to IBL – if you want to capture HDRIs the Weta way – check this out!
- How to Create High Quality HDR Environments – a great walk through and tutorial by the folks at HDRI Haven.
- Jorgen HDRI – Shooting more than 7 brackets with ND filters
Onset Training
For more information on all things onset related, you can check out our courses here:
- Onset Data Acquisition 1001
- Introduction to Cameras and Lenses 1001
- Shooting HDRIs and Panoramas 1001
- Shooting Texture and Look Development Reference 1001
Support CAVE Academy
Here at CAVE Academy the beauty of giving and sharing is very close to our hearts. With that spirit, we gladly provide Masterclasses, Dailies, the Wiki, and many high-quality assets free of charge. To enable the team to create and release more free content, you can support us here: Support CAVE Academy
I like the idea about having the macbeth both parallel and perpendicular to the cam. Maybe simply having two macbeths in that image could save time!
Hey Ross,
That is a great idea. I actually carry two Macbeth charts in my bag! 🤦
We are currently creating a set of kits to easily shoot the reference in one hit (slate, balls, Macbeth), so we’ll also look into added a little arm to hold both Macbeth charts.
Thanks for the idea.
J
I’ve largely replaced the traditional dSLR HDRI acquisition with bracketed raw images on the Ricoh Theta Z1. Unless I need ultra high resolution reflection sampling the Z1 is incredible. Fast, completely customisable, and a tiny footprint in the shoot kit bag.
Not recommending this, but as an example of how customisable it is… if you wanted to for some reason, you could shoot a series of 14 exposures with the darkest images being one stop apart, the mid-range exposures being 1/3 stops apart, the upper exposures being 1/2 stops apart, even mixing ISO/WB/Shutter & Aperture settings, per shot.
You do need an iPad or something to run the app and fire it off remotely, but results have been fantastic and it’s just so convenient on set.
Hey Steve,
I’ve got a Theta but I’ve found I’m quicker with the Canon. But as you say, the footprint of the Theta is fantastic. What I’ve found I’ve been doing is using the Canon for the main HDRI and then using the Theta to grab additional 360 reference. Thanks for sharing the settings, I’ll definitely test them out. It would be good to have a write up on using a DSLR and the Theta. I actually run through the Theta on the onset course we deliver but I’d have to double check the settings I use.
Hi! I’m curious about the image quality of those 360 cameras like 360 one RS/ Theta Z1 compare to DSLRs. They’re way faster and easier to use. As for HDRI, mainly for lighting purposes, are they sufficient? Like the color compare to DSLRs, and how much the difference between them?
Hi Des,
I think there is a place for both a full frame camera and a 360 camera. With the full frame camera, you will get a higher quality result, however, you then have issues with form and where you can place the camera. With a 360 camera, you can sneak it into smaller spaces. We recently did a shoot and the 360 camera was preferred as it was a miniature shoot. I find I’m personally faster shooting with a Canon 5ds (I can be in and out within a couple of minutes) and I don’t like relying on Bluetooth (as sometimes it does not connect). So I would say pick and choose the right tool for the right job. Also, I just think of it all as visual reference. I never use a HDRI as is in render. I chop it up, extract lights, grade individual elements, project the map onto the environment, etc. The 360 HDRI just acts as a good reference of what was where during the shot. Hope that helps. J
Thank you!
Hey Jahirul!
I’m loving the Cave Academy, learning so much!
Please, I’m interested in the custom balls and Macbeth stand kit the you mentioned above. How can I do to buy it? I did not find in the Cave’s store page here.
Thank you again!
Eliel G.
Hey Eliel,
Apologies for the slow response. We used to create and provide reference balls. However, the cost of the balls to the creation of them did not go hand-in-hand. On top of that, shipping costs were getting pretty wild at the time and I was not comfortable getting parts shipped to the UK and then shipping them back out again once we created the kit. Maybe in the future, we’ll look again and look at sourcing all the parts locally to make it more environmentally friendly. If you did want the fanciest of balls, you can check out this page: https://www.vfx-store.com/
There are a few other sites/companies nowadays too that offer kits, but the above company makes the best balls that I have seen.
Thanks
J
Thanks for sharing all this, truly outstanding!
I am wondering about remoing fringing/CA from the Sigma 8mm – or is it OK for shot not needed for texturing/high detail, like for automotive rendering?
Thanks again!
Thanks Larsen,
At some stage, I do need to edit this page with some new/more information. But the basic foundations are still the same. You will get some minor fringing and CA for sure with the 8mm lens. If I had more time, I would not use it and would go for something like the 24mm lens. Primarily, I use the 8mm for speed purposes. However, for creating a HDRI and using it for lighting (and usually I would clean it up, split out the light sources, etc.), it does the trick. For me, the HDRI becomes more of a reference to the onset lighting, and then I rebuild as much of the setup/set as possible in CG. This allows for more believable results. And yes, for texturing, panoramas, look dev reference, I would use a different lens (24mm, 50mm, 100mm, etc.)
Thanks
J
I have created more than 1000 hdris in my life, and found some best solutions to make it easily. Anyway I like that you presented so much details about setting up panoramic head.
Thanks Grzegorz.