
Search the wiki
02. Prepping your HDRI Data

Organising your HDRI data
At this stage, you should have a dataset for your HDRI which will consist of a 7+ bracketed set of exposures from 3 or 4 different positions (shot every 120 degrees or 90 degrees). You should have also shot a Macbeth chart using the same settings, and ideally a grey/chrome ball that can be used for reference. When shooting the Macbeth chart, here is some very useful advice from Thomas Mansencal (which I’ll be implementing on future shoots):
I would suggest is to lay the ColorChecker flat where you are shooting the HDRI. A few reasons for that:
The Illumination captured by your HDRI is only right at the very single point where the lens entrance pupil was, anywhere else and you start to introduce error, thus the ColorChecker needs to be very close.
The ColorChecker to be useful in this context should be sampling as much of the same Illumination than the HDRI, given that we are mostly interested by the upper hemisphere, it makes sense to put it flat pointing to the sky so that there is no preferred angle in the upper hemisphere that would bias the measured values.
I do shoot a specific brackets series top-down to minimise reflections on the ColorChecker
Once you have all your data, copy them into a folder so you can start editing them. For example:
- /hdri_int_workshop_pos1001
I am using this naming convention to state that the dataset is a high dynamic range image (hdri), it was shot in an interior (_int), the environment was a workshop and it was in the first position (_pos1001)
Next, take all the pics that will be used for the HDRI 360 panorama and drop them all into the following path: /hdri/cr2. For example:
- …/hdri_int_workshop_pos1001/hdri/cr2
Then that all the reference images (the Macbeth chart, grey and chrome ball) and from them all into the following path: /reference/cr2. For example:
- …/hdri_int_workshop_pos1001/reference/cr2
And lastly, if you have images of the slate, copy them into the following path: /slate/cr2. For example:
- …/hdri_int_workshop_pos1001/slate/cr2

Converting the images from RAW (CR2) to EXR
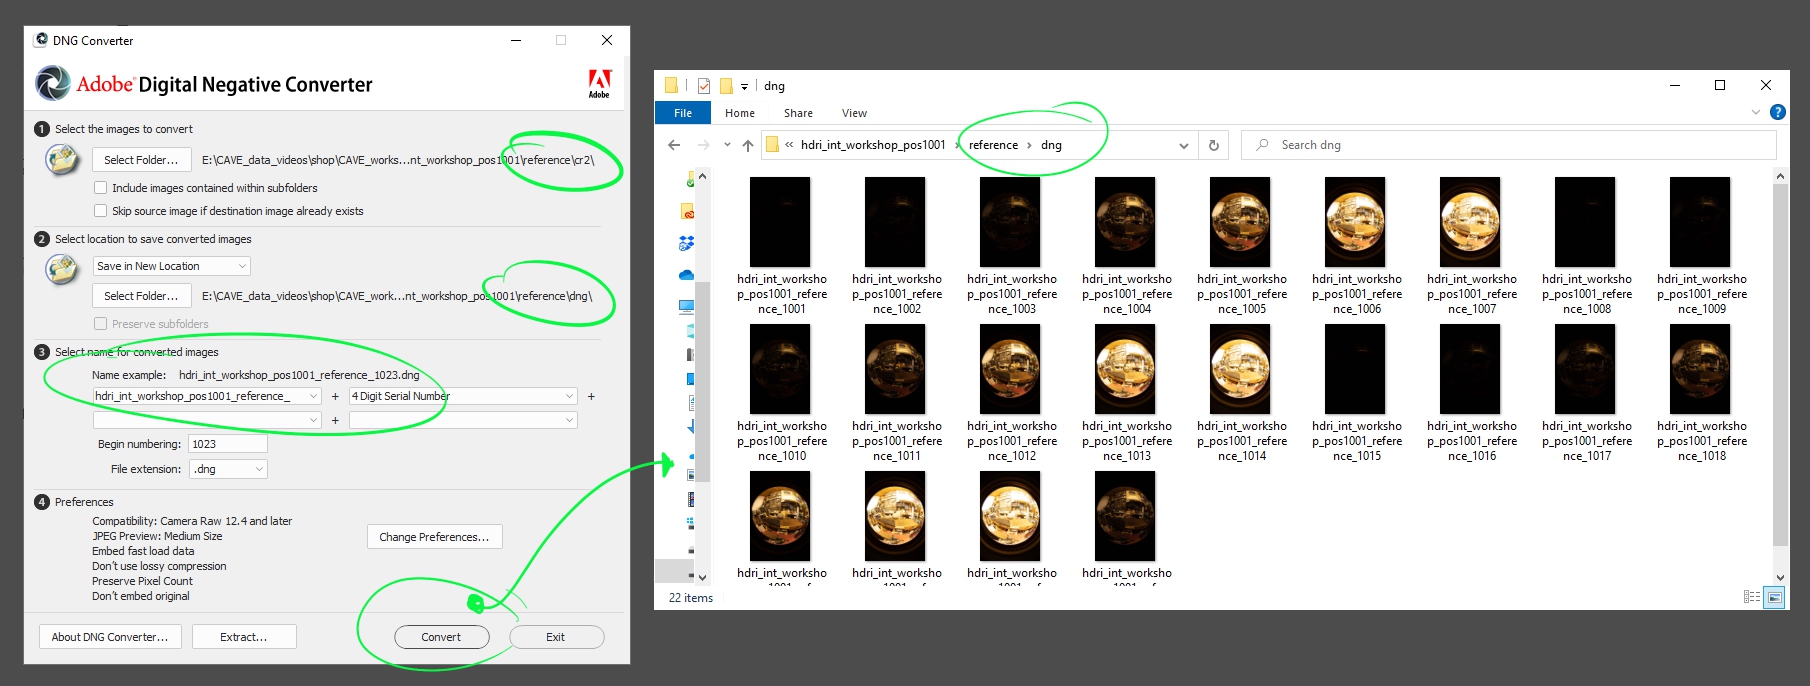
Once I have my data organised, I’ll go through the process of converting the hdri data .To convert your camera images from RAW (in my case CR2) to EXR, you can use Adobe Digital Negative (DNG). To do this, load the tool and then select the /hdri/cr2 folder the the 1st part of the tool.
Then set the save location to ‘Save in New Location‘ and create a dng folder within your hdri folder. So, something like: …/hdri_int_workshop_pos1001/hdri/dng
I like to then set a naming convention for my images, so I use something like the following:
- <filename> + 4 Digit Serial Number
- Begin numbering: 1001
- File extension: .dng.
- Example: hdri_int_workshop_pos1001_1001.dng
Once you are happy with your settings, hit Convert
 You should then have something like the following:

Repeat the step for your reference data set. The only difference I did for the reference is to add ‘_reference‘ into the filename.
At this stage, you should have a version of all your images in the .dng format.
Converting the images from DNG to 16bit ACES EXR
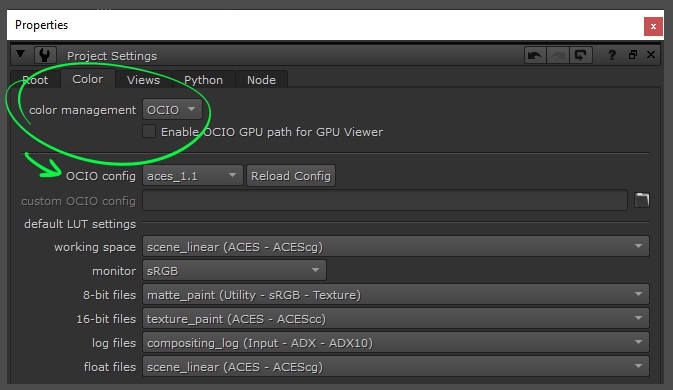
To go from .dng to 16bit ACES .exr files, we’ll be using Nuke as it can read the .dng file format.
Launch Nuke and before you load any images, make sure to set your colour space to ACES by hitting S on your keyboard to bring up the Project Settings.
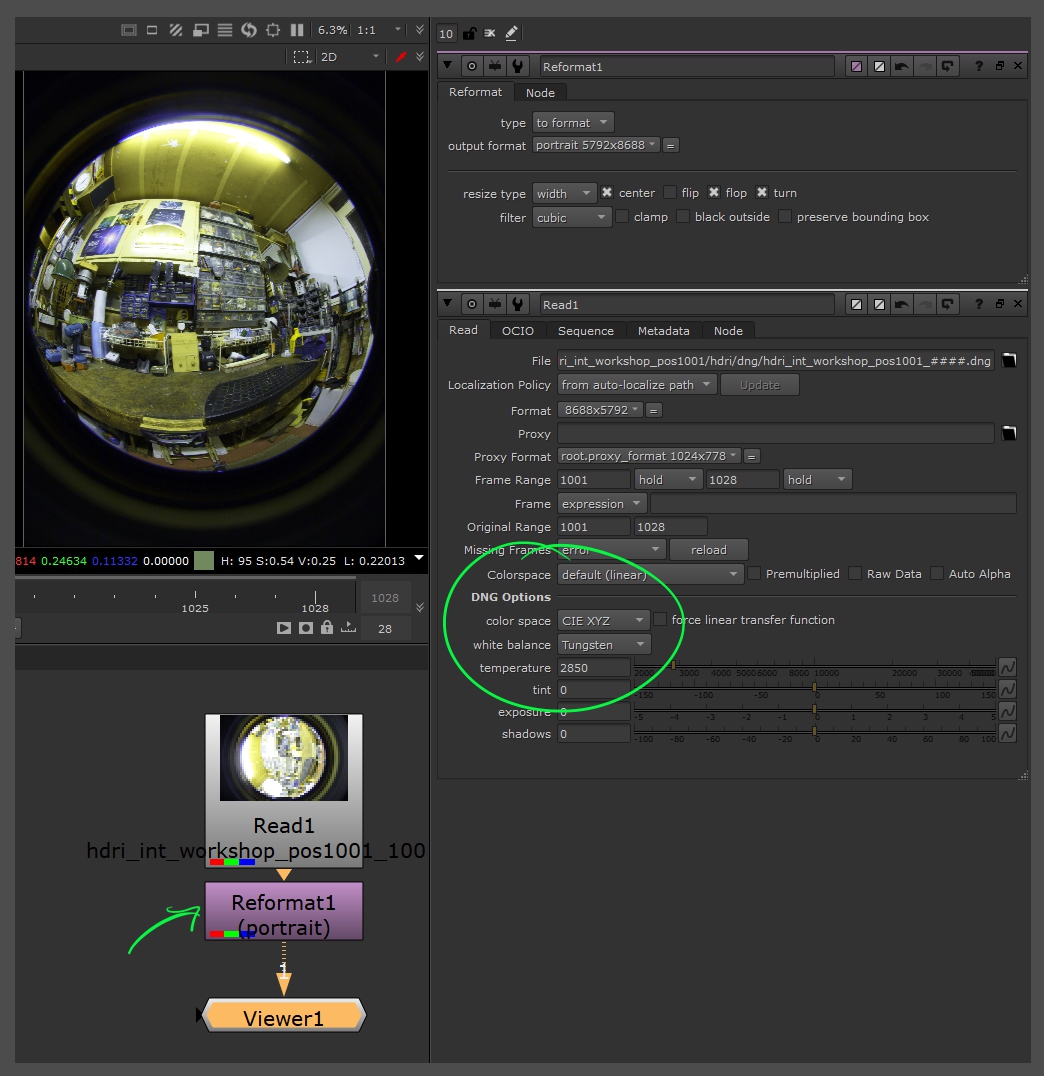
Next, read in your dng image sequence for the HDRI, and set the following:
- Colorspace: default (scene_linear)
DNG Options
- color space: CIE XYZ
- white balance (to match your shoot camera setting). For this dataset, I have set this to Tungsten
I also dropped down a Reformat node to flip the HDRI as it came in on its side.
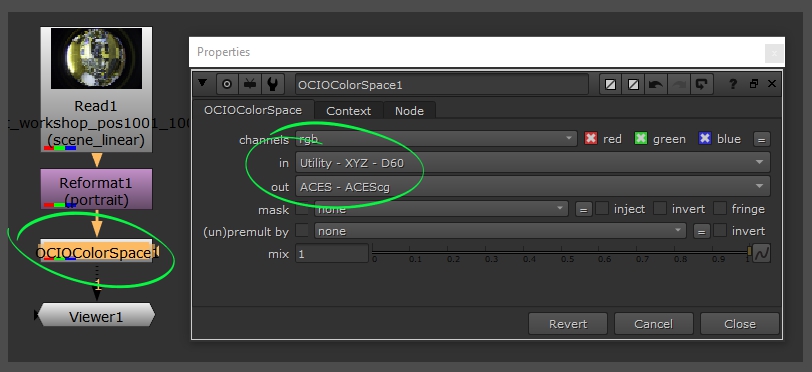
Next drop down an OCIOColorSpace node and set the following:
- in: Utility – XYZ – D60
- out: ACES – ACEScg
Lastly, you can write out your exr sequence. To keep things organised, I’ve created a new folder here for the exr images:
- …/hdri_int_workshop_pos1001/hdri/exr
Drop down a Write node and use the following settings (although I need to look at the metadata write-out as I am having some issues):
- file type: exr
- datatype: 16 bit half
- metadata: all metadata
- …and make sure to enable ‘do not attach prefix‘


Lastly, make sure to repeat the process for your reference data.

Moving On
Support CAVE Academy
Here at CAVE Academy the beauty of giving and sharing is very close to our hearts. With that spirit, we gladly provide Masterclasses, Dailies, the Wiki, and many high-quality assets free of charge. To enable the team to create and release more free content, you can support us here: Support CAVE Academy