
Search the wiki
Prepping Onset Texture and Look Development Stills Photography

Test Data
If you are looking for some test data, you can pick up a series of photographed Macbeth charts here:
Overview
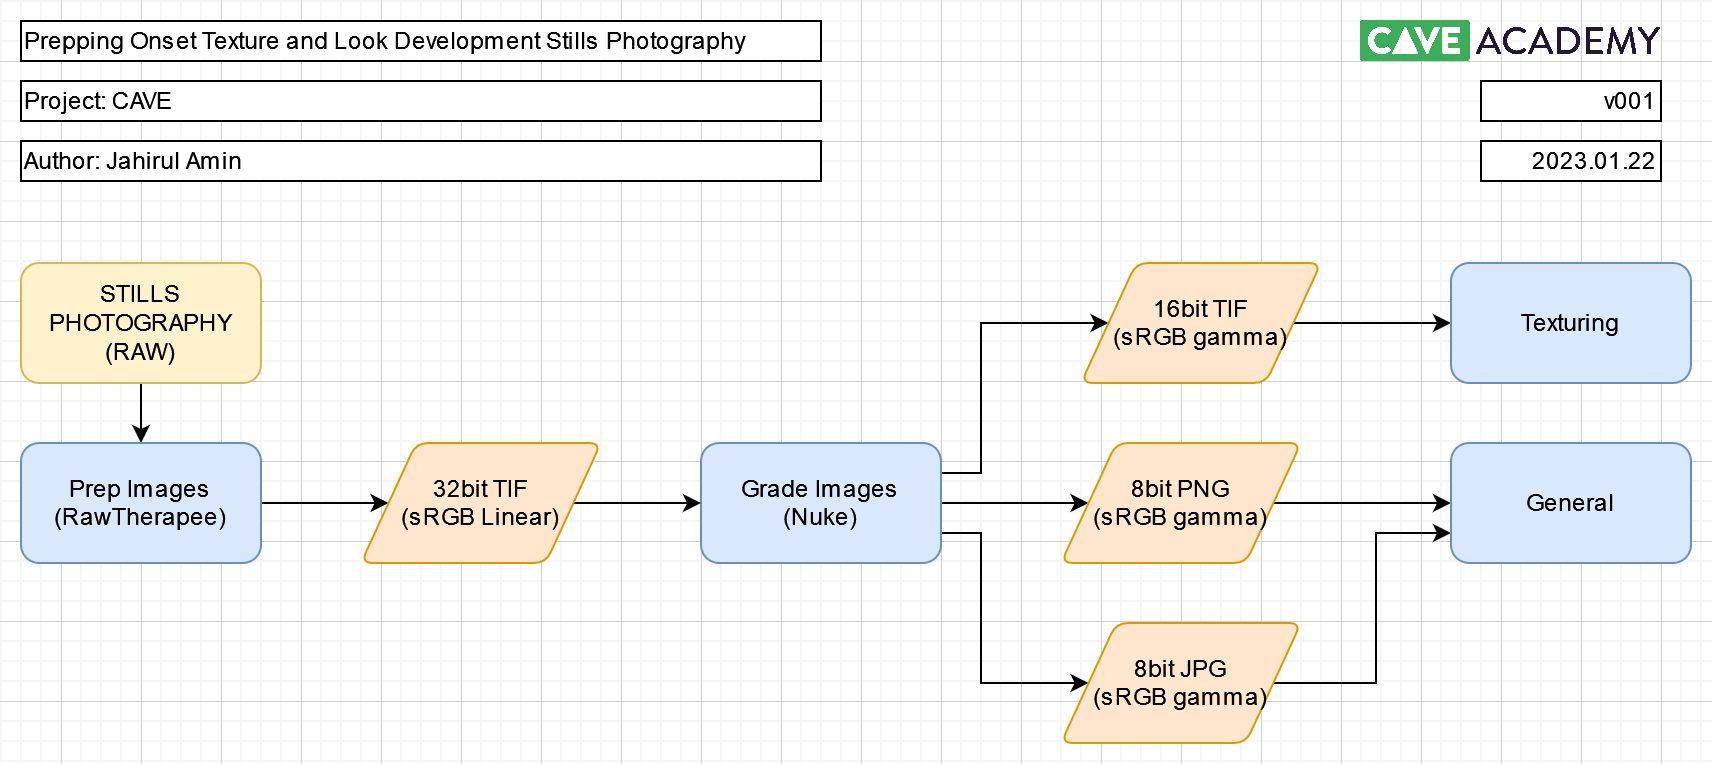
At CAVE, we are rendering in ACEScg, however, we are using an sRGB colour workflow for texturing (primarily for the base colour/diffuse map). This is to allow us is to easily work between Substance 3D Painter, Mari, Photoshop and Nuke. This also keeps things simple if we are to use online images (of which we will assume will be in sRGB).
However, at this stage (especially for onset data), we’ll be exporting linear sRGB images in 32bit TIF format. This is to ensure we lose no data when grading the images in Nuke. From Nuke, and after grading, we can then output the images as sRGB + gamma curve 16bit or 8bit, so they can be correctly viewed using general image browsing tools or used in your texturing tool.
It’s true that the 32bit TIF images output from RawTherapee (which is what we are using) will be HUGE, so if you are finding that is problematic, then you may want to consider other output options. The reason we are going with 32bit TIF is to ensure no data is clamped.
The workflow looks something like so:
When prepping onset texture reference, we are also assuming the data has been shot as both polarised and cross polarised, and for look development reference, the photography should be shot unpolarised.
For more information on unpolarised, polarised and cross polarised photography, please take a look at this doc:
If you have shot multi-bracketed shots for textures and look dev, then you can also use the workflow outlined below.
However, if you are prepping a HDRI (360s or lightmaps), then you should NOT use this workflow. For HDRIs, please follow the workflow here to prep your data (which sticks with ACES):
Prepping your Data in RawTherapee
In RawTherapee, navigate to the directory containing your RAW (in our case, CR2) images and load them into RawTherapee. For this example, we are using the following image:
- \cave_greyChromeMacbeth_reference_1001\cave_macbeth_test\unpolarised\raw\cave_macbeth_u_v001_r001.cr2
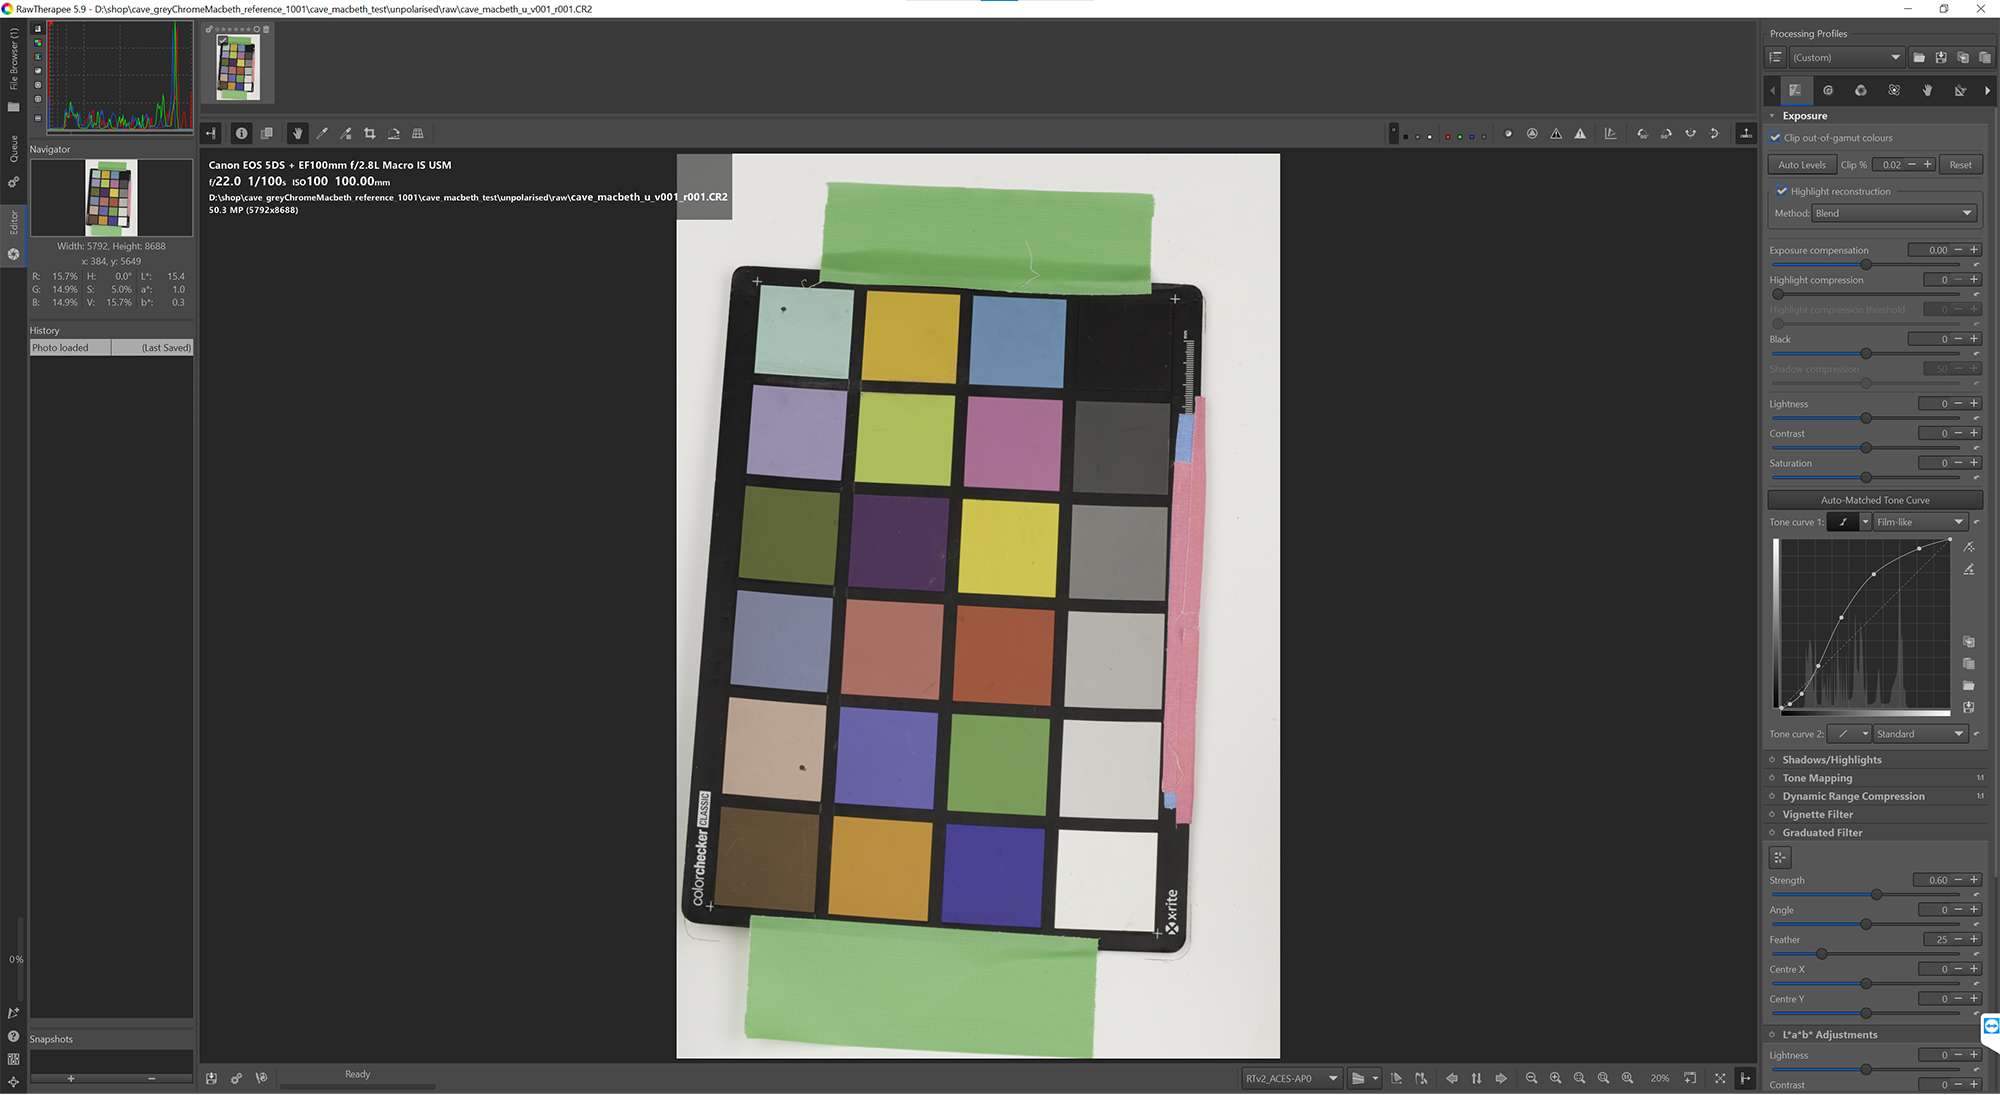
This image is of a Macbeth chart shot under unpolarised light (no filter on the lights or the lens).
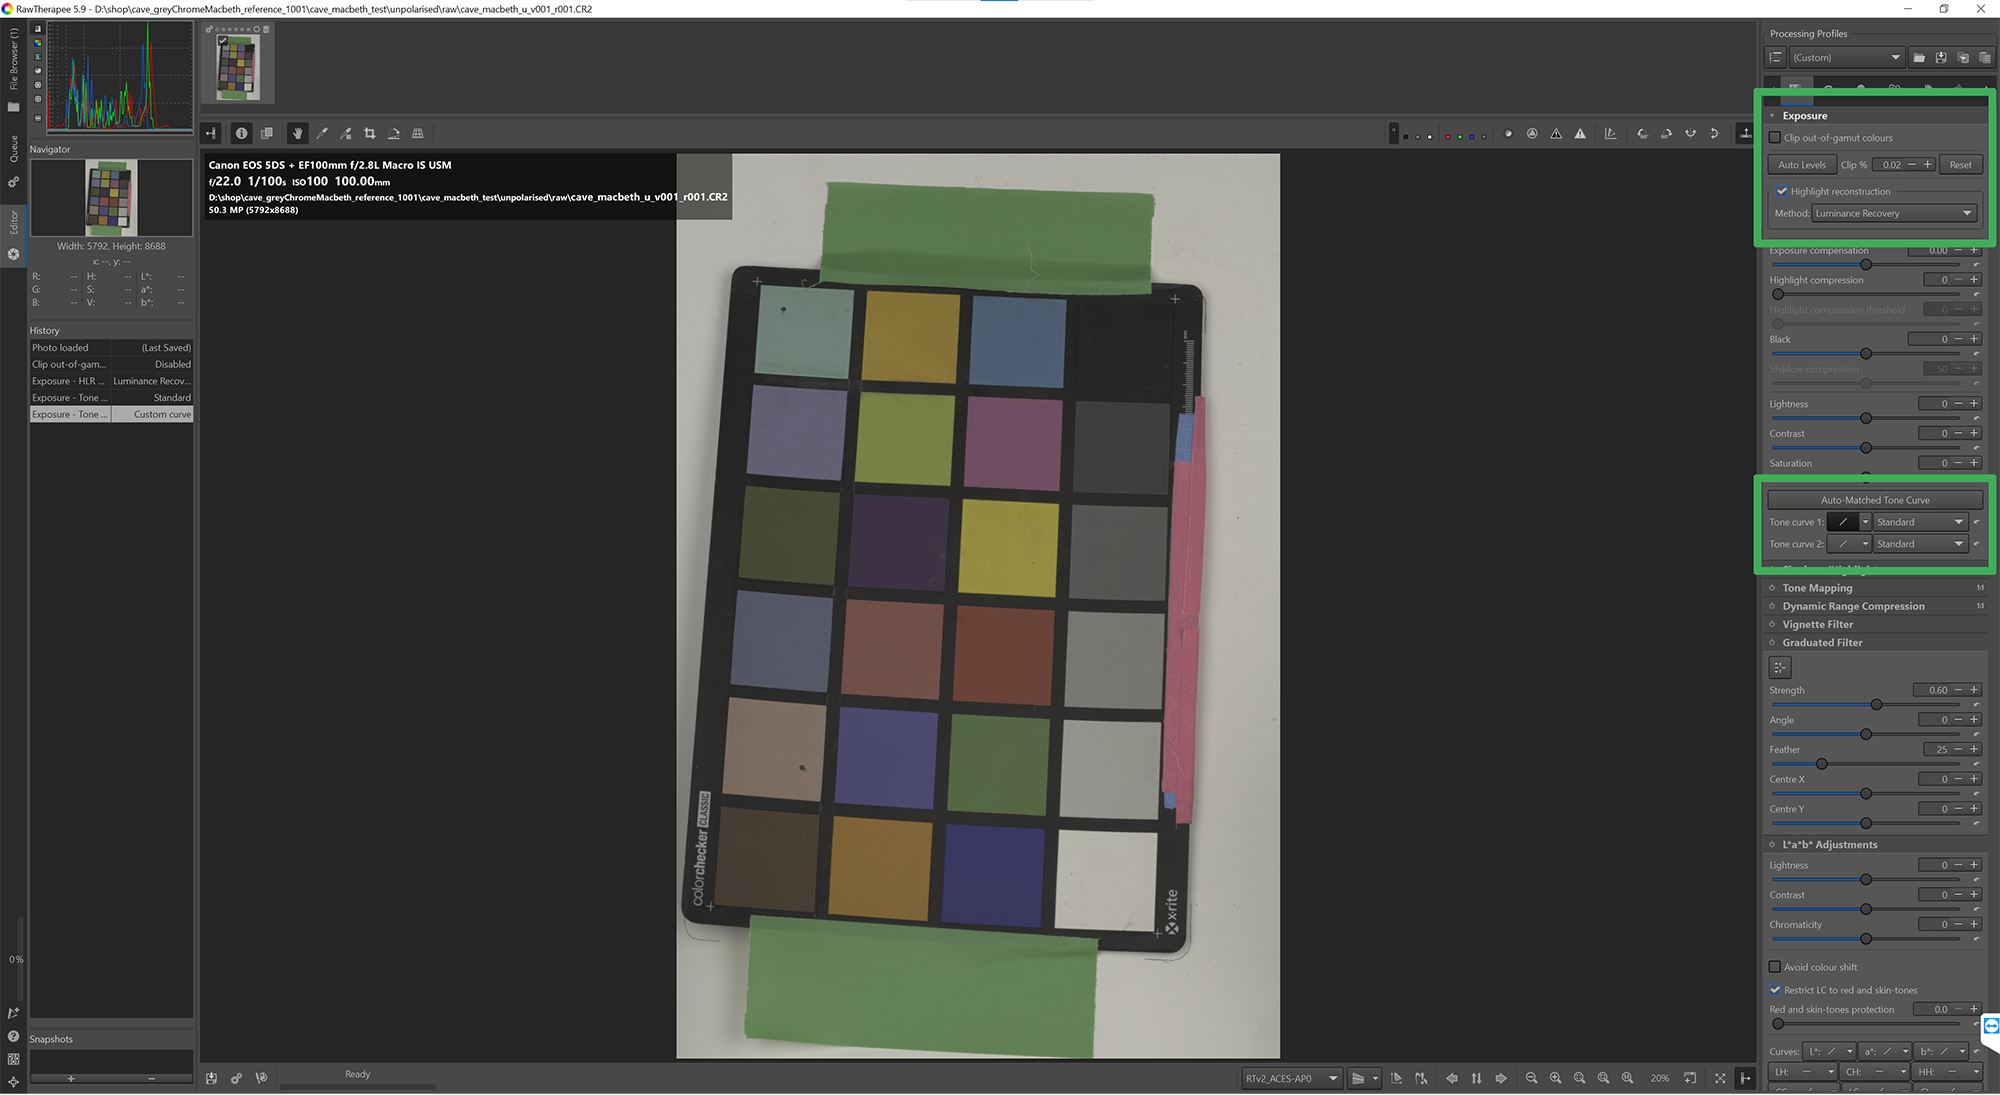
Exposure
Next, jump to the Exposure tab and set the following:
- clip-out-of-gamut colours: Disable
- Highlight reconstruction: Luminance Recovery
- Tone curve 1: Linear, Standard
- Tone curve 2: Linear, Standard
White Balance
This step is not necessary (as we’ll be doing a proper grade in Nuke) but we like to do it as a kind-of pre-grade.
On the Colour tab, go to White Balance and click on the ‘Pick’ button, and then click on a grey swatch (mid grey).
Colour Management
This is where we will define our Working Profile and Output Profile. For textures and look dev reference, as mentioned previously, we’ll be working in sRGB. So, set the Working Profile to sRGB.
Next, set the Abstract Profile to Custom and the Gamma value to 1 (Slope should automatically be at 1).
Lastly, set the Output Profile to: RTv4_sRGB
We find this gives us a good result, but we do need to experiment with some of the other Output Profiles to see if they are any better.

Demosaicing
Jump to the Raw tab now and set the Demosaicing Method to: RCD+VNG4
Similar to the Output Profile, we like the results with this setting but need to experiment with some of the other options.

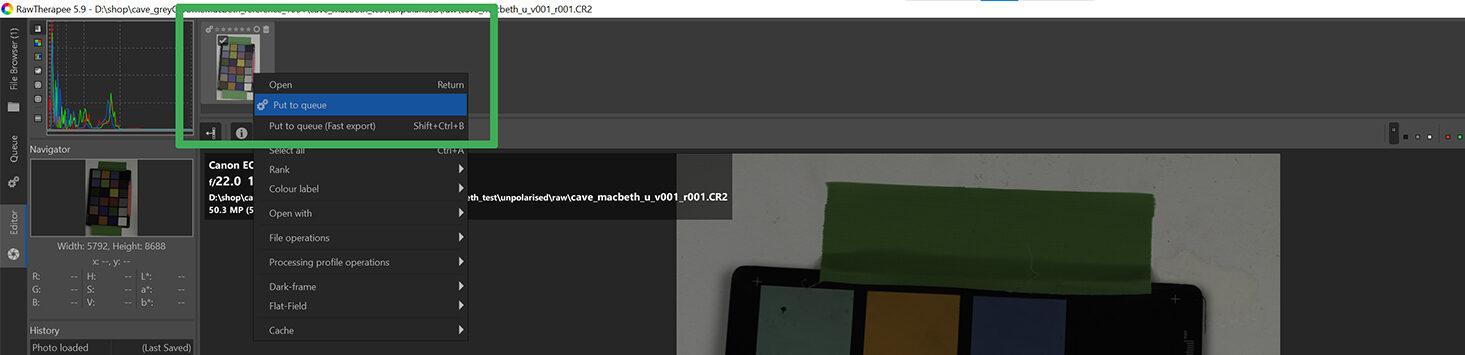
Export your Images
If all looks good, apply the settings to all your images, select them, hit the right-mouse-button and go ‘Put to queue‘:
Jump to the Queue tab and set the following:
- File format: TIFF (32-bit float)
- Uncompressed TIFF: Enabled
- Save processing parameters with image: Enabled
Once all looks good, kick off the processing of the images.

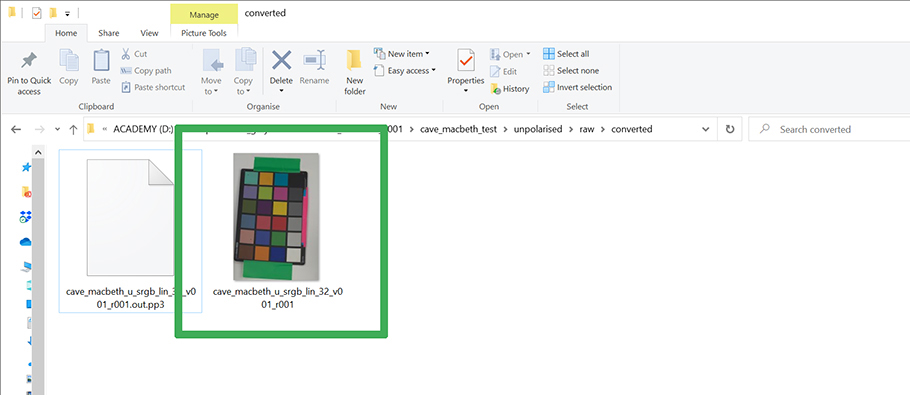
You should now see something like so (although I’ve renamed the file).
Assessing your Image in Nuke
Just a quick note that we’ll not be covering a full grading workflow in this doc. We’ll just be running through the basics in order that you can check your data, and so you get an idea of how to continue pushing your data through the pipeline.
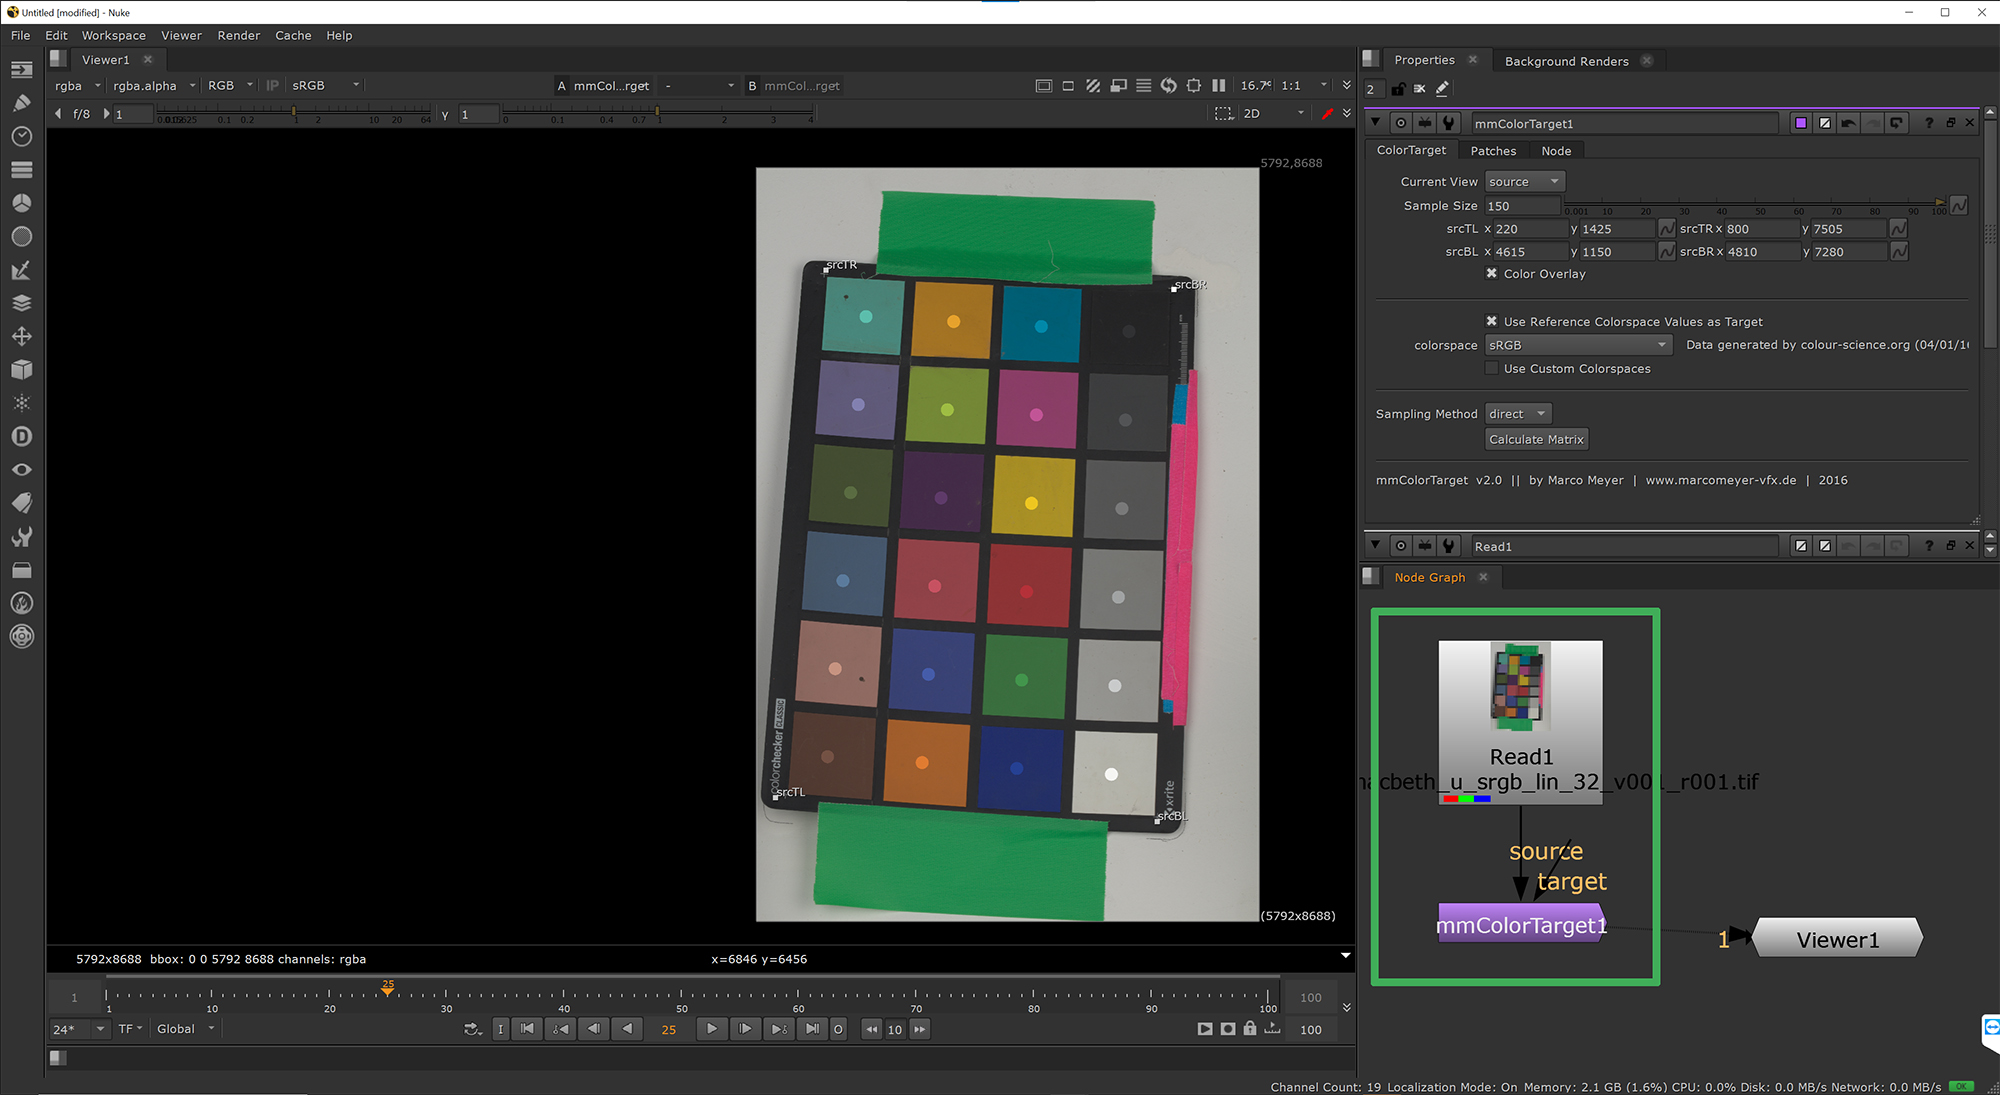
If you now launch Nuke, leave the colour settings as they are (in sRGB) and load your image, you should get something like so. Make sure to leave the ‘Read‘ Colorspace as default (linear):

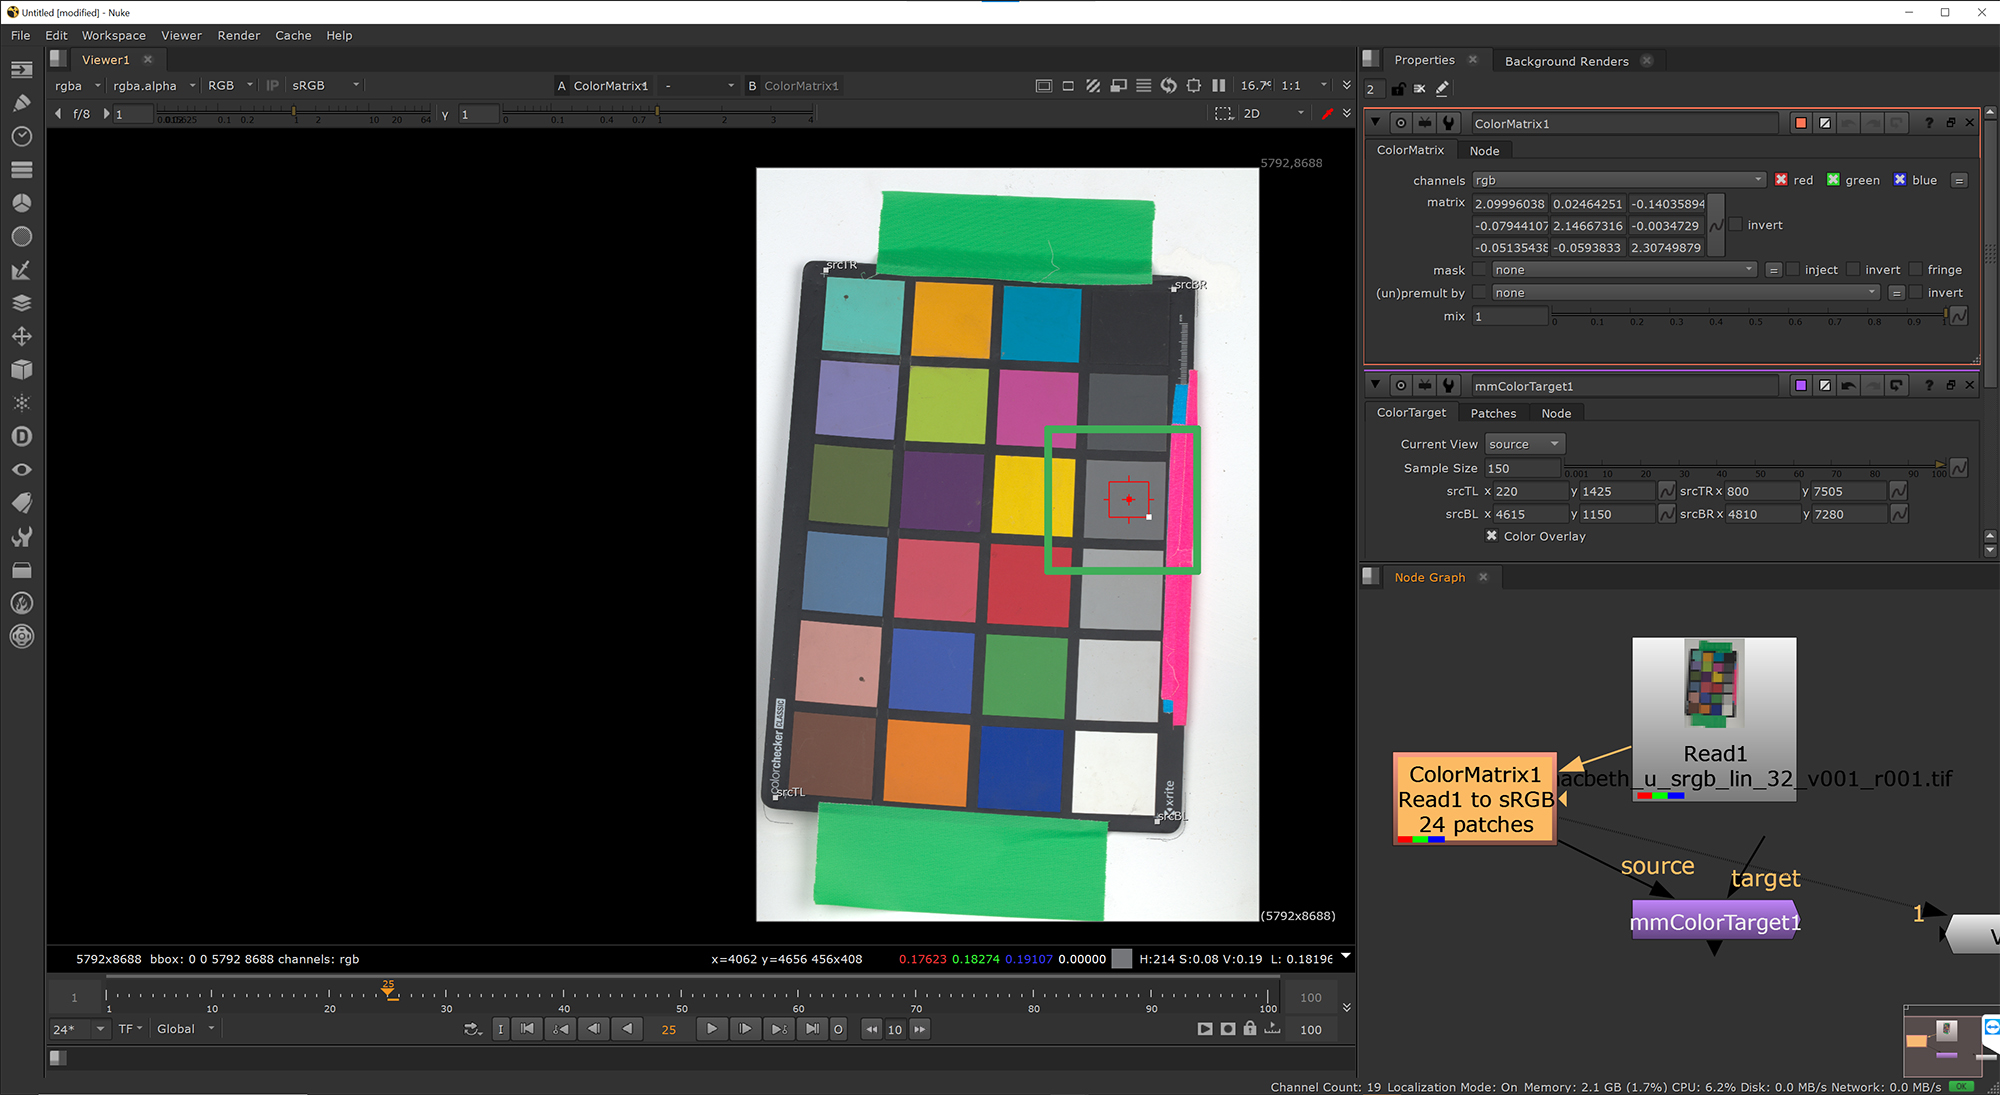
You can now grade your reference using your standard tools, or in our case, we are using the mmColorTarget tool. If you have shot multi-bracketed images, you’ll want to merge them together too.
At this stage, you can now write your images out in whatever format you need. For example, you may wish to export 16bit TIFF images for texture projection work, or 8bit PNG or JPG for general reference.
In our case, we’ll be exporting 16bit TIFF for texture projection work and with the colorspace set to default (sRGB) on the write node.
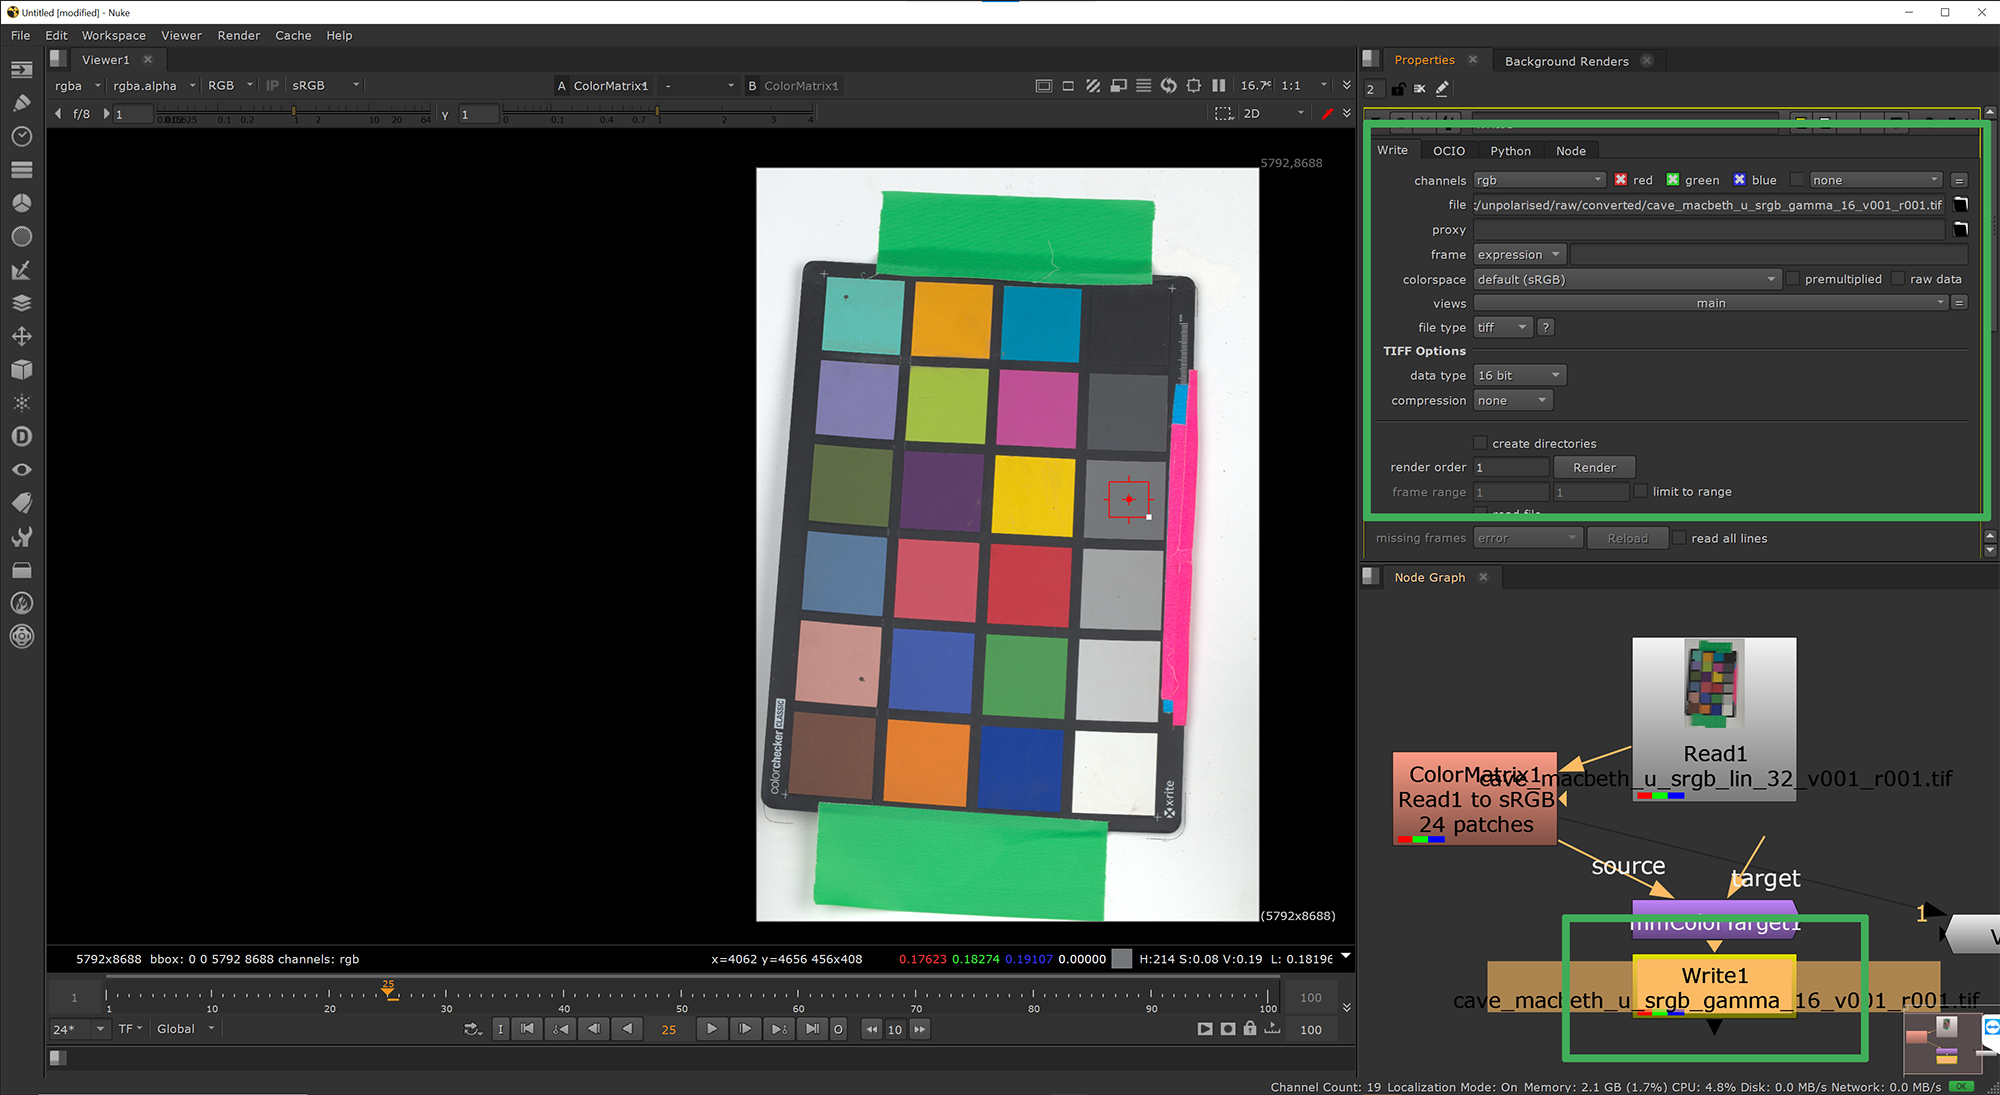
If you now load the image back into Nuke, with Colorspace set to default (sRGB) or load the image in any image browser, you should see if looks as expected.

That’s it. Your texture or look dev images should be good to go.
Links
- RawTherapee – RawTherapee is a free, cross-platform raw image processing program.
- Jedypod blog – Excellent info on working with RawTherapee for VFX.
Onset Data Acquisition and Creating Look Dev Environments Course
If you are looking for a more detailed step-by-step breakdown, you can check out our courses on capturing and working with light maps here:
- Shooting Texture and Look Development Reference 1001
- Creating Digital Studio Look Development Environments 1001
- Onset Data Acquisition 1001
- Shooting HDRIs and Panoramas 1001
Support CAVE Academy
Here at CAVE Academy the beauty of giving and sharing is very close to our hearts. With that spirit, we gladly provide Masterclasses, Dailies, the Wiki, and many high-quality assets free of charge. To enable the team to create and release more free content, you can support us here: Support CAVE Academy