
Search the wiki
03. Creating your HDR Panorama in PTGui
Note. I’m currently using PTGui for merging the EXRs and stitching the panorama together. This is primarily for speed and simplicity at the moment but moving forwards, the aim will be to implement a Nuke/CaraVR workflow as covered here:
Checking your Metadata
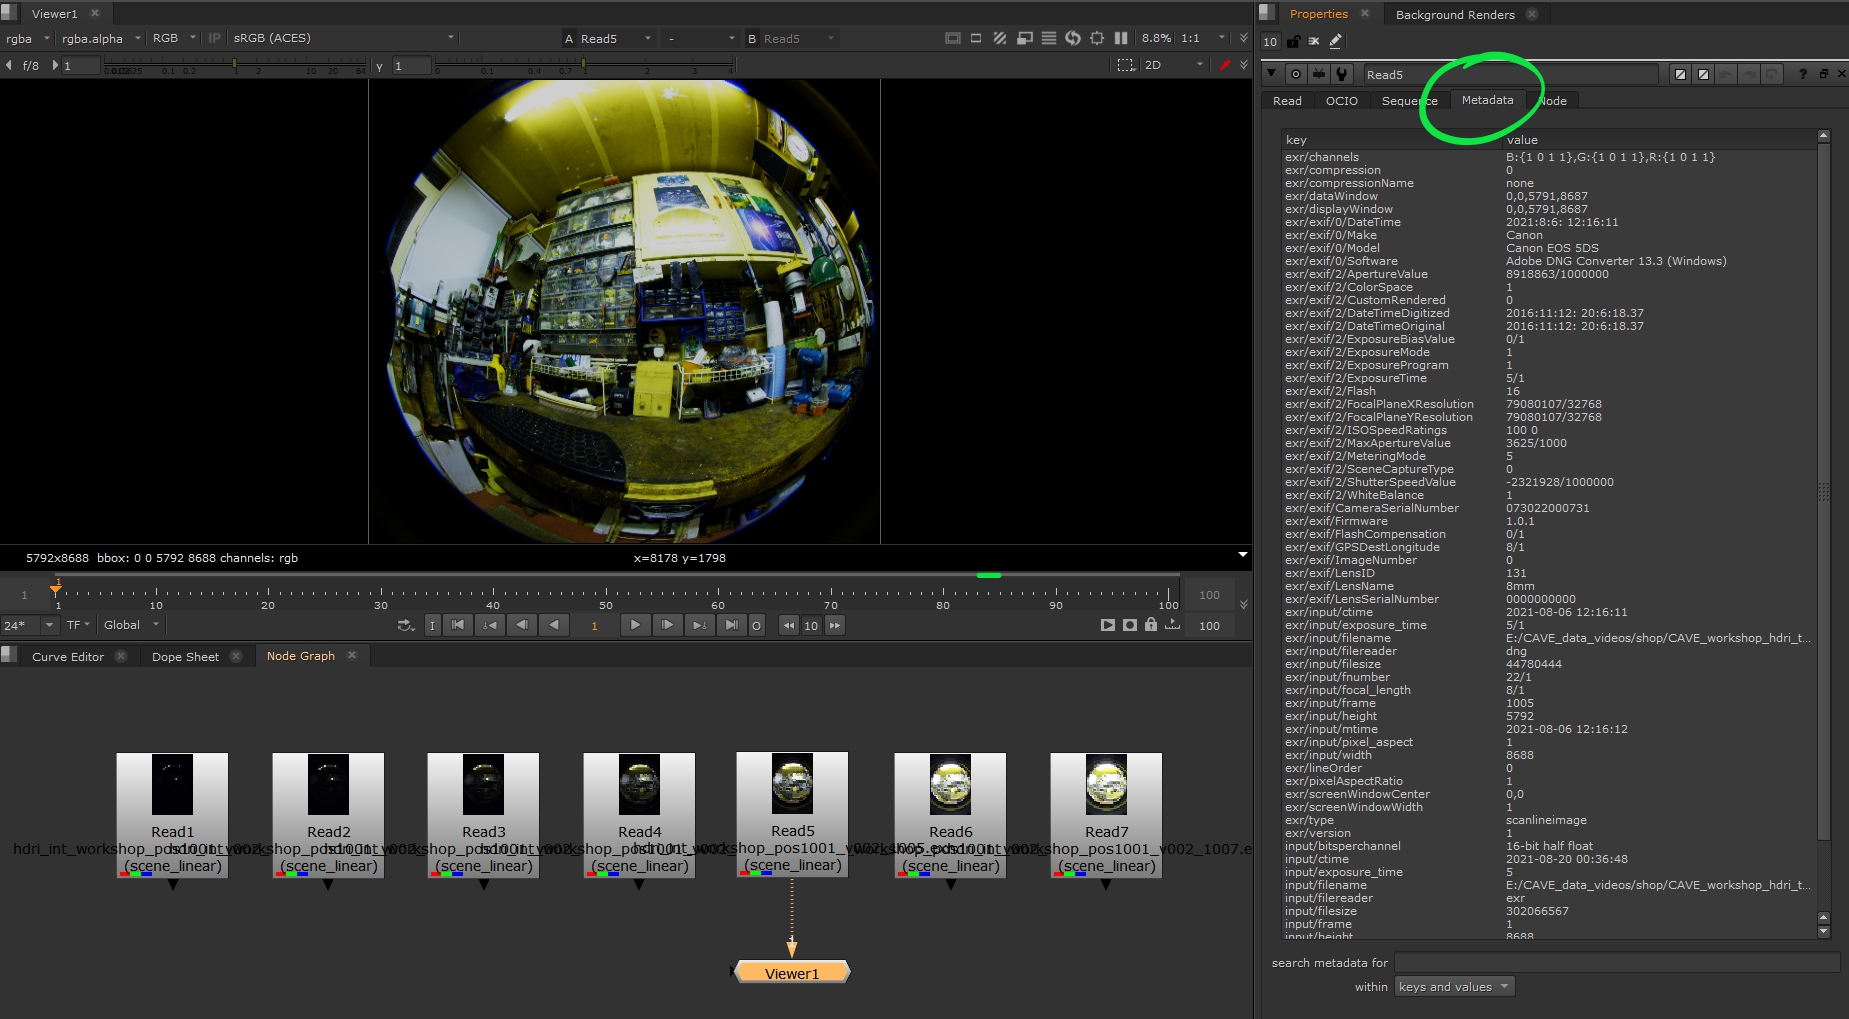
So going back to processing the HDRI. You should now have all your EXRs and in order for things to work easily in PTGui, you’ll need to ensure that the metadata for the exposure speed is available. You cna do this by importing one of your EXRs into Nuke and looking at the metadata.
Importing your Images into PTGui
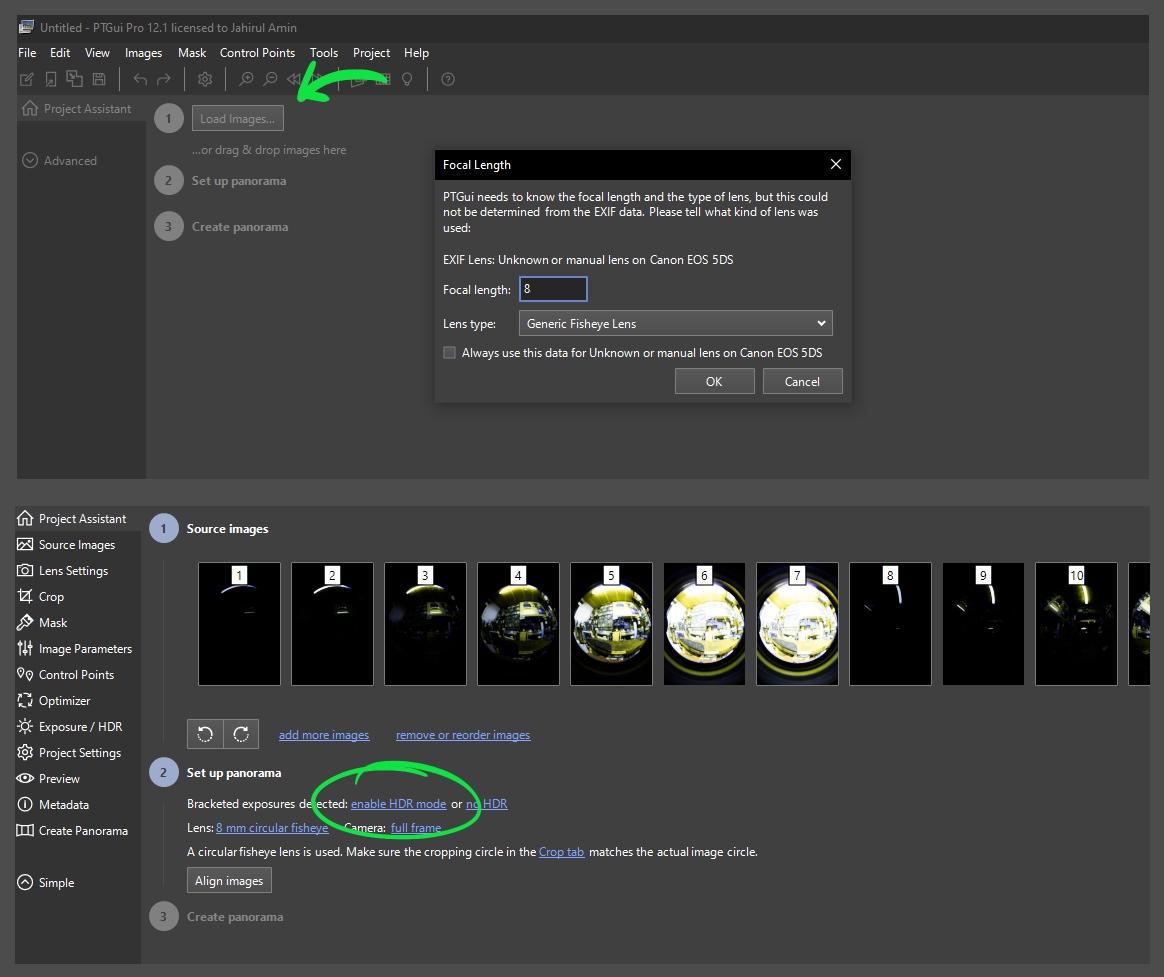
Next, jump into PTGui and hit the Load Images button. If the metadata is present, all you should have to do is add your Focal length, which in my case was 8.
You should then see that all your images have been loaded up, arranged in order from the darkest to the brightest. You should also have the option to ‘enable HDR mode‘, which you’ll need or else things will not work.
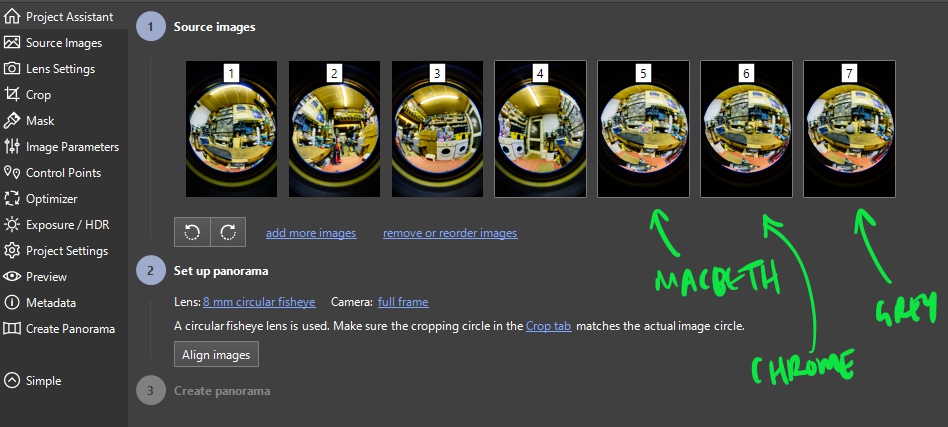
Quick note that I’ve actually imported 7 sets of images. 4 for each of the camera rotations (every 90 degrees), a 5th set for the Macbeth chart, a 6th for the grey ball, and a 7th for the chrome. Usually, I only have 5 sets (4 for each position, and a 5th set for all the reference). I’ve pulled all the images in so I can treat them all in the same manner during the merge, and then later on, I’ll grade the set in Nuke. You could also pull in your grey and chrome reference too. For the actual stitch, I’ll only be using the 4 main sets of images.
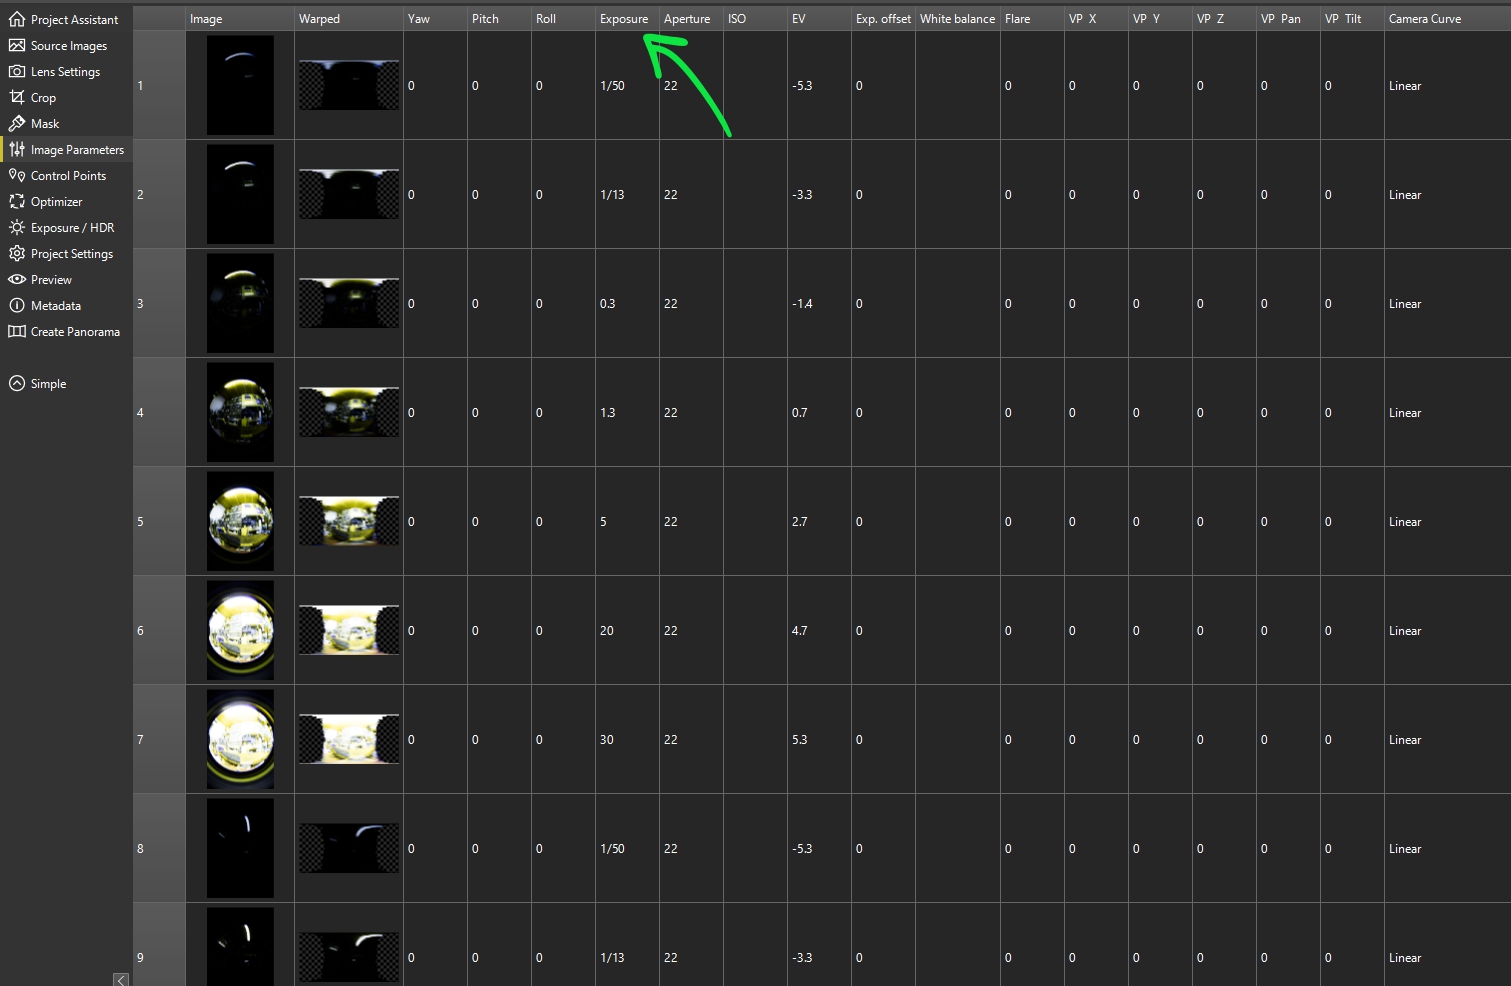
You can also jump into the ‘Image Parameters‘ tab to check that all the metadata has come into your project. If you do not get the ‘enable HDR mode‘ due to a lack of metadata, you can manually enter the ‘Exposure’ values here to get things working.
Merging your Images
For now, jump back into the ‘Project Assistant‘ tab and hit ‘enable HDR mode‘. When the ‘Bracketed Exposures‘ pop up window appears, enable ‘Merge bracketed images to HDR and link the positions‘.

You should now have something like so, where all the LDR images have been merged together into HDR images.
Aligning your Images
We next want to align our images but before doing so, I’m going to disable my reference set, so they are not included in the solve. To do this, right-mouse-button click over the sets and go ‘Exclude from Panorama‘. They should be marked with a red cross.

Next, hit the ‘Align images‘ button and you should get something like this:

Cleaning up your Panorama
Once aligned, you may want to check that the solve has not cropped out any of your image. To do this, go to the ‘Crop‘ tab and pull the crop circle to get the most out of your photography. In some cases, you may find it is good as is, but always a good idea to check.

And if your stitched image does not look great, you can line things up using the ‘Control Points‘ tab and paint areas in and out (such as the tripod legs) using the ‘Mask‘ tab. I’ll not be covering both here as you can generally find good documentation on both from the PTGui website.


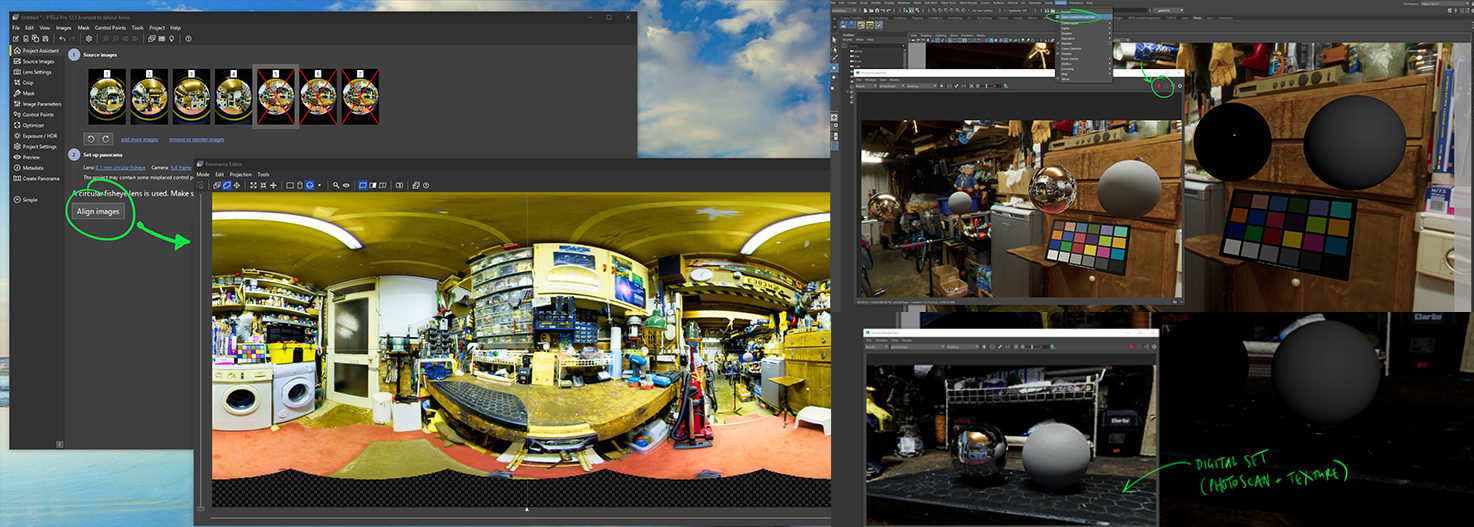
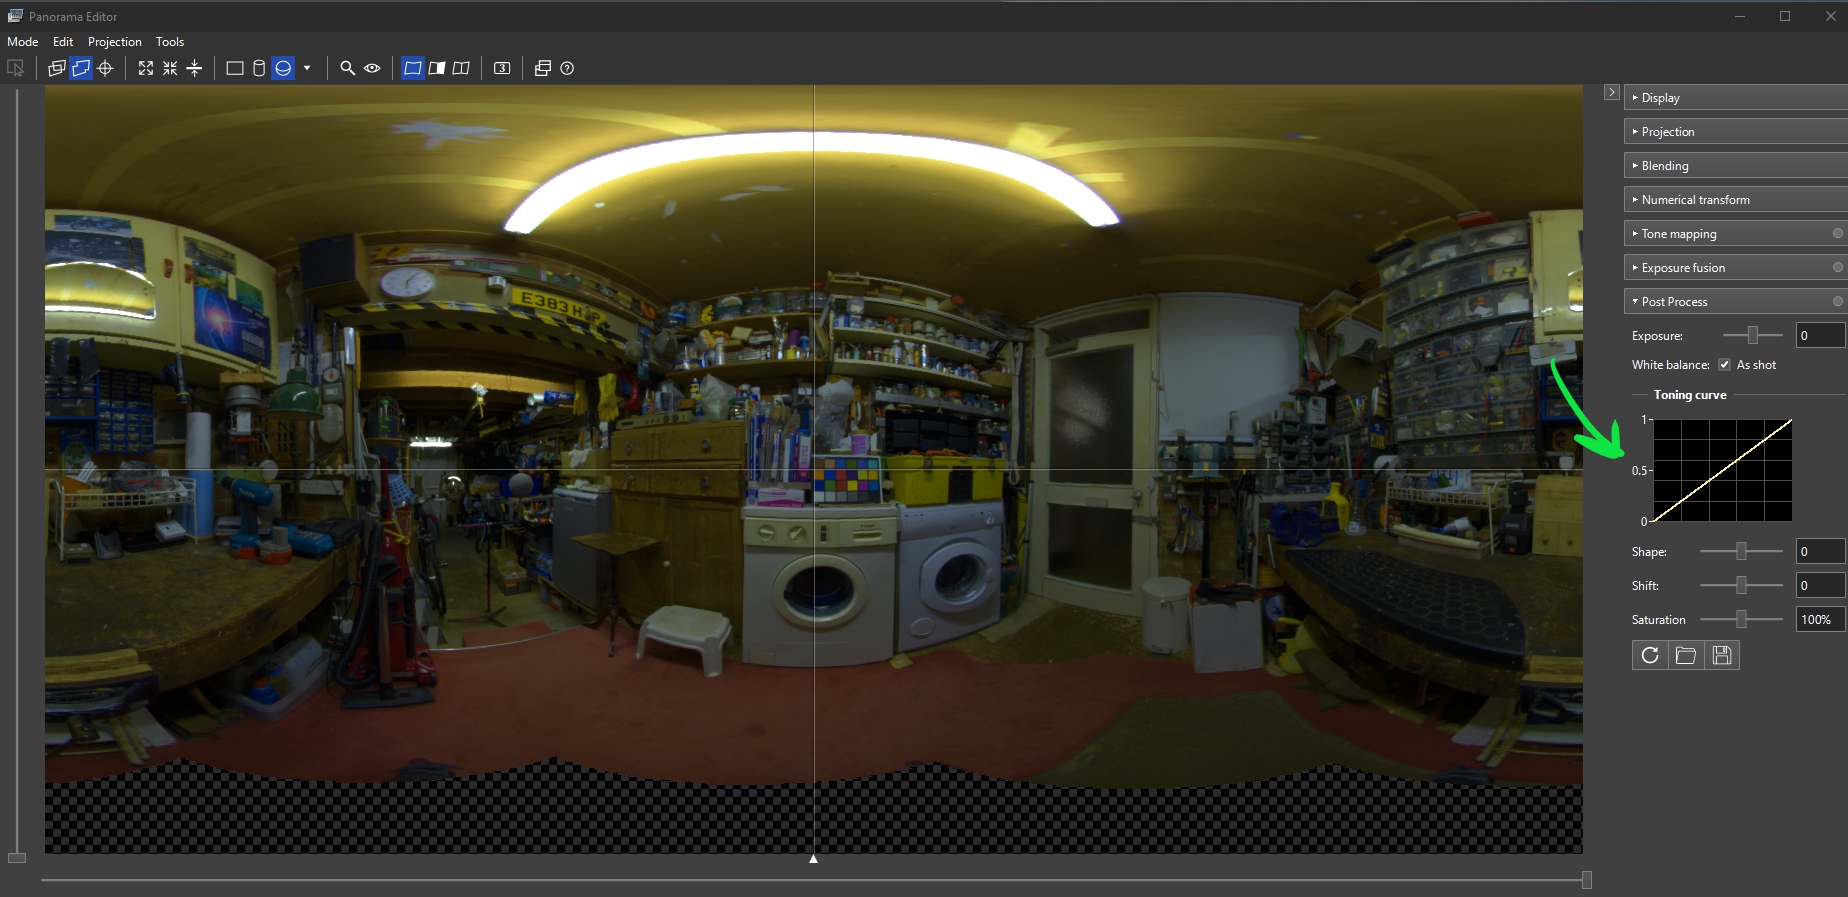
What I like to do next is a bit of cleanup. Firstly, I like to centre the key light source (for example the sun), so it is in the center of the panorama. You can do this by left-mouse-button dragging in the ‘Panorama Editor‘ window. You can also use the right-mouse-button to rotate the panorama, and you also have additional tools to straighten the panorama (as highlighted on the image below).

Next, I like to disable any tonemapping. To do this, go to the ‘Exposure/HDR’ tab and make sure ‘Precision‘ is set to ‘Float‘. Make sure ‘Merge using‘ is set to ‘True HDR‘ and then disable ‘Tone map stitched panorama‘. You can also disbale this in the ‘Exposure fusion‘ drop-down in the ‘Panorama Editor‘ window.

If you drop down the ‘Exposure‘, you’ll get a clearer idea of how this works.

You could also play with the ‘Post Process‘ ‘Toning Curve‘ (the ‘Shape‘ and ‘Shift‘ sliders), but you’ll find that they will have no effect on the HDRI on export. So I just leave the sliders as they are.
The next thing I like to do is go to the ‘Blending‘ drop-down menu in the ‘Panorama Editor‘ and enable ‘Fill holes‘, which should then fill the gap at the bottom. I tend to tilt the camera up 15degrees when shooting a HDRI (to capture all the light from above) and this leaves a hole. You could manually clone something in but as there is no light source down there and it is primarily colour, this should do the trick. Alternatively, whilst onset, take a snap of the group and you can patch it into the panorama.

Exporting your Panorama
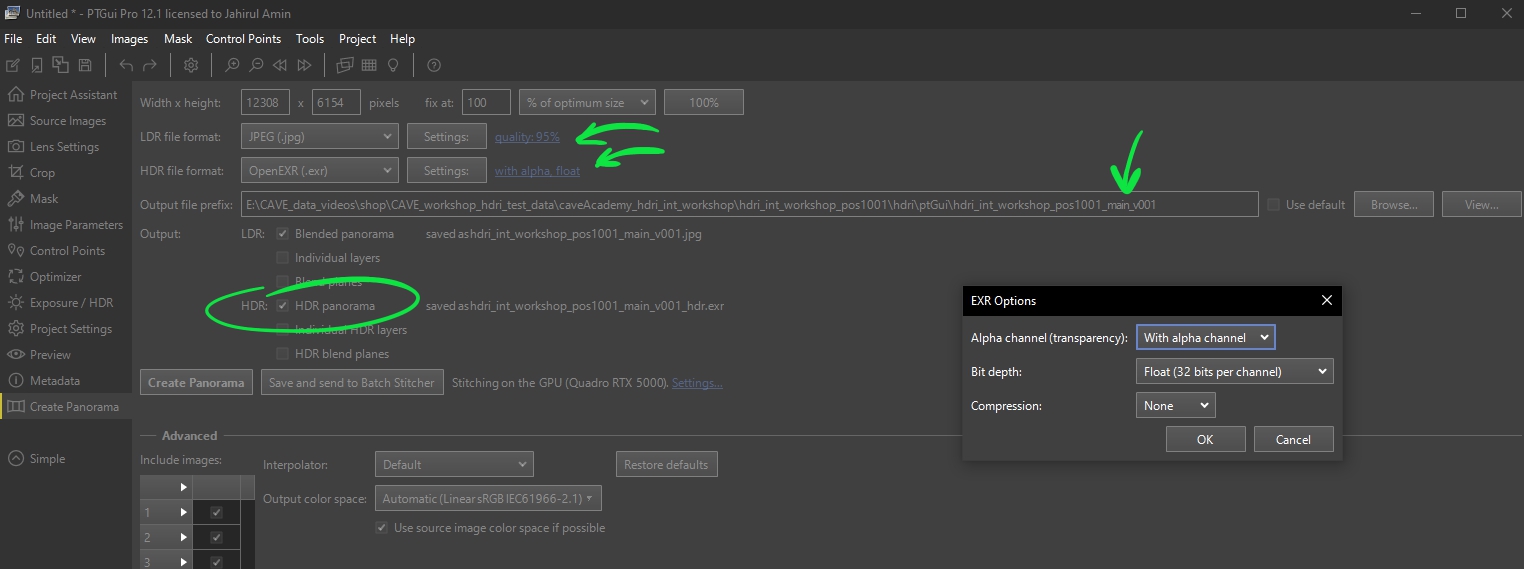
At this stage, you should be pretty much good to go. So pop over to the ‘Create Panorama’ tab and enable the following settings:
- Output: LDR: Blended panorama (although not needed, I keep this for visual reference).
- Output: HDRl HDR Panorama
- LDR file format: JPEG (.jpg), quality: 95%
- HDR file format: OpenEXR (.exr), with alpha, float, no compression
- And make sure to name your file accordingly. For example: hdri_int_workshop_pos1001_main_v001_r001 (I added the _main as this will allow me to keep it seperate from _macbeth version that I’ll also be exporting)
You should now have your EXR and JPG saved to disk, and if you check the HDRI in Nuke, you should get something like this. Increase and decrease the exposure to see how it responds.

Exporting your Macbeth and additional reference from PTGui
Now that we’ve got our _main HDRI out, what I’ll do next is export the reference. Starting with the _macbeth. To do this, I disable all the image sets other than the Macbeth chart image set. Then, in the ‘Panorama Editor‘, I hit ‘Projection > Cube face: 90 Rectiliear‘. This should give you something like this, which you can then export out as a HDRI, labelled: hdri_int_workshop_pos1001_macbeth_v001_r001.
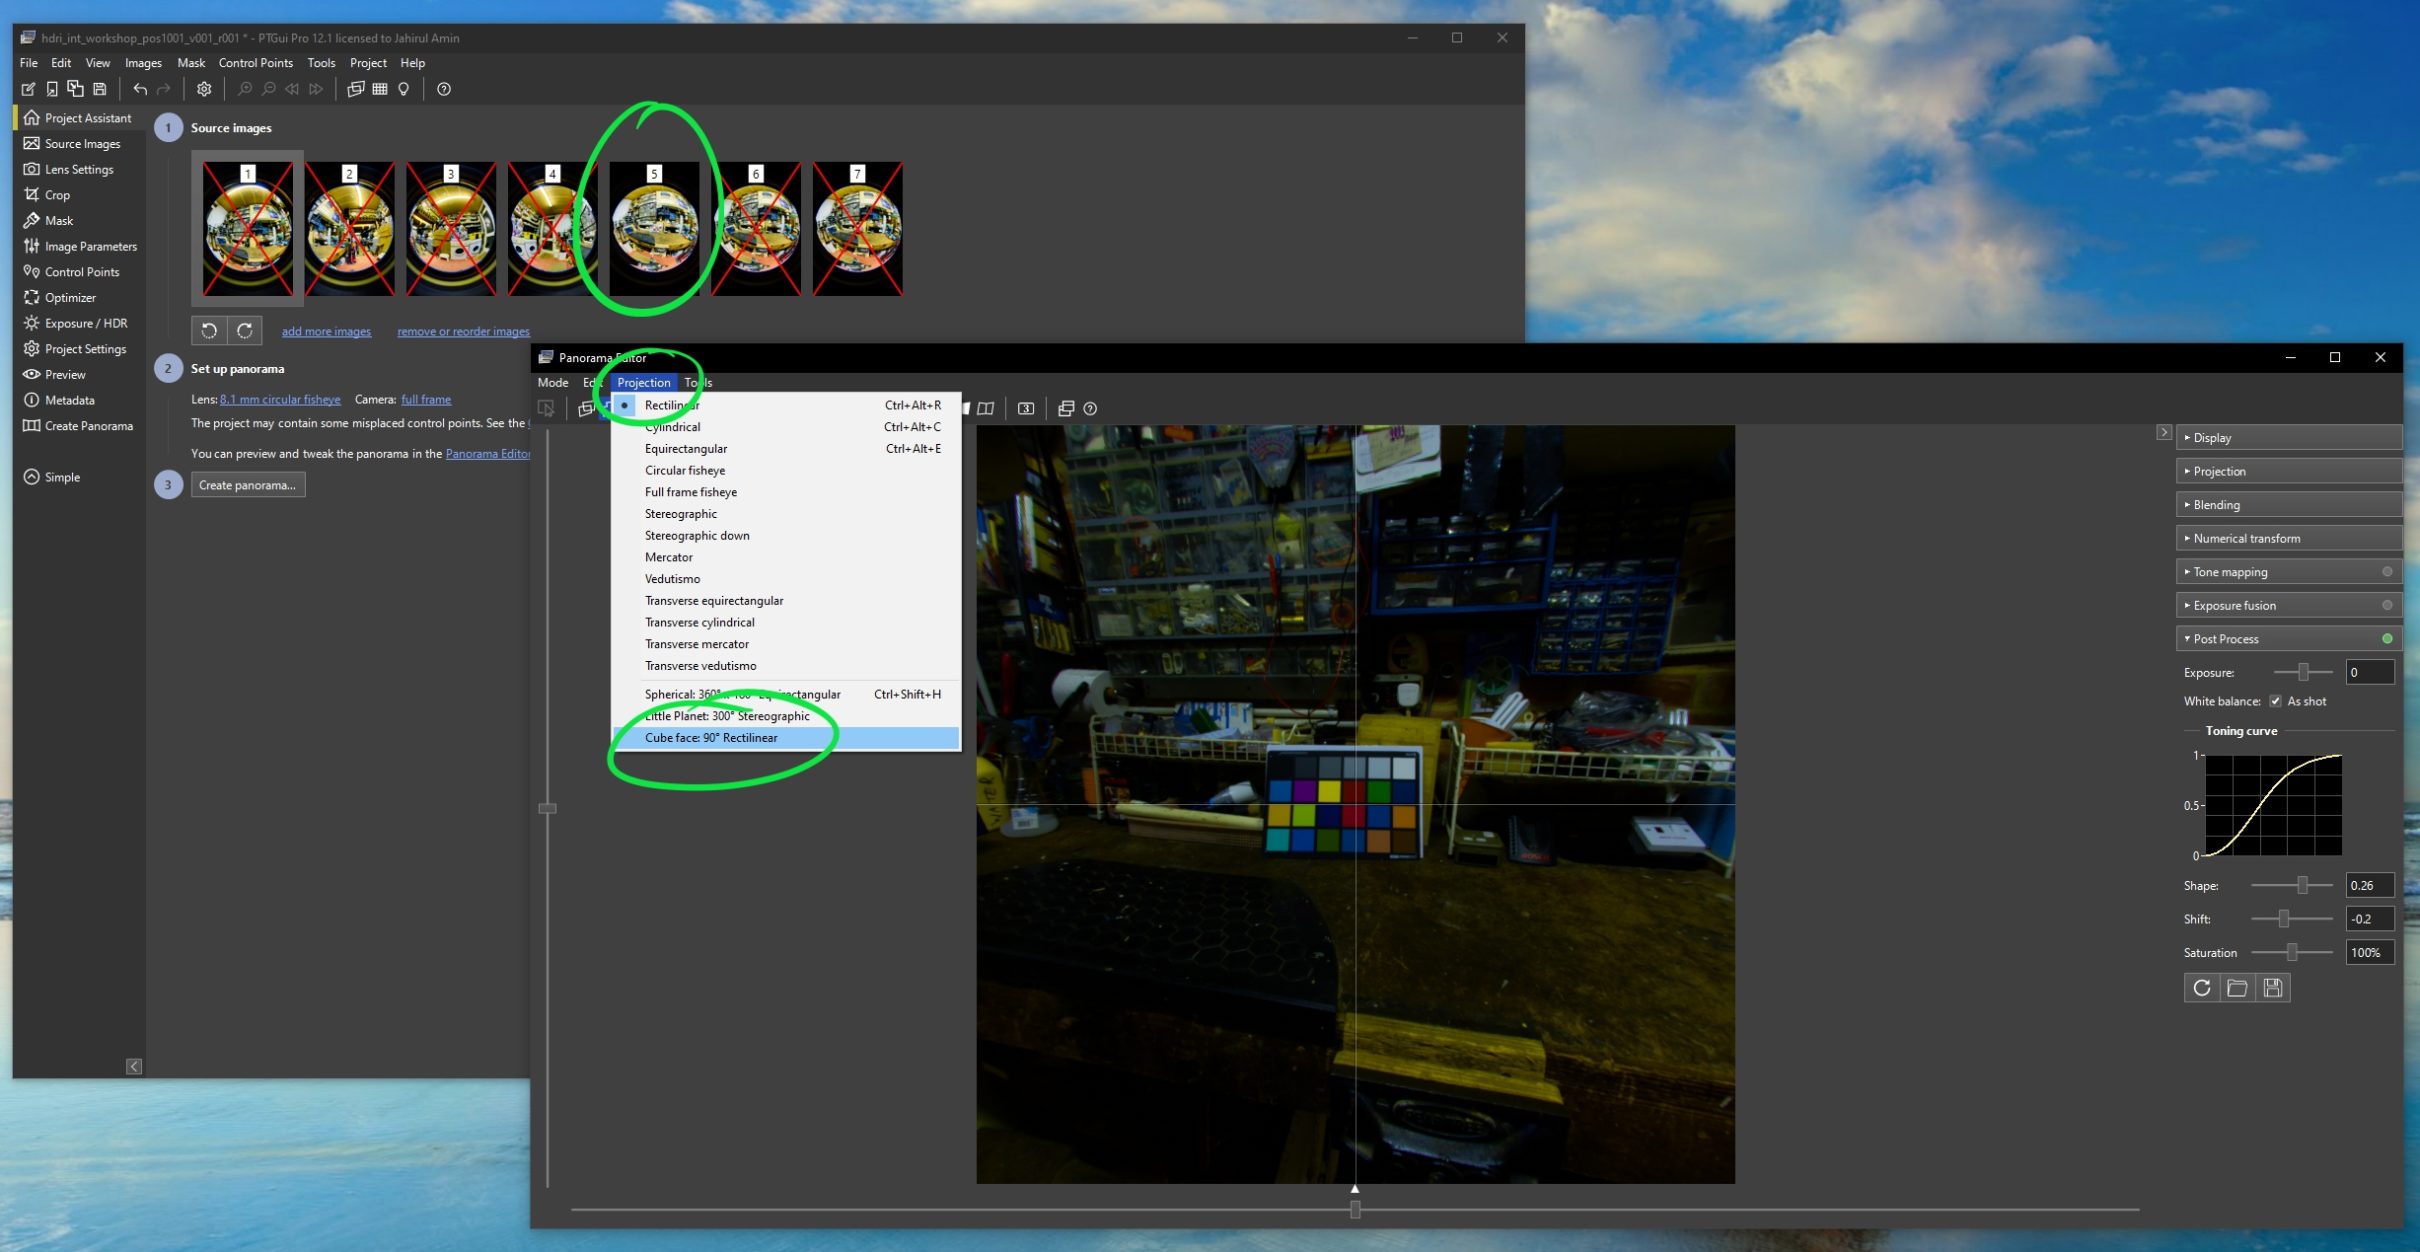
You can then repeat the steps for the grey and chrome ball, which I labelled: hdri_int_workshop_pos1001_greyBall_v001_r001 and hdri_int_workshop_pos1001_chromeBall_v001_r001.

You should now have the following in your output directory:
- hdri_int_workshop_pos1001_main_v001_r001.exr
- hdri_int_workshop_pos1001_macbeth_v001_r001.exr
- hdri_int_workshop_pos1001_greyBall_v001_r001.exr
- hdri_int_workshop_pos1001_chromeBall_v001_r001.exr
And when reviewing all the output files in Nuke, you should get something like this (which I’ve dropped into a contactSheet node and increased the exposure slightly for review purposes):

First Pass Grading your HDRI in Nuke
To grade the HDRI, we’ll be using the very amazing mmColorTarget tool by Marco Meyer. If you are having trouble getting the tool going on Windows, have a look at this walkthrough here:
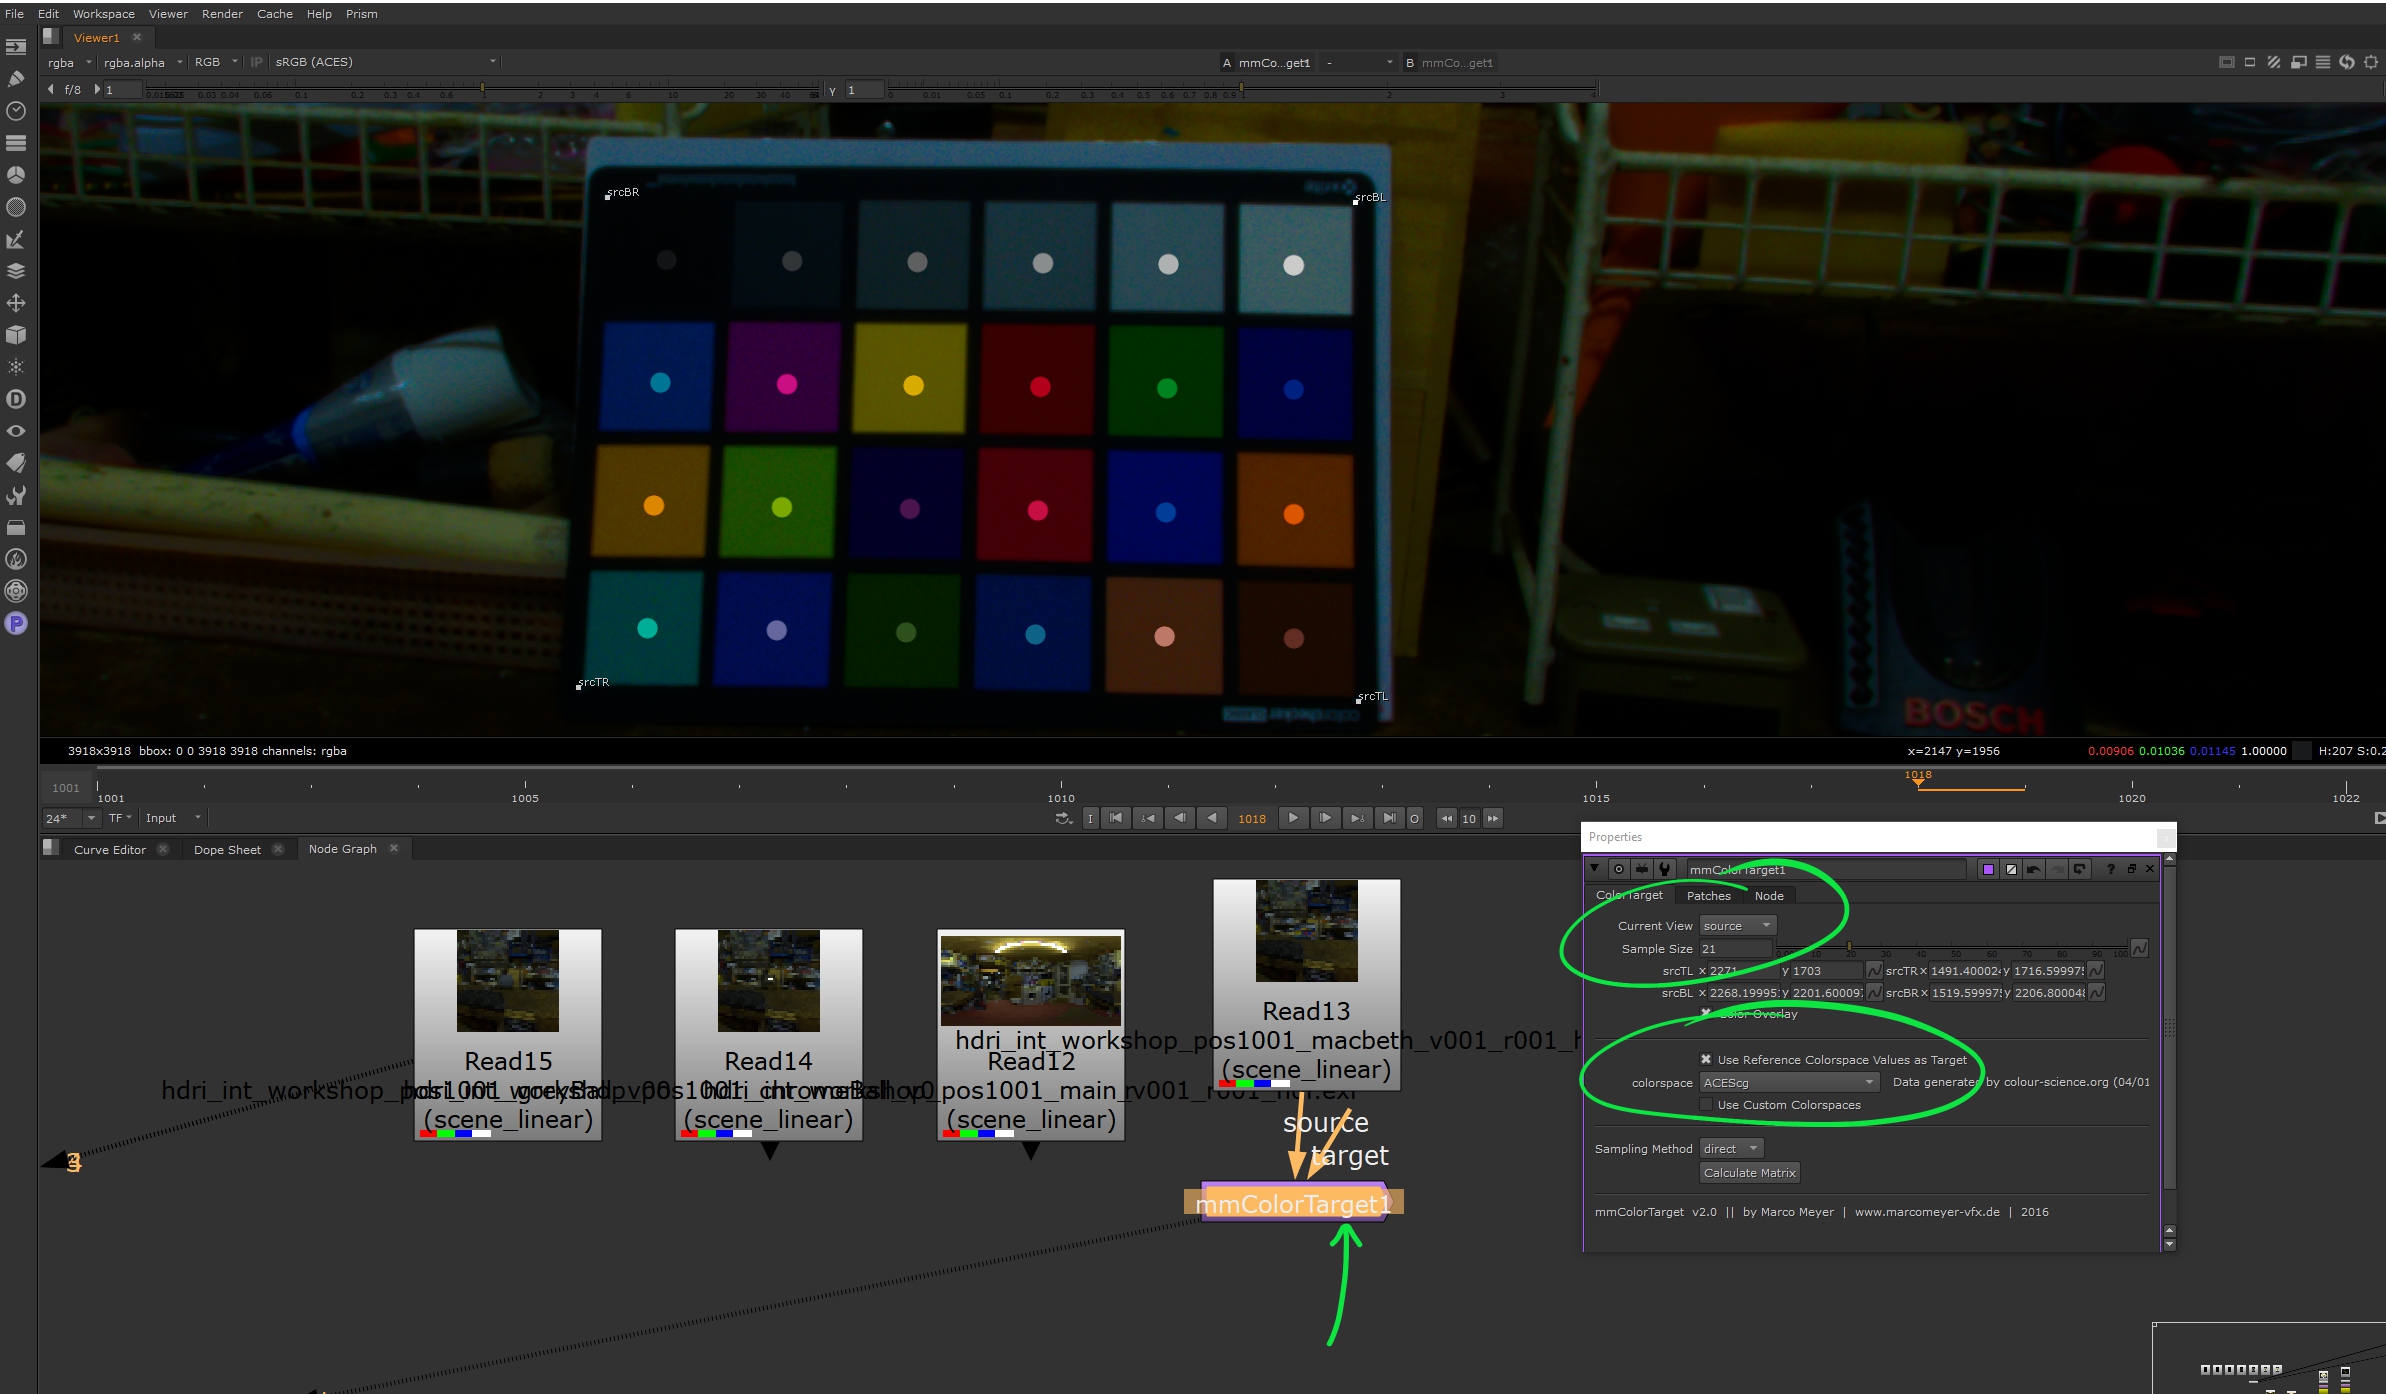
Once you’ve got the tool up and running, drop down a ‘mmColorTarget‘ node and connect your Macbeth chart HDRI to the ‘source’ input. On the ‘mmColorTarget‘ node, set the following:
- Current View: source
- Sample Size: 21 (you’ll need to play with this)
- colorspace: ACEScg
Then pull the 4 anchor points around until the colours line up with your chart samples. If you don’t see the anchor points to begin with, frame the whole image as they’ll be in the bottom left corner.
Once everything looks good to go, hit ‘Calculate Matrix‘ and you should get something like so:
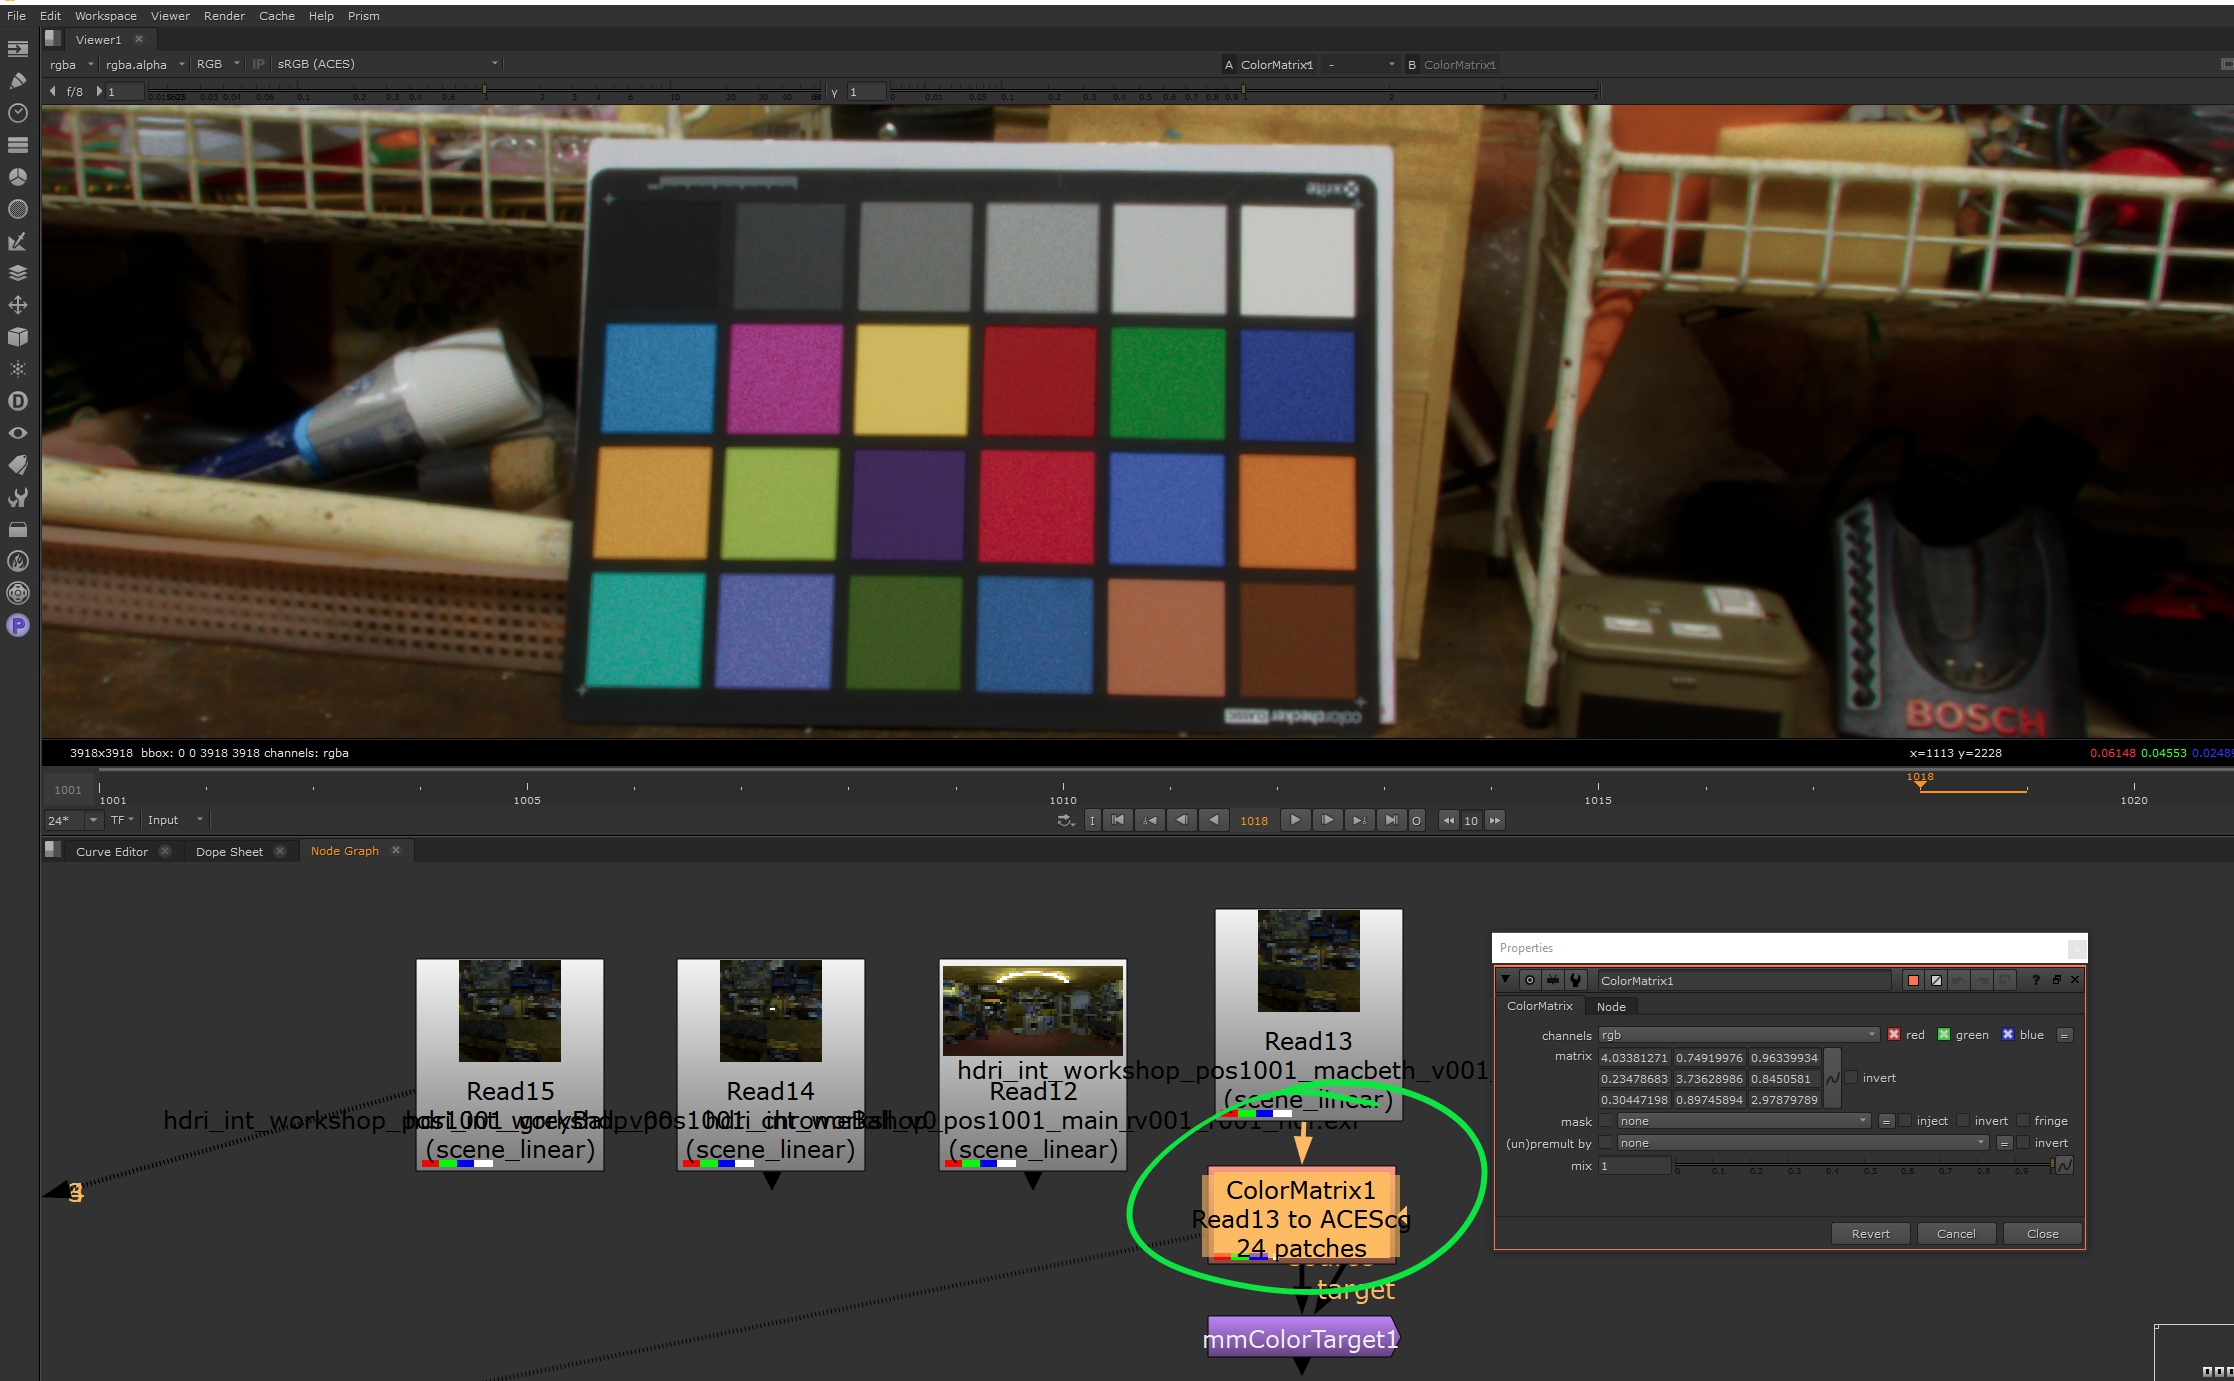
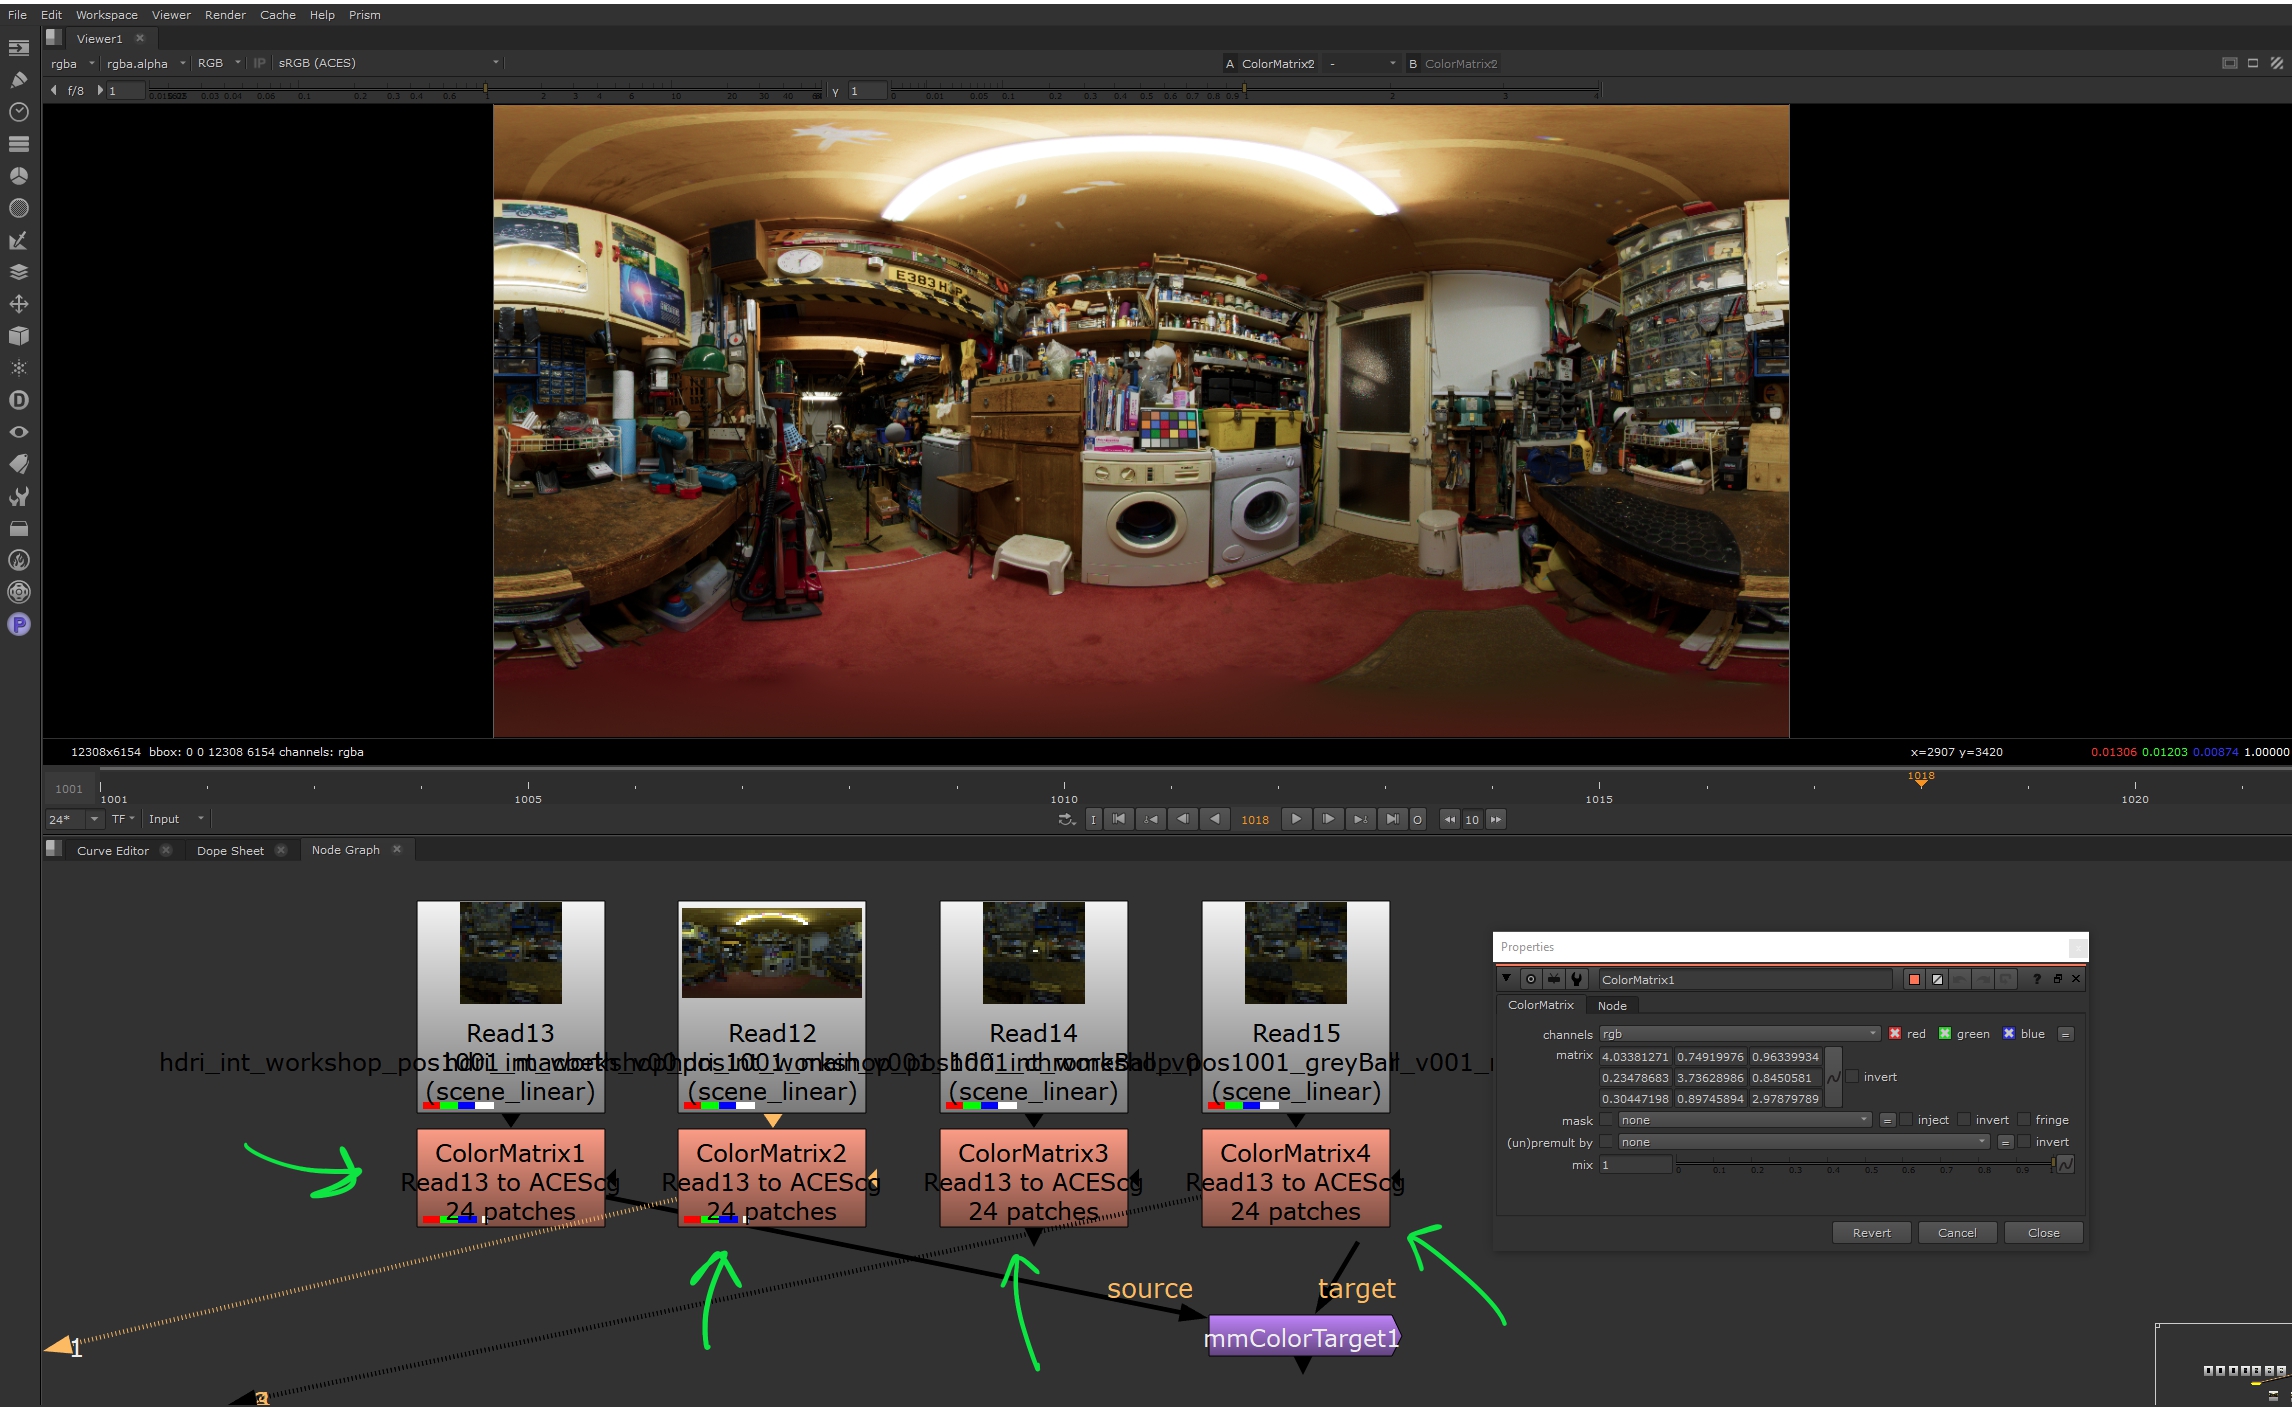
You’ll notice a ‘ColorMatrix‘ node has been generated and your image colour/exposure has been auto-magically tweaked to be more neutral. Next, copy the ‘ColorMatrix‘ node and drop it onto the end of each of your other input images (_main, _greyBall, _chromeBall). And you should have something like so:
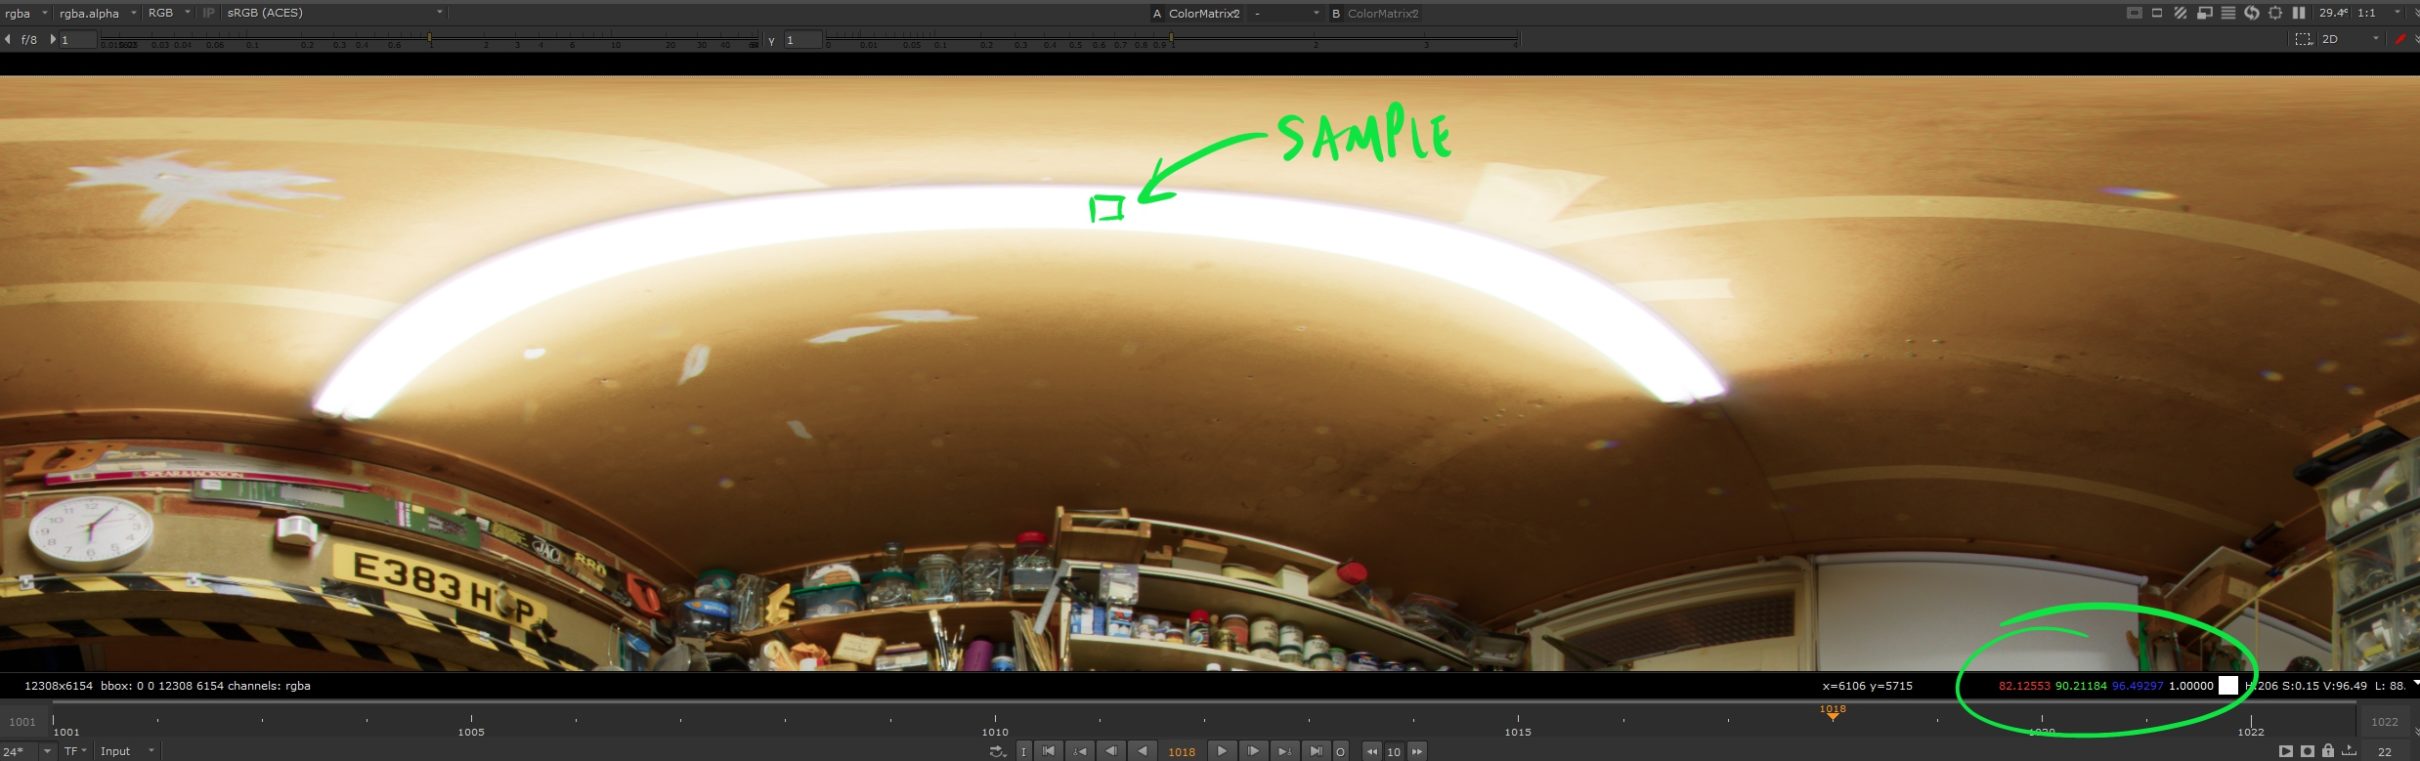
And when you sample the values around your light sources, hopefully you start to see some big numbers.
Exporting your HDRI
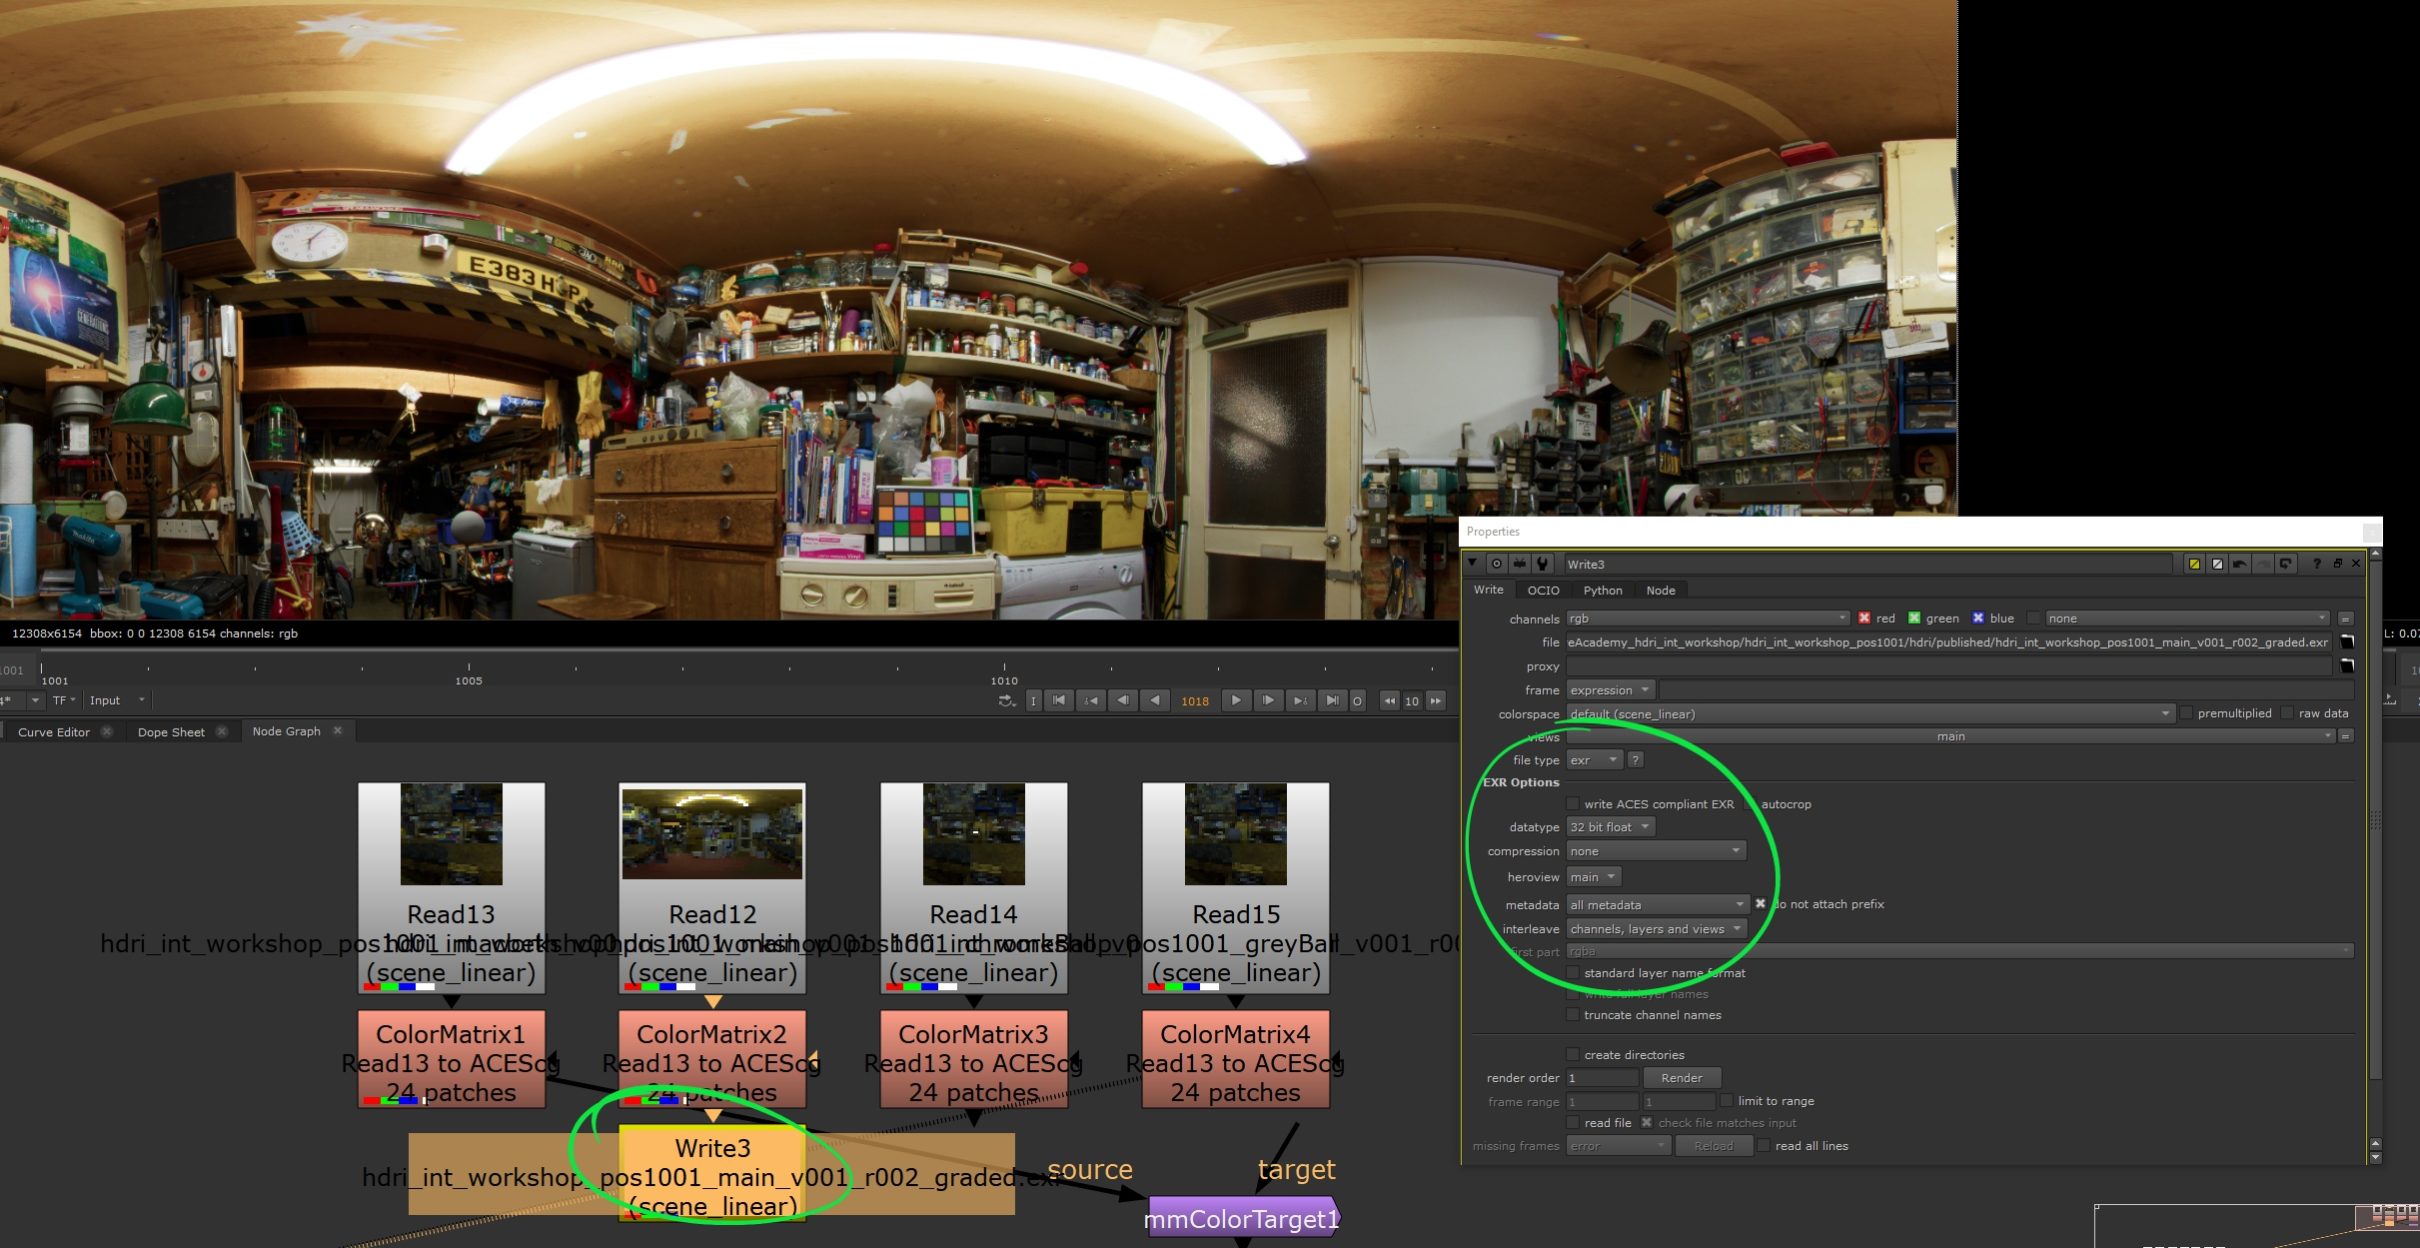
The next thing to do is write out the HDRI, so drop down a ‘write‘ node and use the following settings.
- file: …/hdri/published/hdri_int_workshop_pos1001_main_v001_r002_graded.exr
- file type: exr
- colorspace: default (scene_linear)
- datatype: 32 bit float
- metadata: all metadata
- Make sure to enable ‘do not attach prefix‘
…and hit ‘Render‘
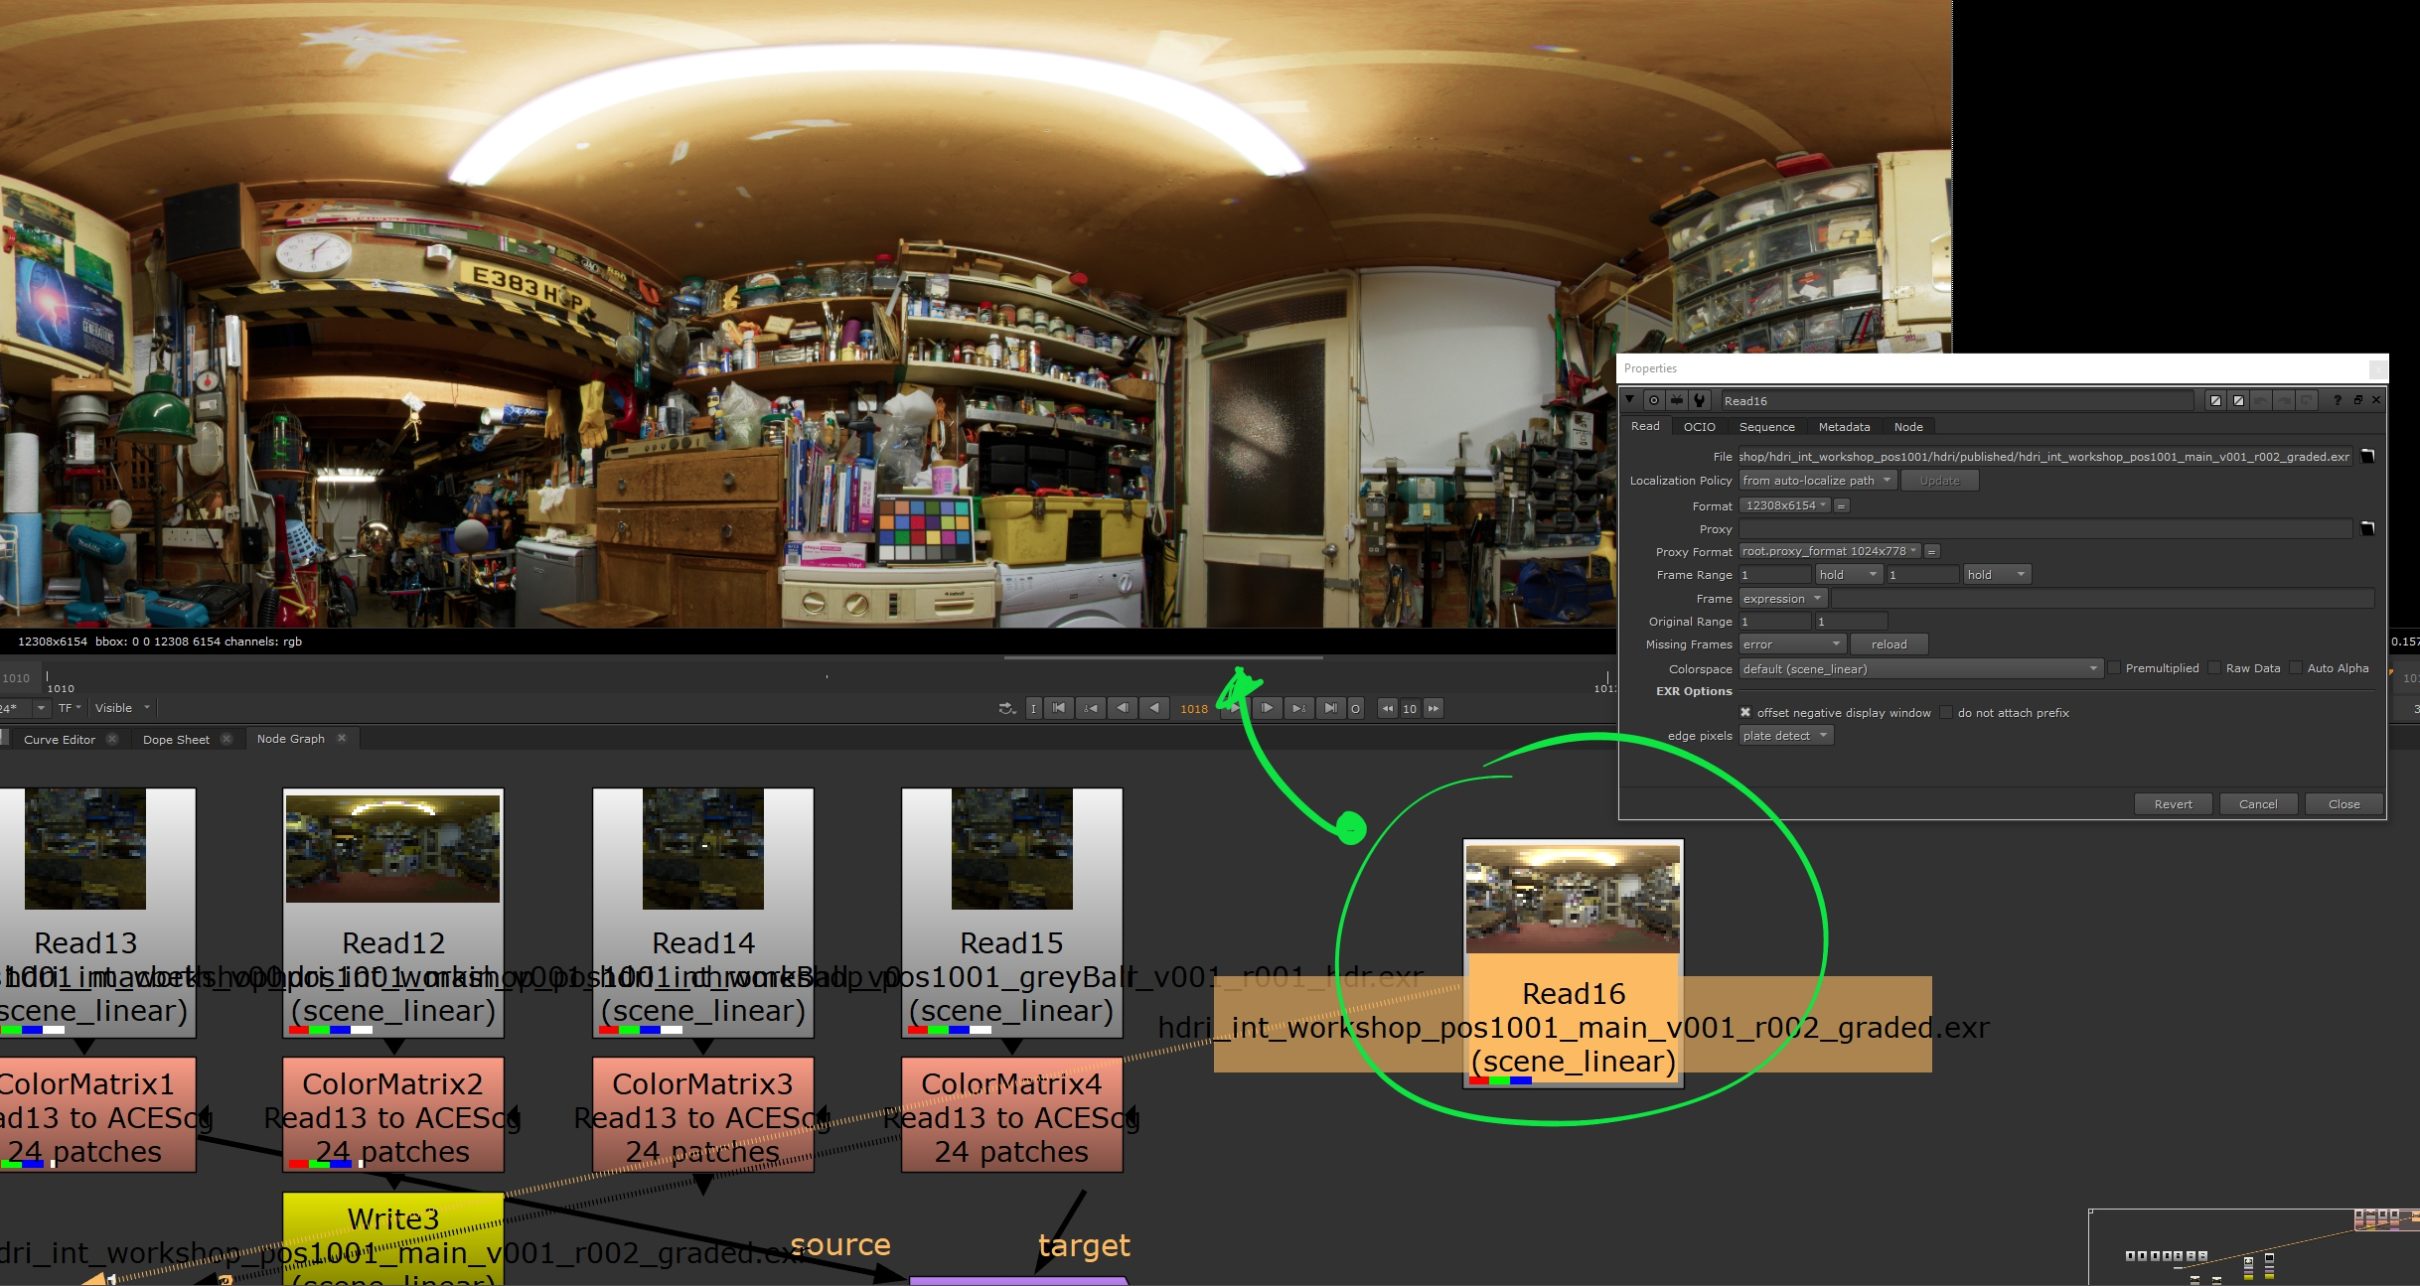
Lastly, read the image back in to Nuke to check it all looks good.
Testing your HDRI
I’m testing the HDRI in Maya/Arnold, but any application/renderer that allows you to set your colour space to ACEScg will do the trick.
To test the HDRI, it is worthwhile having a scene file with a Macbeth chart, a grey ball and a chrome ball, and luckily for you, we have a Maya project right here:
If you are using other applications, you can very easily set up a scene file and here is some further guidance on doing so:
Once you are good to go, set the Maya project as your active project and open up the scene file: cave_maya_reference_2020_v001_r001.ma
You should see something like so:

Then simply go ‘Arnold > Lights > Skydome Light‘

…and add your HDRI to the ‘Color‘ input by clicking on the swatch icon and then selecing ‘File‘ from the ‘Create Render Node’ window.

Next, on the ‘file‘ node, plug your HDRI into the ‘Image Name‘ slot and set the ‘Color Space’ to ‘ACES – ACEScg‘.

Kick off a test render by going ‘Arnold > Open Arnold RenderView‘ and clicking on the render button. At this stage, you can play with the exposure of the light and rotate the HDRI to try to get things to match your reference…

…but do also note that lighting is a lot more than just dropping a HDRI into the scene. If you really want to match the onset lighting, you’ll want to extract the key lights from the HDRI and position them in 3d space using area lights, rebuild the set (even as proxy geo) and then project the HDRI onto the digital set to have more accurate indirect light and reflections. But this is a conversation for a different day 😉


Moving On
Support CAVE Academy
Here at CAVE Academy the beauty of giving and sharing is very close to our hearts. With that spirit, we gladly provide Masterclasses, Dailies, the Wiki, and many high-quality assets free of charge. To enable the team to create and release more free content, you can support us here: Support CAVE Academy