
Search the wiki
Shooting a Panorama

Introduction
A huge thanks to the fantastic team at Clear Angle Studios for providing all the kit and making this tutorial possible, and for Rebellion Film Studios for allowing me to capture the data onsite.
In this tutorial, we’ll look at how to go about shooting a panorama. This could be a 90 degree pano, a 180 or 360 capture. It all comes down to how much coverage you need and more importantly, how much time you have.
Panoramas can be used for backplates, DMP, texturing and compositing, so it is vital that we consider the usage of the data during the capture. Ideally, we’d end up with something like so as an output:

Example Data
Coming Soon!
Panorama Shoot Kit
The following kit list is to give you an idea of what I generally use to shoot a panorama. I like to use the 5Ds or 5D MkIII as it allows you to shoot 7 brackets with one click. We won’t need 7 brackets for a pano but the option is there 😉
- Canon 5Ds: a full frame camera that allows you to shoot 3+ bracketed exposures with one click.
- 24mm, 50mm and 100mm prime lenses: depending on your capture requirements, you’ll need a good mix of lenses.
- Ninja Nodal 6 panoramic head: allows you to incrementally rotate the camera around the no-parallax point (the center of the lens’s entrance pupil).
- Macbeth chart: for reference purposes. For colour calibration in post.
- Slate: for reference purposes. To give yourself (and the team back in the office)
- Manfrotto Tripod: a solid tripod for shooting under difference environments.
- Shutter release cable: this is so you can fire the camera without touching it, allowing you to minimise camera shake.
- Batteries, memory cards, gaffer tape, etc.
- Grey ball: I do capture the grey ball but this is not essential. The 18% grey ball (mid grey) will allow you to match exposure in post.
- Chrome ball: I do capture the grey ball but this is not essential. The chrome ball will give you a clear idea of where the lights were onset.

001. Prepare your Camera and the Ninja Nodal
The first thing we want to do is attach the ninja nodal onto the tripod. The following values described in this tutorial are for the positioning of the the Canon 5ds (or MkII or MkIII) and your 50mm lens (which is what I’ll be kicking things off with) on to a ninja nodal. If you are using a different camera and lens, you will need to figure out the no-parallax point for that specific camera and lens. For more information on this, check out the following links:
- https://wiki.panotools.org/No-parallax_point
- https://panosociety.com/pages/how-to-set-no-parallax-point
- https://wiki.panotools.org/Entrance_Pupil_Database
Here is a table that breaks down where to position your camera/lens:
| Lens | Arm A | Arm B |
|---|---|---|
| Sigma 8mm f/3.5 | 5.3 | 8.95 |
| Canon 24mm f/2.8 | 5.3 | 6.7 |
| Canon 24mm f/1.4 L Series | 5.3 | 8.8 |
| Canon 35mm f/2.0 | 5.3 | 5.7 |
| Canon 50mm f/1.4 | 5.3 | 5.55 |
| Canon 50mm f/1.2 L Series | 5.3 | 5.7 |
| Canon 100mm f/2.0 | 5.3 | 5.7 |
| Canon 100mm f.2.8 Macro | 5.3 | 7.6 |
So let’s start by connecting the base arm of the ninja nodal to your tripod. We’ll refer to this horizontal arm as armA.
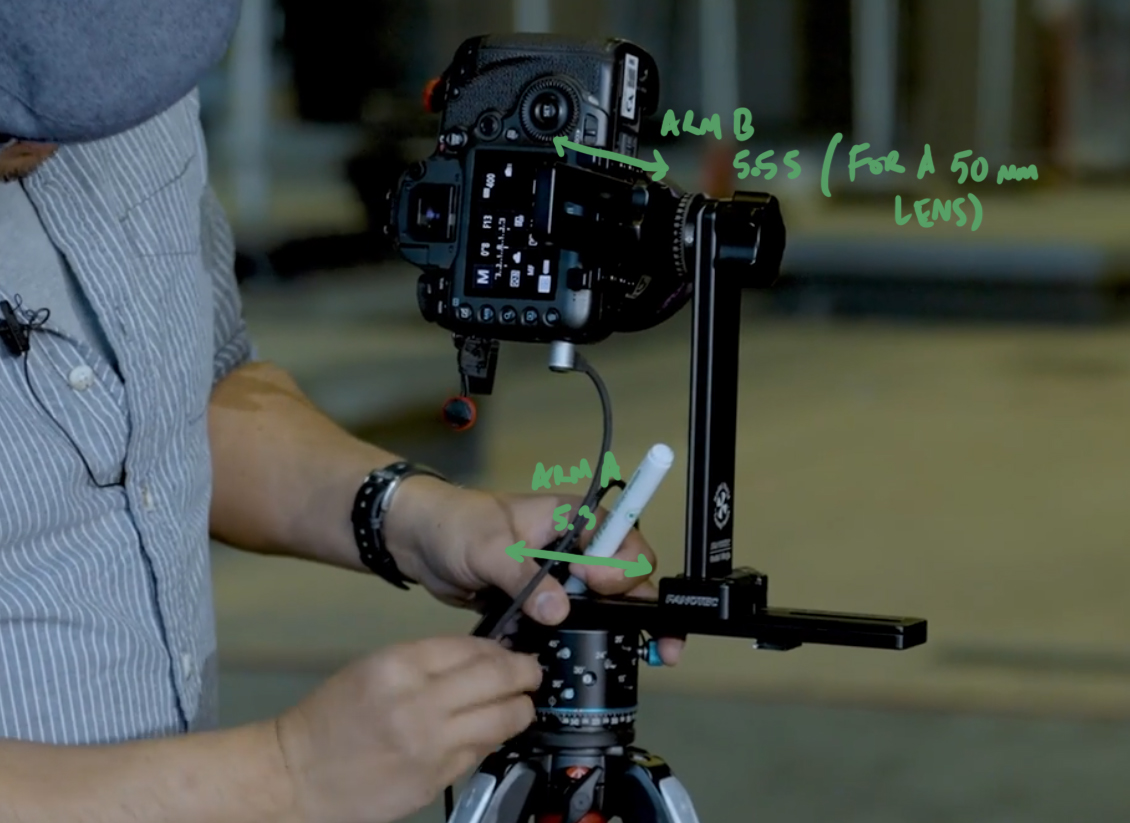
Then connect the second vertical arm (which we’ll refer to as armB) of the ninja nodal to armA and make sure the rotating tilt knob is pointing away from the no-parallax point (as illustrated in the image below). If this is not connected with the correct orientation, you will not be able to capture a pano that stitches well. With the arm connected, take the front ledge of armB and position it to 5.3 on armA.
Now attach your camera to armB using the provided plate and position the camera so the middle line on the plate lines up to a value of 5.55 on armB of the ninja nodal.
Now take one of the blue knobs and make sure it is screwed into the 15-degree hole (I’m using the 50mm lens and this should be plenty for overlap). Make sure this knob is screwed in quite tight. For the remaining 2 blue knobs, make sure they are loosely tightened. When you rotate the ninja nodal now, every 15-degrees, it should click into place. Do double check you are getting plenty of overlap by looking through teh camera viewfinder. The amount of overalp will vary per lens/amount of rotation.
Your camera should now be positioned correctly and rotate around the no-parallax point, and click-in every 15-degrees.I’ll also be using the rotating knob on arm B to rotate the camera up and down every 15-degrees. Please do remember that you’ll need to play with the amount of rotation based on your lens and the overlap you are getting between pictures.

The last thing to do is attach the shutter release cable. Your setup should look something like this:

002. Set your Camera Settings
Here, we’ll look at the camera settings I use for shooting a panorama. The settings will be for the Canon 5Ds but you should be able to match the settings to other cameras. Before you begin, make sure to set the camera to MANUAL mode, so we have full control of the shutter speed, the ISO and the F-Stop.
- If your camera allows it, set the Color Space to Adobe RGB. It is more than likely set to sRGB by default.
- Shoot a minimum of 3 brackets per angle
- Set the brackets to 2 stops apart
- Set the bracketing sequence to go from under to over exposed (- 0 +).
- Shoot in Manual mode
- Shoot RAW
- Check the White Balance
- Select an appropriate F-Stop (F8 – F11+)
- Set an appropriate ISO (100 – 400). Don’t set the ISO too high as we do not want any noise
- Set the shutter speed accordingly.
- Make sure to shoot a test image before you start
Taking all of the notes above, click on the MENU button and head to the Exposure menu and set the following:
- Exposure level increments: 1/3
- ISO speed setting increments: 1/3
- Bracketing auto cancel: 0n (never used/changed this)
- Bracketing sequence: – 0 +
- Number of bracketed shots: 3
- Safety shift: OFF (never used/changed this)
- Same expo. for new aperture: OFF (never used/changed this)
Now we’ll need to set some additional settings which I tend to set using the Q (quick) button on the back of the camera. So hit the Q button and set the following:
- F-Stop: F8.0 (this is just a starting point and will need to be modified depending on the lighting condition).
- ISO: 200 (this is just a starting point and will need to be modified depending on the lighting condition).
- Shutter speed mid exposure: ??? (this will be whatever it needs to be depending on your lighting environment)
- Exposure comp.AEB Setting: -2, 0, +2
- White balance: set accordingly (Daylight/Cloudy for exterior, Tungsten for interior, etc.) but avoid AWB
- Single shooting: Self-timer: 2sec/remote (this will allow you to shoot 3 brackets with one click).
- Make sure to shoot RAW: This is extremely important as this will allow us to grade the images in post, and the RAW data contains a lot more information than jpegs. I usually shoot both RAW and JPEG as this will allow me to easily review the images when onset.
As you can see above, I’ve set some default starting settings for F-Stop, ISO and Shutter speed. Please do note that for every lighting condition, you will need to double check your settings to ensure you are getting the best possible result when shooting a panorama.
003. Position your Camera and Frame your Environment
At this stage, you should have your camera ready to go. What I like to do this stage is look through the camera at my start position and then at my end position. This allows me to map out how many images I’ll need (with plenty of overlap) and from that I can figure out how long it will take to shoot.
Once you’ve placed your camera and figured out your path, check the level to ensure you do not grab a wonky set of photos.
004. Final Setting Tweaks
Now that you are in place, you should do a quick check of your settings. On some occasions, you may be able to fire off several shots to test your settings, but usually, you’ll need to be in and out and will not have the luxury to do this.
The way I like to quickly set my settings is by doing the following.
- With the camera in position, remove the lens cap and press the shutter release button gently (not all the way) to do quick meter reading.
- Find the middle exposure on the Exposure comp.AEB setting and set it to 0.
- Next, I drop the exposure by 1 stop, so my brightest images are not too bright. This is a personal preference, so you’ll have to play with what works best for you and your team
- That’s it.
005. Shoot the Slate and Reference
Once you are in position and ready to go, make sure to create a new folder on the camera memory card. For each take, I recommend creating a new folder, so it is easy to manage your data back in the office.
Now position your slate. Before shooting, make sure to quickly check the focus. Your slate should contain the following info:
- Project code name
- Environment ID
- Date
- Time
- Panorama
- Position (if taking multiple panoramas)
- Diagram (a quick sketch of the set and where you shot the panorama from – this is not essential but nice to have)
With your slate captured, next shoot your reference Macbeth chart. Shoot the Macbeth from a number of positions if you can and also if the lighting changes (for example, you are shooting outdoors), then shoot the Macbeth chart again. Anytime lighting changes, shoot the Macbeth.
The grey and chrome ball are not required but if you already have them set up (like I usually do), then I capture them too.


For the slate, you only really need the one well exposed image but for the Macbeth chart, you need the full 3 exposures. I actually shoot 3 exposures of the slate as once the camera is set up and ready to go, I don’t like to change the settings.
006. Shoot the Panorama
With your slate and reference captured, move them to one side and prepare to shoot your Panorama. For the main panorama, I tend to drop the Macbeth chart onto the floor so it is visible in the final panorama and can be used for additional grading. Just make sure it is not blocking any of the main elements that you are trying to capture. The same goes for the crew, before shooting the panorama, you will need to ensure no-one is occluding the capture volume.
Once all looks good, make sure to orient your camera to your start position (top-left corner shooting from left to right), check your focus and then set the lens to Manual focus.
Then line the camera up on the first 15-degree notch on the ninja nodal and click on the shutter release to take the first 3 exposures. Then rotate the camera 15-degrees horizonrtally and click again for position 2, then again for position 3, and then 4. Continue until you are as far as you’d like to go horizontally, then tilt downwards and start shooting again, going from right to left. When you get as far as you’d like to go, tilt the camera down and go again, shooting from left to right. Continue until you hit your end point.

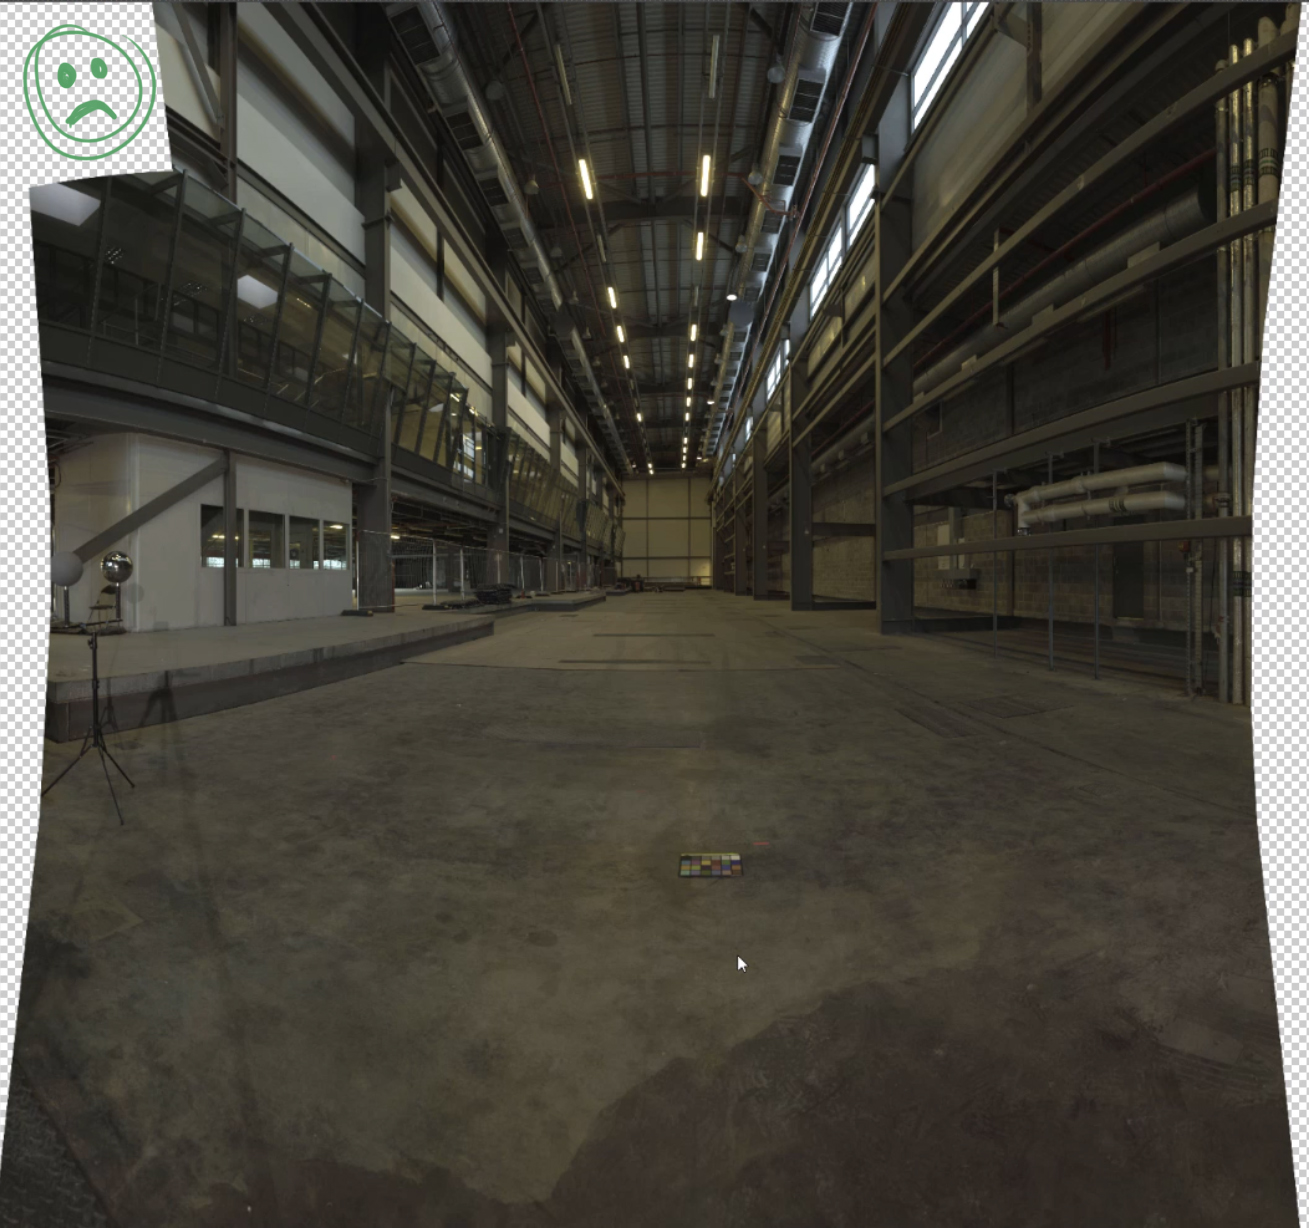
And that’s it. You should now have a panorama ready for processing. This is what I got from a quick process.

Quick Summary
- Attach the ninja nodal to the tripod.
- Attach your camera to the ninja nodal.
- Check the position of the camera on the ninja nodal.
- Check your rotation setup on the ninja nodal
- Check your camera settings.
- Double check your settings
- Create a new folder.
- Focus on the slate and shoot the slate.
- Focus on the Macbeth chart and shoot.
- Check your focus
- Tilt the camera to the start position.
- Shoot as many positions as required.
Links
- Shooting a HDRI Onset for CG Lighting – This tutorial will guide you through the process of shooting a HDRI onset for CG lighting.
Support CAVE Academy
Here at CAVE Academy the beauty of giving and sharing is very close to our hearts. With that spirit, we gladly provide Masterclasses, Dailies, the Wiki, and many high-quality assets free of charge. To enable the team to create and release more free content, you can support us here: Support CAVE Academy