
Search the wiki
VFX Onset Directory

Resources
Here is a zip file containing the basic folders that you can download and experiment with:
Introduction
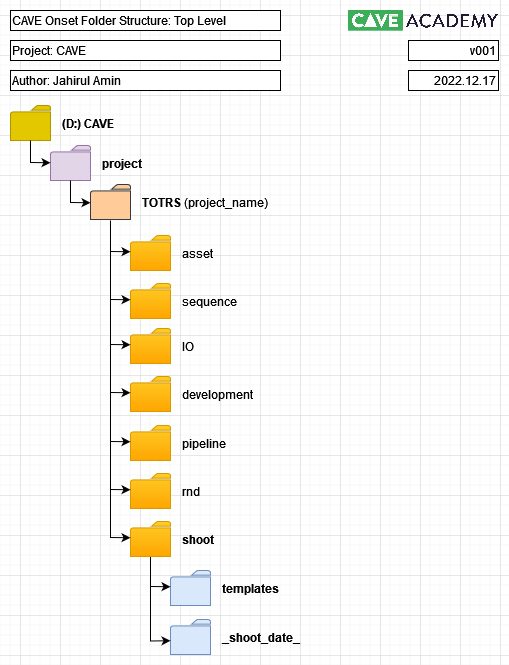
The onset directory is where we will handle all the data captured whilst onset. Later on, this data will be ingested into the /IO folder before being published to the relevant asset or shot.
Windows 10 Path Length Limitation
If you are using Windows 10, you’ll find that there is a default 256 character path limitation. For the directory structure below, you’ll need more than 256 characters, so you’ll be able to enable long path names by doing the following:
Shoot Directory
The /shoot directory consists of 2 main folders:
- templates: here you will find all the templates that you will use on a regular basis (more info below)
- _shoot_data_: this folder you will need to duplicate and rename for each shoot day. You should rename the folder using our standard date naming convention, which is YYMMDD (for example, 221217 or 221220)
Templates
The /templates directory contains a series of folders that you’ll need to copy and paste into the relevant asset, shot, lens grid or grain directory as you progress through a shoot. For example, if you are working on a new character asset (let’s say Jane Doe), you can copy the _asset_chr_template_ into the shoot date folder under …/asset/chr/

Shoot Date
The _shoot_date_ directory is the template for the day. We could have moved this into the templates folder but find it is simpler to copy and paste from the top level. When you are starting a new shoot day, simply copy the _shoot_date_ folder and rename it to match the shoot day. You should rename the folder using our standard date naming convention, which is YYMMDD (for example, 221217 or 221220).
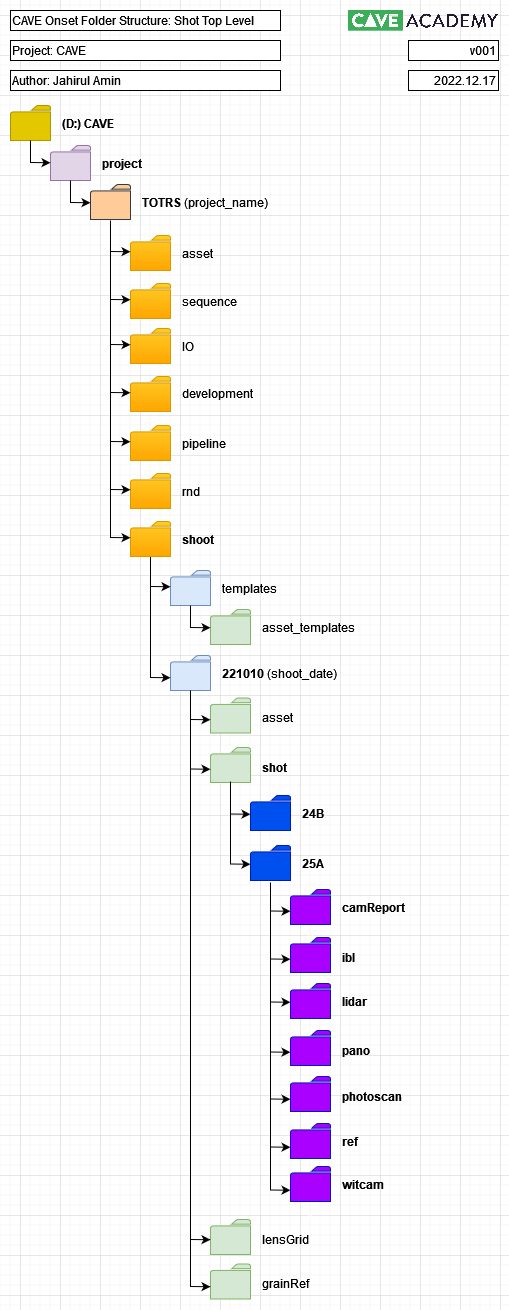
The _shoot_date_ folder contains the following directories:
- backup: at the end of each shoot day, all the raw, untouched data should be copied into this folder.
- asset: you should use series of folders to sort your captured asset data. This data should be a copy of the data from the backup directory.
- shot: you should use series of folders to sort your captured shot data. This data should be a copy of the data from the backup directory.
- lensGrid: you should use series of folders to sort your captured lens grid data. This data should be a copy of the data from the backup directory.
- grainRef: you should use series of folders to sort your captured grain reference data. This data should be a copy of the data from the backup directory.

Each _shoot_date_ folder should have a backup directory, and then you’ll only need the additional folders based on what was captured for that day. For example, if you only capture asset data on the 221219, then you’ll only need the asset folder.

Backup
For each backup directory, you should store all the shoot data from that day. Please do not edit, cut or rename any of the data in this directory. Leave it as you shot it. Create a folder for each camera and then each memory card. Each camera should be named like so:
- camA
- camB
- witcamA
- witcamB
…and then each memory card should be named like so:
- card001
- card002
- card003

Asset
The remaining folders (/asset, /shot, /lensGrid and /grainRef) are for you to use to sort your data (ideally at the end of each shoot day). As mentioned above, you should copy (not cut) the data from the backup directory and sort the data, so it is clear for the ingest team and the processing team what is what.
The /asset directory is for characters, creatures, props, environments, etc. For the most part, the templates for the each asset type is the same, however, there is a slight difference within the /evr directory. It is also important to note that if you capture reference of an environment (for example studioA) that you’ve captured for a series assets within (for example props), then you should still store the environment data under /evr. Just make sure to capture some notes so we know which assets were shot within which environment.

Here is the full breakdown of the folders for a character directory (this is the same for crd, crt, prp and veh . The primary directories are:
- handScan: anything scanned with a hand scanner (for example, using the Faro Quantum ScanArm).
- lidar: anything scanned using a LiDAR scanner.
- lookdev: any look development reference. This includes a clean plate, unpolarised photography and video reference.
- photoscan: and photos to be used for photogrammetry
- ref: any additional reference, including text notes, drawings and diagrams
- texture: for all texture reference. This includes polarised and cross-polarised photography.

As you can see, we’ve got take directories (tk001, tk002, etc.), and in some cases, we’ve split things into slate, macbeth (which is for grey and chrome balls too) and stills (for the main set of images for the take). We’ve also split jpg and raw, so it is simpler to work with the data in post-production.
For environments, we’ve got the following primary directories:
- ibl: for full 360 HDRI panoramas and HDRI light maps.
- lidar: anything scanned using a LiDAR scanner.
- lookdev: any look development reference. This includes a clean plate, unpolarised photography and video reference.
- pano: for any panoramas (primarily for DMP work)
- photoscan: and photos to be used for photogrammetry
- ref: any additional reference, including text notes, drawings and diagrams
- texture: for all texture reference. This includes polarised and cross-polarised photography.

Shots
For each shot, we’ll create a top-level slate directory (for example: 24B, 25A). You should ensure the naming of this directory matches the slate name.
For shots, we’ve got the following primary directories:
- camReport: this directory is for the camera report sheets.
- ibl: for full 360 HDRI panoramas and HDRI light maps.
- lidar: anything scanned using a LiDAR scanner.
- pano: for any panoramas (primarily for DMP work)
- photoscan: and photos to be used for photogrammetry
- ref: any additional reference, including text notes, drawings and diagrams
- witcam: for all witness camera data.
Similar to the asset side of things, we’ve broken things down by take, however, this time, feel free to add a description to the directories (for example, the lens focal length).

Lens Grid
At some stage, lens grids will need to be captured. This set of directories is split between each lens and take.

Grain Reference
Our last set of directories is for grain reference. This is split between cameras and ISO values.

Support CAVE Academy
Here at CAVE Academy the beauty of giving and sharing is very close to our hearts. With that spirit, we gladly provide Masterclasses, Dailies, the Wiki, and many high-quality assets free of charge. To enable the team to create and release more free content, you can support us here: Support CAVE Academy