
Search the wiki
Production Statuses

Resources
If you are looking to make any tweaks, you can download a zip file containing the flowchart here:
Introduction
In order to track each element through a production, we’ll be using the statuses listed below. To give some context to WIP, version and published files, here is a quick summary of how we’ll be dealing with the data:
- wip: this will contain user work-in-progress files. These files should not be passed down the pipeline.
- versions: All versions submitted for review will be placed within this directory. The files should not be passed down the pipeline.
- published: this will contain all published files which will be passed down the pipeline to other departments. We’ll be looking to copy the latest and approved version file into this folder. The version number should be stripped out of the file name.
…and for more information on the topic, please take a look at the following doc:
- VFX Asset Directory – Here you will find information on where we store asset data for VFX projects, covering published, versions and wip files.
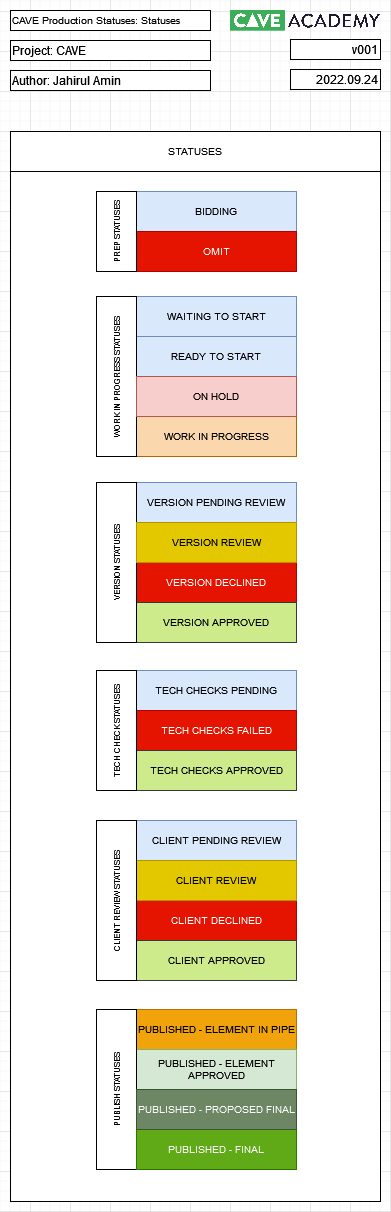
Statuses
This is the full set of Statuses we’ll be using throughout the lifecycle of an element. They will be used in applications such as ShotGrid or FTrack to manage and inform the team of the current status of an element.
We’ve broken the statuses down into the following groups:
- PREP STATUSES: Statuses for an element that we are either bidding on or it has been omitted.
- WORK IN PROGRESS (WIP) STATUSES: For elements that are currently being worked on. If any element is declined (either by an internal or client review), then it will be pushed back to WIP.
- VERSION STATUSES: When a WIP file is ready to be reviewed, a version should be created. This version can then be submitted to an internal Dailies session.
- TECH CHECK STATUSES: With a version approved, it can move on to being tech checked. This is to ensure it is pipe-friendly.
- CLIENT REVIEW STATUSES: Once a version has been internally approved and passed the tech checks, it can be submitted to a client Dailies session.
- PUBLISH STATUSES: When a version has been internally approved, it can go through tech checks, be published, and (fingers crossed) be signed off by the client. If all goes to plan, we can finalise the published element.
Here is a short summary for each status:
Prep Statuses
- BIDDING: We are bidding on the element.
- OMIT: The element has been omitted from the project.
Work In Progress Statuses
- WAITING TO START: We are waiting for additional data. Maybe a photoscan, or some reference images or scale reference. Could be anything.
- READY TO START: We have all the info we need to begin the element.
- ON HOLD: For some reason, our internal supe team or the client has asked us to pop the element on hold. Make sure to find out why.
- WORK IN PROGRESS: We are working on the element.
Version Statuses
- VERSION PENDING REVIEW: We have created a version and have submitted it to internal Dailies for review.
- VERSION REVIEW: The version is being reviewed internally.
- VERSION DECLINED: The version has been declined. Go back to WIP.
- VERSION APPROVED: The version has been internally approved. We can now perform tech checks so we can publish the element.
Tech Check Statuses
- TECH CHECKS PENDING: The version has been internally approved but we have yet to apply the tech checks.
- TECH CHECKS DECLINED: The version has failed the tech checks. You can still use it in the pipeline but with the status of PUBLISHED – TECH CHECKS FAILED.
- TECH CHECKS APPROVED: The version has successfully passed tech checks and the status can be updated to PUBLISHED: ELEMENT APPROVED.
Client Review Statuses
- CLIENT PENDING REVIEW: The version has passed tech checks and has been submitted to the client for review.
- CLIENT REVIEW: The client is reviewing the element.
- CLIENT DECLINED: The client has declined the element. You can continue using the element in the pipeline with a status of PUBLISHED – ELEMENT IN PIPE, however, it now needs to go back to WIP, so the requested tweaks can be made.
- CLIENT APPROVED: The client has approved the element. Success! We can now change the status to PUBLISHED – FINAL (so long as the tech checks have been completed).
Publish Statuses
- PUBLISHED – ELEMENT IN PIPE: The element has been internally approved but has failed tech checks. Feel free to use it in the pipeline but DO NOT send this to the client for review.
- PUBLISHED – ELEMENT APPROVED: The element has been internally approved and has passed tech checks. You can use this internally in the pipeline and it can be sent to the client for review.
- PUBLISHED – PROPOSED FINAL: The element is on it’s way to the client for review. This could be either an ELEMENT IN PIPE or ELEMENT APPROVED file (we would prefer the latter).
- PUBLISHED – FINAL: The element has been internally approved and client approved. Lock this down.
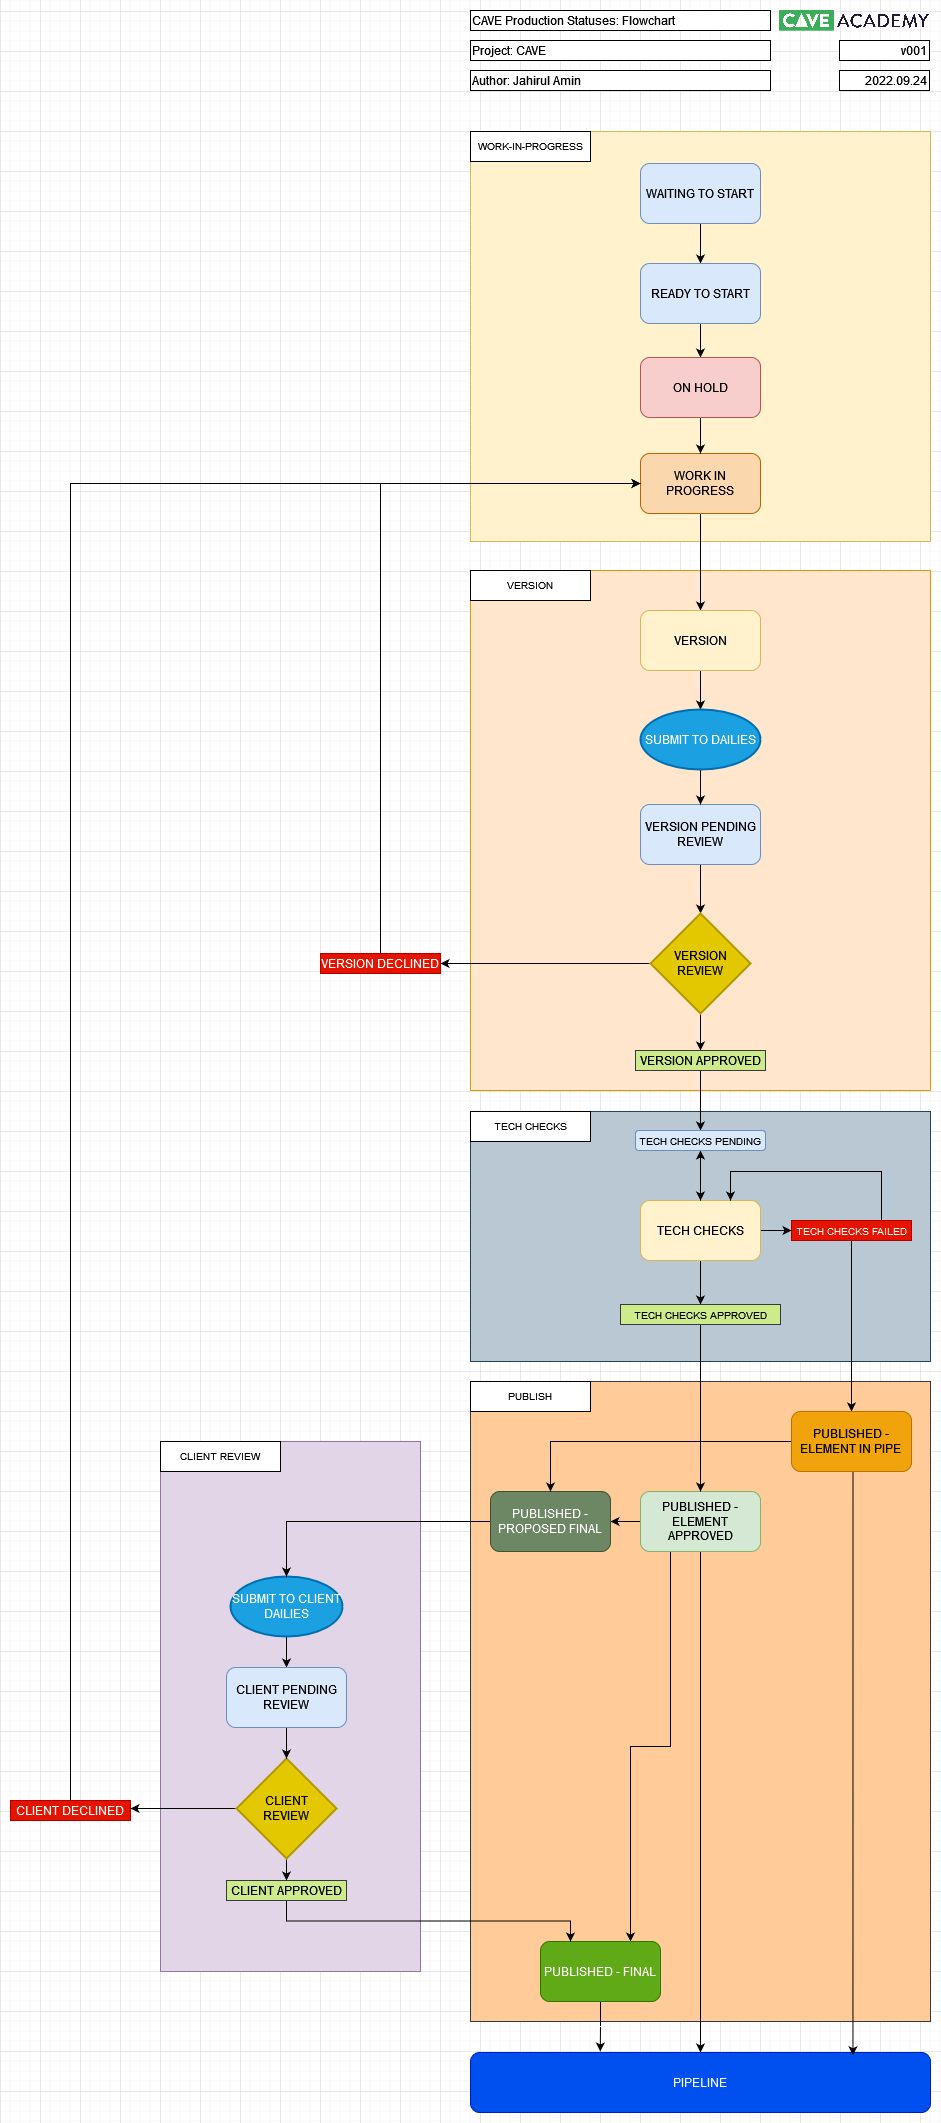
Production Flowchart
This flowchart gives a breakdown of the different stages of an element and how we go from WIP to PUBLISHED – FINAL. For certain departments, we may need to introduce additional steps but we’ll see how we go for now.
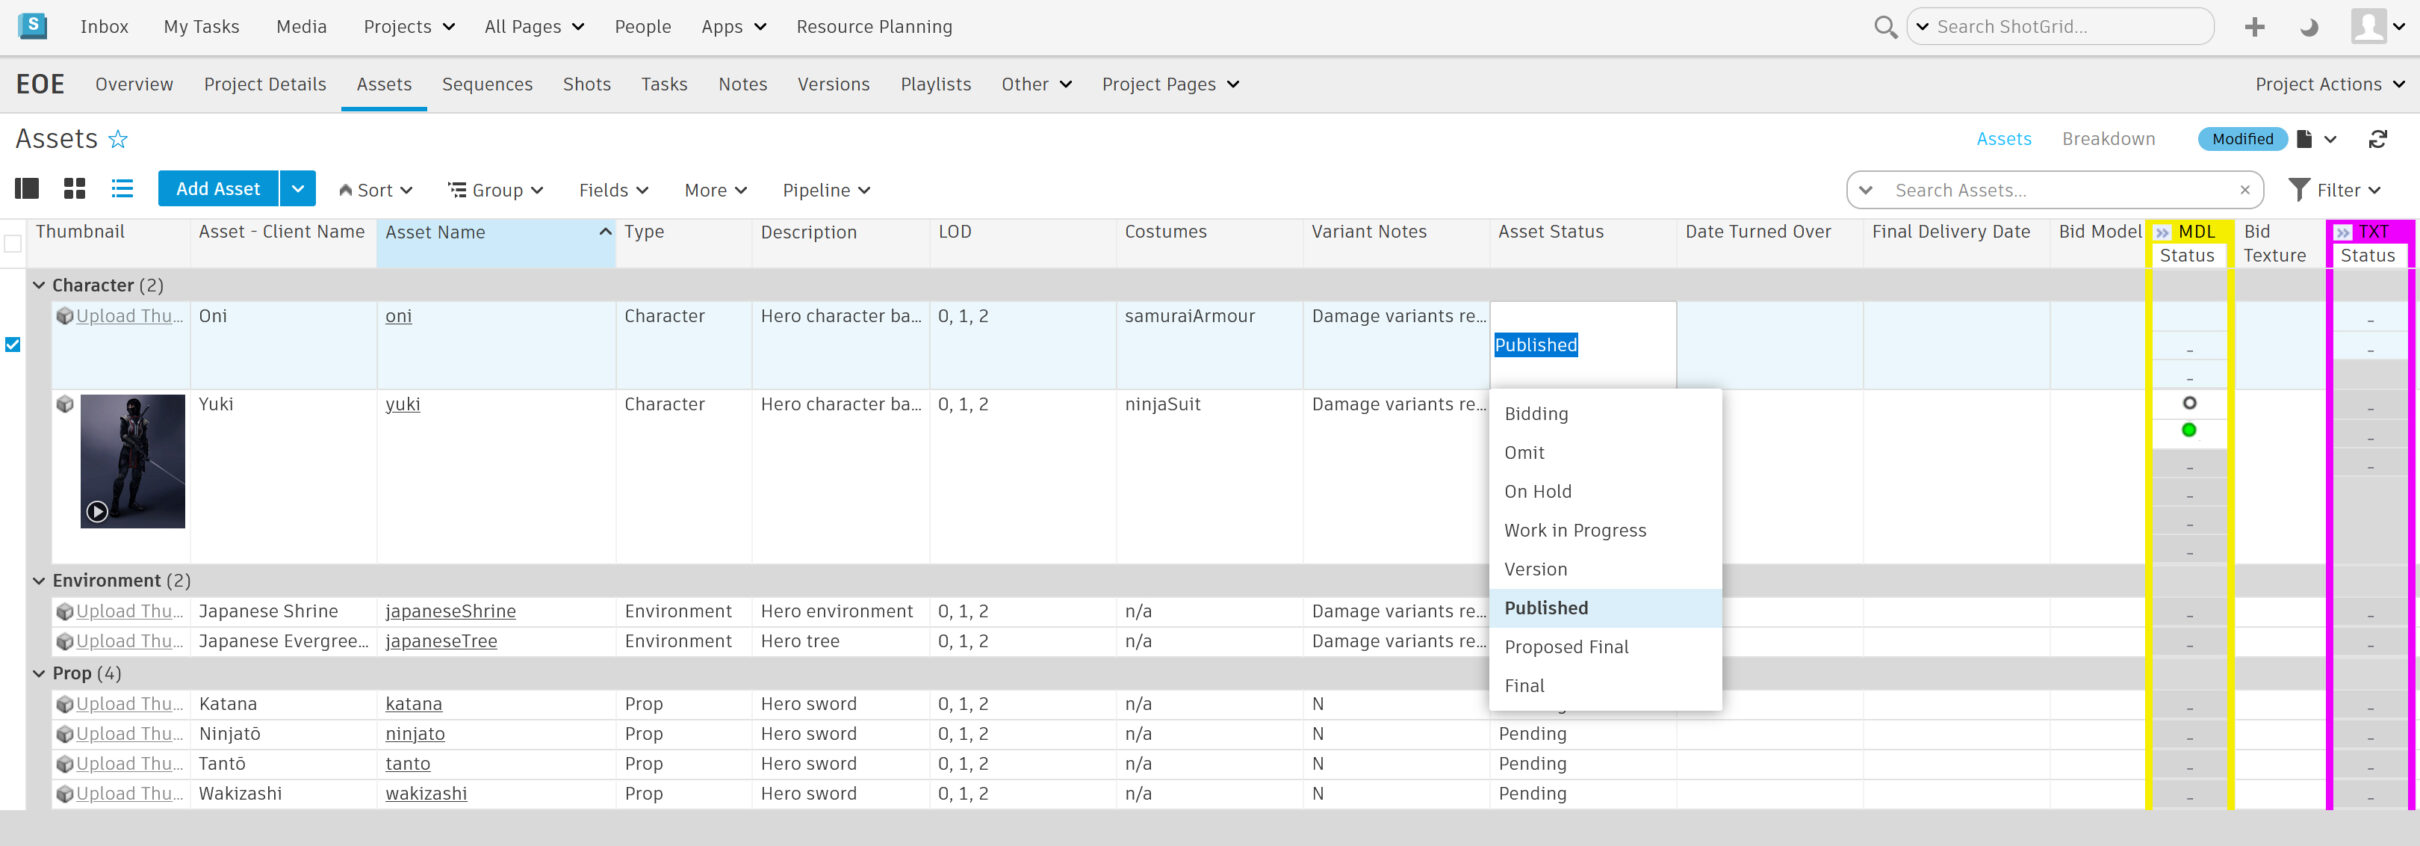
Asset, Discipline, Version and Publish Alignment
In ShotGrid, it is possible to change and configure the status of an element at the following points:
- Asset/Shot Status: Top level info and what we’ll usually be sharing with the client.
- Discipline (Model, Texture, Rigging, Animation, Lighting, etc.) Status: The current status for an element of a particular stage in the pipeline.
- Version Status: The statuse for an individual version of an element (includes tech checks).
- Published Status: Info on the published file (which should reference an approved version).
We’ll be looking to sync specific statuses across the points. For example, when FINAL is triggered at an Asset/Shot level, this should trigger PUBLISHED – FINAL for the Discipline and Publish Status of an element.

Asset/Shot
The Asset/Shot stage is what we’ll be presenting to the client. These are the top-level statuses. The data we’ll be sending to clients will be pretty much completed assets or shots (or what we consider to be close to final). For example, we won’t be sending them an animation blocking file or a model blocking file. On some occasions, the client may want to be more hands-on and see things at an earlier stage, and if so, we can tweak our workflow.
Discipline
These statuses are per Discipline (for example, how is the Model doing, or how are we when it comes to Layout). We’ll be using these statuses to inform others of where the element is in the creation process.

Version
These statuses are on a per element basis. They’ll describe primarily if a version has passed an internal Dailies session and if it does, then how is it doing regarding the Tech Checks.

Published
A version that has been approved internally can then be referenced to the Publish file. We’ll only have one publish file per element. These statuses will inform others that they can pick the asset up and if the element has passed Tech Checks. These statuses should sync up with the Discipline statuses, so we can easily see the status for each Discipline from the main Asset/Shot ShotGrid page.

Model Example
Taking the above notes, here is the workflow for a model passing through production. In this example, v001 successfully makes it through to PUBLISHED – FINAL – which would more than likely never happen.

Animation Example
And here is an example of the journey of an animation element. This time, v001 failed to be approved internally, so a v002 was created and passed through. Again, we’d expect more back and forth, especially when the client gets involved, so this is an extremely simplified journey. Please note that we’ve not added stages such as ‘Blocking’ as we expect such stages to be done as the norm as part of the genenral submission.

Further Reading
- VFX Project File Structure – This following docs will break down the project folder structure we are adhering to at CAVE Academy for VFX-based projects.
VFX Production Training
For more information on all things Production related, you can check out our courses here:
The Connection Programme
If you are a fan of mixing science with art, or maths with creative thinking, then join our Connection Programme, where we’ll be exploring VFX, animation and games from the core fundamentals:
Support CAVE Academy
Here at CAVE Academy the beauty of giving and sharing is very close to our hearts. With that spirit, we gladly provide Masterclasses, Dailies, the Wiki, and many high-quality assets free of charge. To enable the team to create and release more free content, you can support us here: Support CAVE Academy