Search the wiki
Feature Animation Colour Pipeline
Suggested Reading
For CAVE CG Animation projects, we’ll be implementing an ACES colour pipeline. This is to ensure we work consistently across projects for all things colour related, and so that we have a larger gamut of colour to play with.
If you are new to ACES, it can be a pretty intimidating subject. Anything colour related is a hot potato in the CG world I find. Lukily for us, there are many docs and videos on ACES, from technical explanations to more artist-facing walkthroughs, so if ACES is new to you, I recommend you work through the following docs to become more acquainted with ACES:
CAVE CG Animation ACES OCIO Config
At CAVE, our colour team have put together a modified version of what you’d typically find online. This is a simplified config to create less confusion when setting things up, and has been tailored for better results when displaying content on sRGB monitors for output.
You can download the CAVE config from the shop here: CAVE_cgAnim_slim_aces_ocio_config
There are two colorspaces in this config:
- Utility – sRGB – Texture: which is the sRGB Gamma curve and the sRGB primaries (so normal sRGB)
- Utility – Curve – sRGB: which is the sRGB Gamma curve but uses the ACES2065-1 primaries (AP0)
The first space (Utility – sRGB – Texture) will match most normal texture uses (hence the name) and will make interchange between apps such sa Substance Painter/Mari simpler. The latter (Utility – Curve – sRGB) uses the sRGB gamma curve but uses wide gamut primaries, and would make interchange with Substance Painter/Mari more complicated. For most cases, we should be able to stick with: Utility – sRGB – Texture
…and I’d also recommend you download some colour checker charts to test your setup. For the below walkthroughs on setting up Maya, Nuke, etc, I’ll be using the ACEScg_ColorChecker2014.exr chart that has been very kindly provided by colour-science here: ColorChecker2014
Setting up your Applications
If you only need to stick to one config, you can hook this into your environment variables. However, as we’ll be working on a mix of VFX and CG Animation projects at CAVE, we’ll occasionally switch between different configs, and therefore we’ll show you how to manually set up your applications. In the future, we’ll be looking to create a set of tools that will automate this process.
Maya
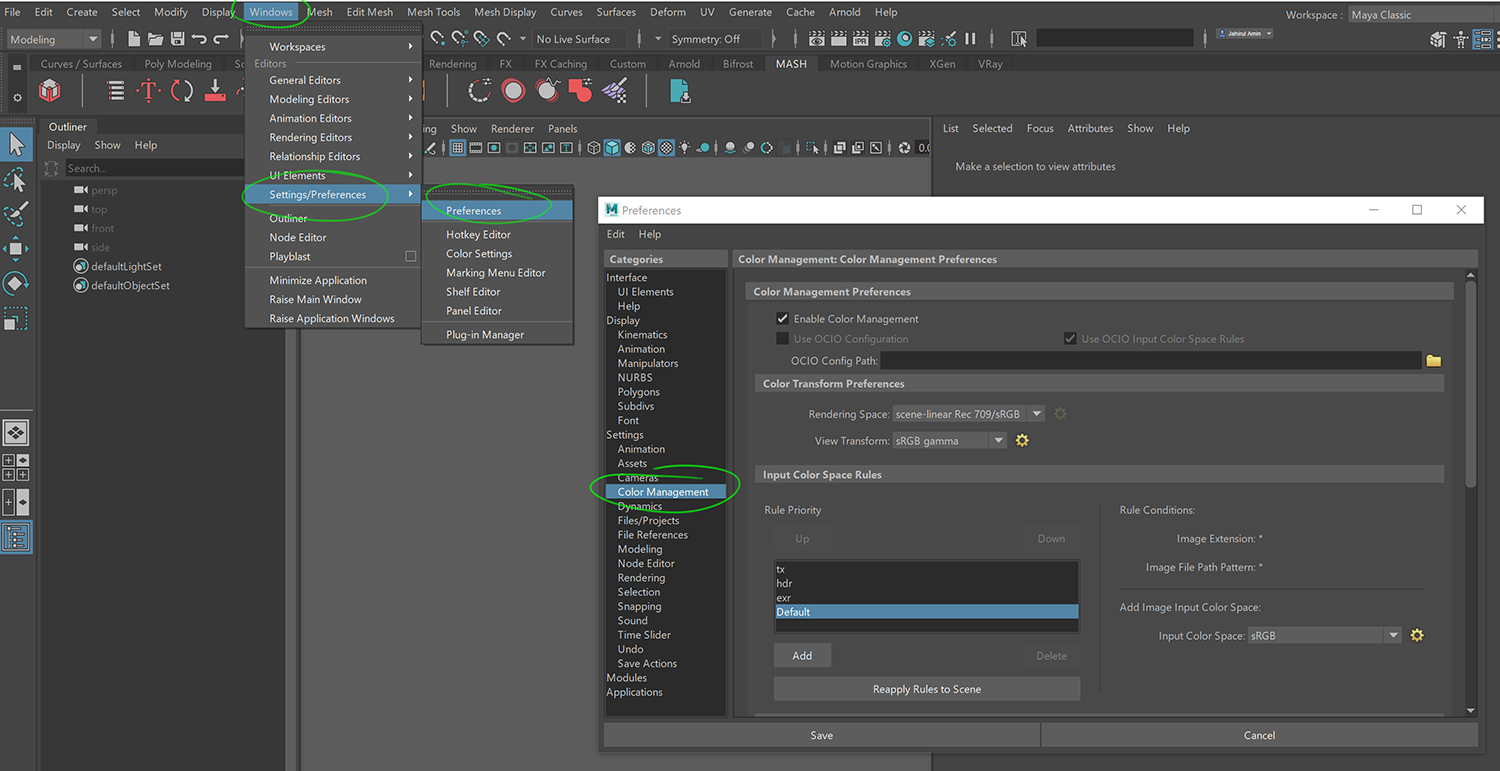
Launch Maya and set your project. Next, go Windows > Settings/Preferences > Preferences, and click on the Color Management catergory.
Click on the folder icon to the right of OCIO Config Path and then select the config.ocio from the CAVE_cgAnim_slim_aces_ocio_config:
Make sure Use OCIO Configuration is enabled and check your Color Transform Preferences are set to:
- Rendering Space: ACES – ACEScg
- View Transform: sRGB (ACES)
If you click on the View Transform drop-down, you’ll notice we are only making available 3 transforms: sRGB (ACES), Raw (ACES) and Log (ACES).
The next thing to do is check that all looks good in the render. Below are the steps to create a macbeth geometry plane, and you can also grab the macbeth geo that I am using here: CAVE_prop_macbeth_model_prim_default_lod1_v001
Start by creating a polygon plane (Create > Polygon Primitive > Plane) and set the following:
- Width to 27.900
- Height: 21.000
Rename this plane to macbeth_GEO.
Next, hold down the right-mouse-button (RMB) over the plane and go: Assign New Material, and then select the aiFlat shader. In the Attribute Editor, rename the shader to: macbeth_MAT and then click on the checker input icon for Color.
Next, select File and then add the ACEScg_ColorChecker2014.exr to the file input. As this is an exr file, make sure to set the Color Space to ACES – ACEScg. In the viewport, hit 6 to jump to textured mode and if the macbeth texture looks a bit funky, you’ll probably need to update the UVs on the geo.
Now to test this in render.
Maya/Arnold
Frame your macbeth chart and then launch the Arnold render window by going: Arnold > Arnold RenderView
Make sure the View Transform is set to sRGB (ACES) and hit render. If you get something like this, then you are good to go:
For more information on ACES Workflows in Maya/Arnold, check out the official docs here: Maya/Arnold ACES Workflow
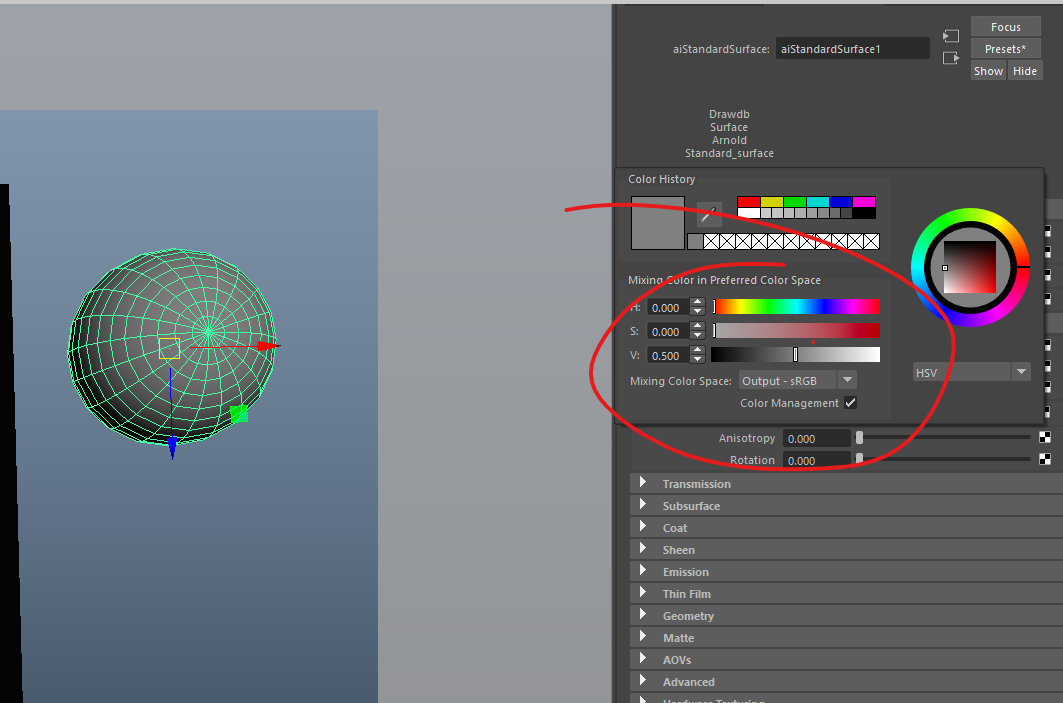
Colour picking in Maya
- color_picking: Output – sRGB
Nuke
In Nuke, hit the S key on the keyboard to bring up the Project Settings window (or go Edit > Project Settings).
Then set the OCIO config to custom, and load the config.ocio file into the custom OCIO config slot.
To see how this looks on the colour checker image, drop down a Read node (R) in the NodeGraph and load ACEScg_ColorChecker2014.exr. Make sure the Colorspace is set to scene_linear (ACES – ACEScg) on the Read node, and your viewer lut is set to sRGB (ACES). Then press 1 on the keyboard to plug the image into the viewer and hopefully you get something like this:
Houdini
Coming soon!
Mari
Coming soon!
Substance Painter
Coming soon!
Substance Designer
Coming soon!
Photoshop
Coming soon!
Resolve
Coming soon!
Support CAVE Academy
Here at CAVE Academy the beauty of giving and sharing is very close to our hearts. With that spirit, we gladly provide Masterclasses, Dailies, the Wiki, and many high-quality assets free of charge. To enable the team to create and release more free content, you can support us here: Support CAVE Academy


Thanks for sharing, It’s very helpful.
thanks for sharing!
A question regarding sRGB jpg-Textures in Maya/Arnold:
They look wrong when using the sRGB-Texture setting. When I use Output-sRGB it’s fine.
Is this normal and correct? Because I read everywhere to use sRGB-Texture. (it’s the same with the original Aces config)
Hey Tino, I can’t attach images to this discussion, so I’ve dropped an image here: https://discord.com/channels/756703913054306384/757342792170078370
…I guess it all depends on your inputs and outputs and what colour space you’ve created your textures in and what not. In the image I added to the Discord, I grabbed 2 Macbeth charts from the ‘colour-science’ gitHub: ACEScg_Labels_ColorChecker2014.exr and sRGB_Labels_ColorChecker2014.exr
ACEScg_Labels_ColorChecker2014.exr I set to ACES – ACEScg
… and sRGB_Labels_ColorChecker2014.exr I set to Utility – Linear -sRGB.
Both give me the same result and what I’d expect.
Hi Jahirul,
Can you please send a link for “ACEScg_Labels_ColorChecker2014.exr” and ” sRGB_Labels_ColorChecker2014.exr” as I’m not able to find on gitHub. Thanks!
Hi Ashish, you can find the charts here:
https://github.com/colour-science/colour-nuke/tree/master/colour_nuke/resources/images/ColorChecker2014
Thanks
J
Hey Tino,
Yes you’re correct, to view sRGB textures (jpeg/png) in ACES you’ve to keep the IDT to Output-sRGB but the thing is it doesn’t clamps the values and can give you value above 1. So how I work is like I keep my diffuse maps in Output-sRGB but keep the data maps as sRGB-Utility-Texture as we anyway tweak them as per our needs and also the map is clamped. My method can be wrong too and I would like to know more about ACES.
Hi, thank you for sharing this valuable information.
I see slightly different colours when I render in Redshift(brighter and less contrast) with the same settings.
Are you planning to make a tutorial for Redshift in Maya, too? Or is that as easy as just commenting in here? 🙂
Thank you!
Oh ok, I just read the part in the An Idiot’s Guide to ACES and learned about the trouble for Redshift.
Thanks!
Hey Nur,
Glad to hear you found a solution. We will be looking to document each renderer but this wil take a bit of time to get round to doing so. If you’ve managed to set things up and are happy to send through screen grabs with some step by step text, then that would be amazing and we’d be able to get things documented quicker.
Thanks
J
thanks for sharing!
More awesome content like this! thx!
Great stuff, gold mine for me the new guy stepping it up.