
Search the wiki
03. Introduction to Animation in Maya

Resources
The following zip file contains all the Maya scene files and some reference videos.
Introduction
This tutorial is going to be the first in a series which will take you through the first steps of animating in CG.
I’ll be using Maya but the same principles and techniques can easily be transferred over to whichever package you prefer. This month we’ll focus firstly on setting some foundations: introducing tools such as the Graph Editor, the Dope Sheet and Motion Trails, and secondly we’ll be using these tools to animate a bouncing ball.
So the main outcome of this first tutorial is an animated bouncing ball. It’s an exercise which may initially seem simple but which is an invaluable first step. The bouncing ball demands an adherence to some of the key principles of animation, namely timing, spacing, weight and squash and stretch. Also though, the motion created by the ball may be seen as a somewhat primitive precursor to a moving character, making the bouncing ball exercise a useful preparation for a walk cycle. Finally, the exercise will help you get used to some of the animation tools in Maya such as the ones mentioned above.
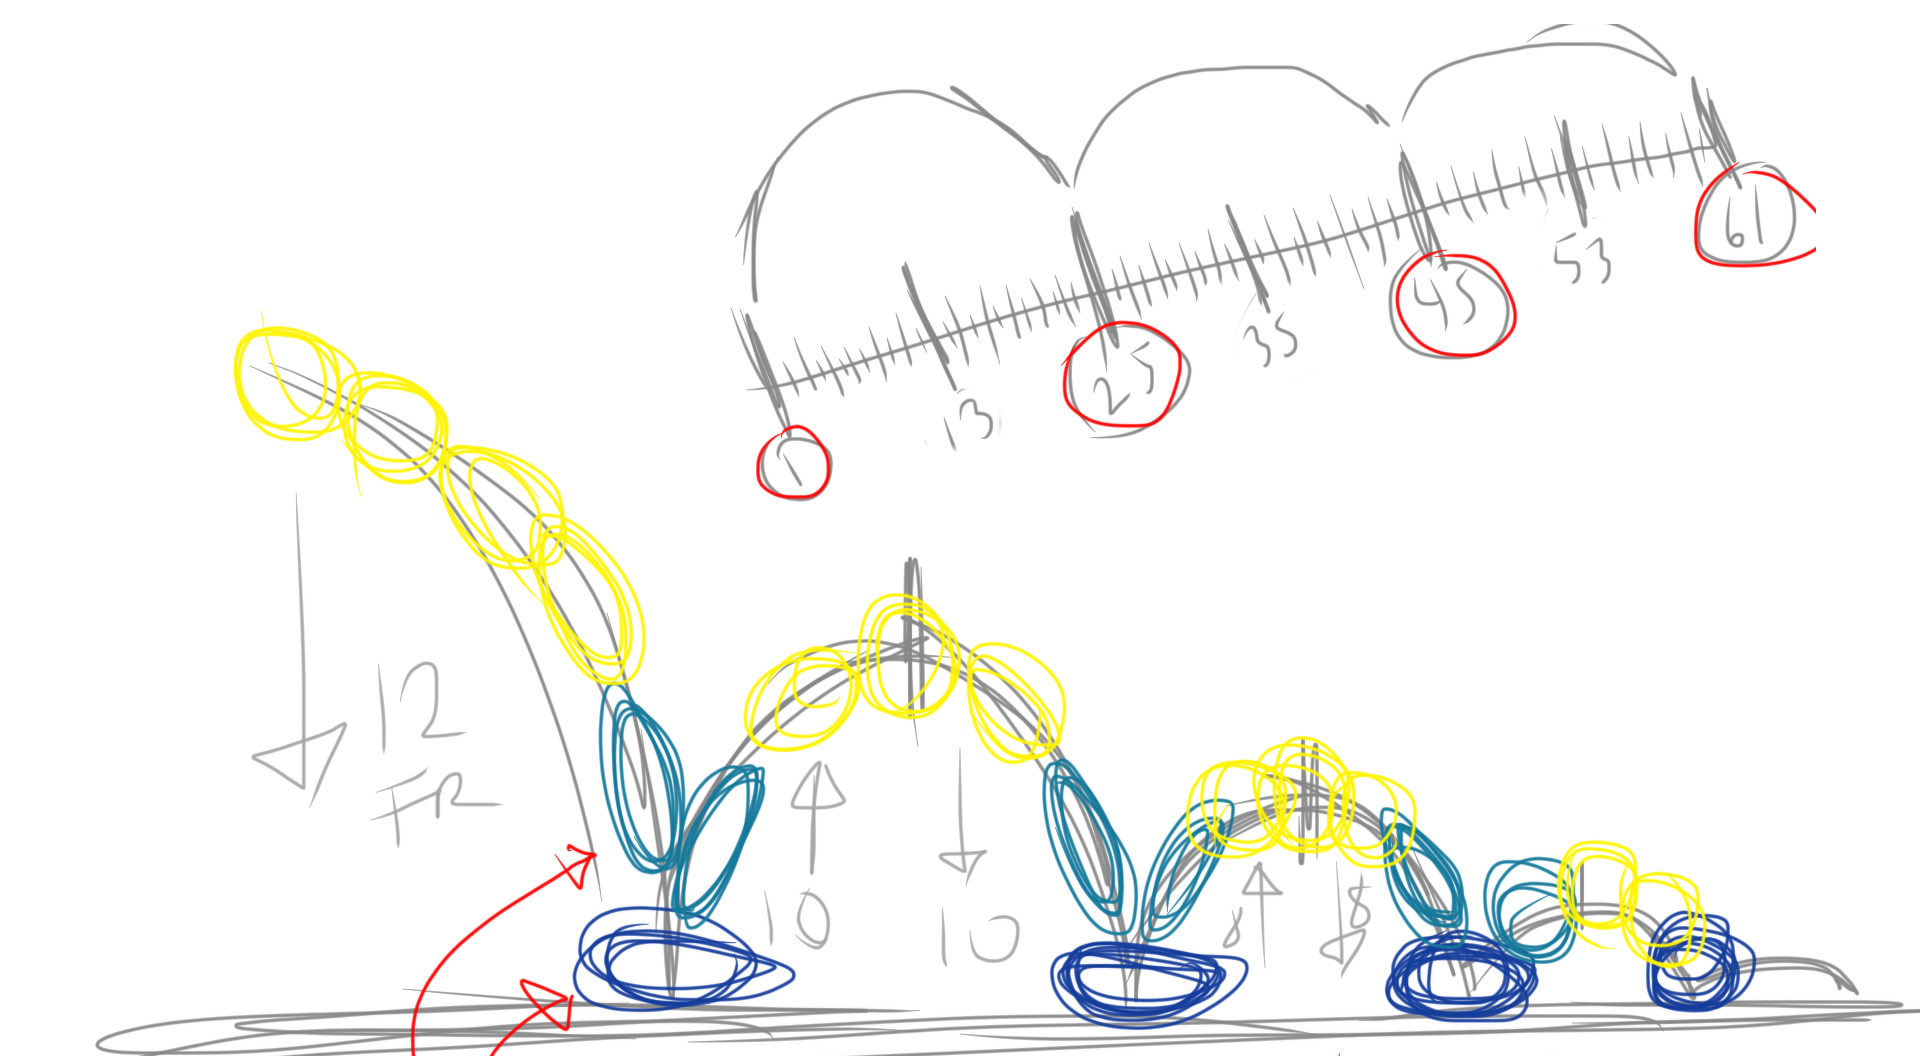
As with all animation, getting good reference is the essential first step. Watch how different kinds of balls drop and bounce. Compare the behaviour of the different ball and see Newton’s Laws of Motion in action. Film the balls bounce then watch them over and over. Take your footage into the fabulous and utterly free Kinovea, break it down and draw over it to get a feeling for the key poses, timing, spacing, the way the balls lose energy and so on.

It’s essential to note that while observing reality is vital, it’s not absolute reality that you’ll need to recreate in CG. Bizarrely, a totally faithful mimicry of reality actually looks unreal. You’ll need to push the poses, as what’s imperative is that the movement looks and feels right, not that it is “mathematically” correct.
I personally find that before beginning to animate in CG, planning on paper really helps. The “organic” nature of paper and pencil lends you complete freedom to plan and explore ideas. The rig, however well created, will always be something that you will have to work around to maximise its potential. This can feel like a restriction on your creative freedom.
Then it’s time to take it all into Maya, or your preferred package, and get animating in CG. Regarding a general approach to animating, I like to first block in the Golden Poses, making sure that the poses are clear and readable for the audience. I then move on to getting the timing right. Finally I refine it. Then I refine it some more. Next I refine it again. Do you get my point about the importance of refining?!
As this exercise uses a ball rather than a character with arms and legs, we’ll break down the process into first working on the translation of the ball, then the rotation and lastly adding squash and stretch. Squash and stretch, by the way, is something that can be overused; it is important that the audience feels it as opposed to actually seeing it.
To animate the bouncing ball, we’re going to keep our animation curves in Spline Mode, though Clamped is also fine. The reason for this is that we need to see the transitions from pose to pose and the arcs that are thereby created. Having smooth, clean arcs adds fluidity and keeps things moving naturally.
As mentioned before, one of the tools that you’ll meet during the next ten steps is the Graph Editor. This tool is a visual representation of each keyed attribute and the interpolation between key frames, and though it may at first seem intimidatingly complex, get to know it and it’ll be your best friend for life. The Graph Editor allows you to do a million and one things from shifting key frames to cleaning up Motion Capture data. It lets you do these tasks in often the most efficient way possible. So it’s well worth getting past its perhaps off-puttingly technical appearance to find its inner charm.
A second tool we’ll look at is that Dope Sheet, which would be called the Exposure Sheet in 2D. It’s a device for shifting keys around to rework timing so it comes in very handy when blocking out a shot.
For this exercise I’ve provided a ball rig. It’s pretty simple, but you’ll find it will be able to do what you need it to do. There’s no sense overcomplicating a rig: make it fit for purpose. I’d have a quick play around with the rig to make yourself comfortable with it before beginning the exercise.
As a last point before we get going into the ten steps, I would really advise you to get feedback on how your animation is looking throughout the process. A fresh pair of eyes can help you to identify areas that may need reworking. If no fresh eyes are available, leave your work for a while, refresh your own eyes, and compare your work again with your all important reference.
Reference Videos
Step 01: Animation Preferences
Open up the scene file ‘bb_start.ma’ and go Window>Settings/Preferences>Preferences. In the Preferences panel highlight Settings and change the Time to PAL (25 fps). I work primarily in PAL but you will need to adjust your settings in accordance with your regional requirements. Next highlight Animation and change the Default in tangent and Default out tangent both to Spline. Then highlight Time Slider and change the Playback Speed to Real-time [25 fps]. When changing your animation time units, you will find that Maya will either compress or expand your current Playback Range, hence the importance of checking these settings before you start animating. Set the start time of your playback range to 1 and the end time to 80.

Step 02: Setting Keys
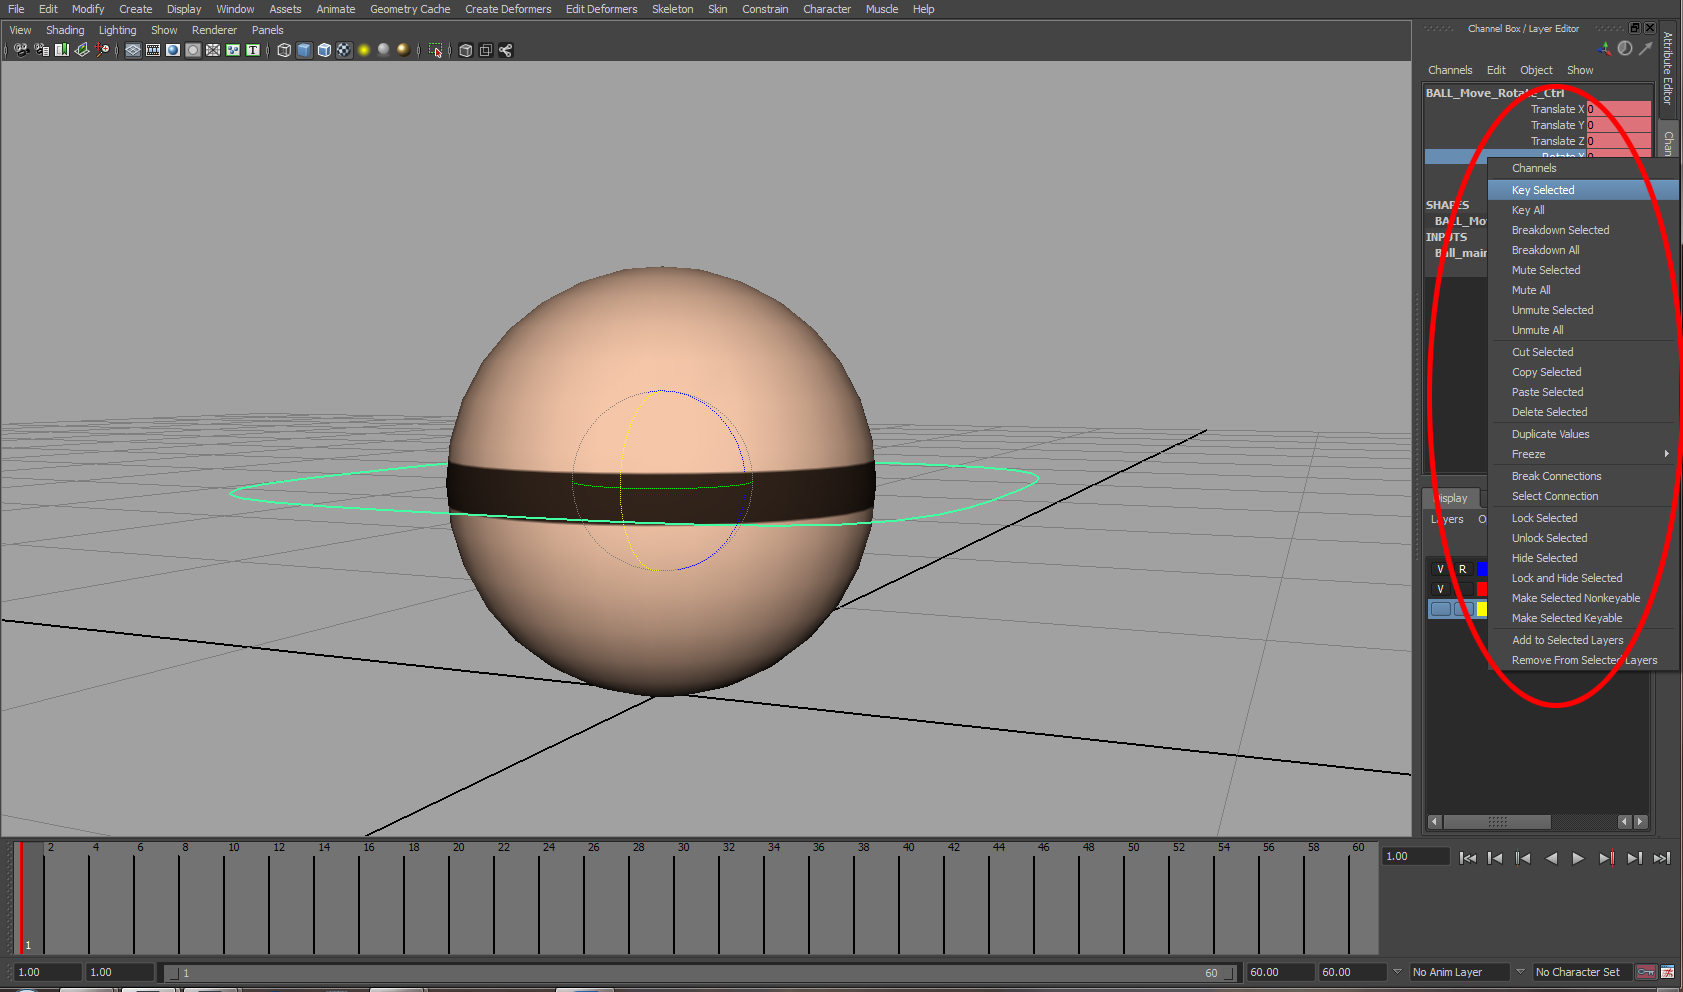
When setting keys it is important firstly to move to your desired frame, then move/rotate the object and then set the key. To set a key, you can hit the ‘S’ on your keyboard. This will put a key on all the attributes in your channel box as well as a notch on the Timeline. There may be occasions where we would only like to key specific channels. To do this, we can highlight an attribute in the channel box, hold the right-mouse button over it and go Key Selected. We can also key all the translate attributes solely together by hitting Shift+W. The same works for Shift+E for the rotate channels and Shift+R for the scale channels.
Step 03: Playback Settings
Now, on the bottom left of the screen, you will see the Playback controls. I find it more efficient to use shortcuts so here are some useful ones. To play your animation you can hit Alt+V. If you place your mouse pointer in the viewport, you can also scrub through the Timeline by holding down the ‘K’ key on the keyboard and left-mouse dragging in the viewport. Holding down the Alt and pressing the comma or full-stop on the keyboard will also allow you to scrub frame by frame. Another useful shortcut is to go from keyframe to keyframe. To do this, make sure the object has some keys on it and press comma or full-stop on the keyboard.
Step 04: The Graph Editor
To open up the Graph Editor, go Window>Animation Editors>Graph Editor. Navigation in the Graph Editor is the same as in the 3D viewports. Use Alt and the middle-mouse button to Pan and Alt and the right-mouse button to zoom in and out. On the left you will see the object you currently have selected and all the channels that have keys on them. Running up the vertical, we have the value of the attributes and in the horizontal, we have the time. Make sure you have the move tool activated and select a key. By middle-mouse dragging you can re-position that key in both value and time. You will also notice that two tangent handles are also editable for each key allowing you to easily control the spacing and the behaviour of the movement whilst preserving your timing.

Step 05: The Dope Sheet
Open up the Dope Sheet by going Window>Animation Editors>Dope Sheet. Again navigating in here is the same as the Graph Editor and the 3D viewports. With the Move tool activated, you can highlight any of the keys and with the middle-mouse, drag them to re-work the timing. You can move keys on individual channels as well as globally by editing the top most notch. By holding down the right-mouse button over a key, we have another heap of editing options such as copy, cut and paste. To save you having to drop down to the timeline to play or scrub through your animation, you can hold down the ‘K’ and left-mouse drag in both the Dope Sheet and the Graph Editor for playback.

Step 06: Let’s start bouncing
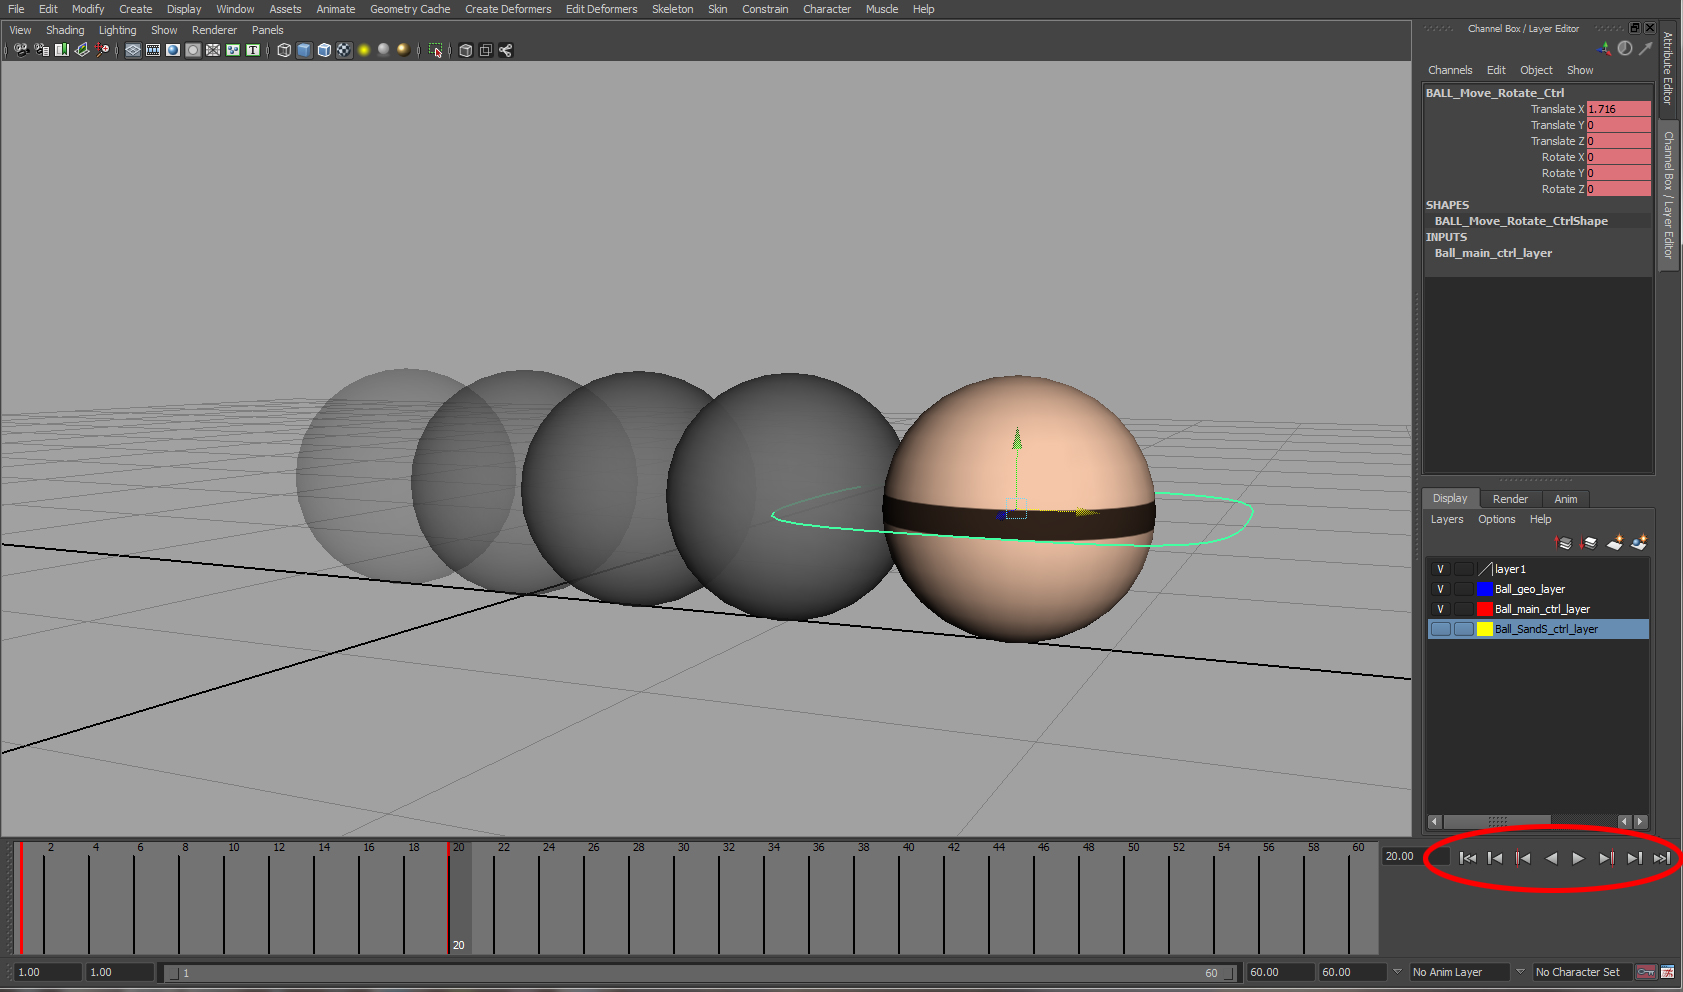
Begin by making sure there are no keys on the ball. If so, you can either delete them in the Graph Editor or hold down Shift and left-mouse drag in the timeline to create a red selection window. You can then hold down the right-mouse button and go Delete. We’ll start by working on the up and down of the ball. Go to frame 1 and translate the ‘BALL_Move_Rotate_Ctrl’ around 4 units up in the Y channel. Highlight the Translate Y in the channel box and key just that channel. Then go to frame 13 and put a value of 0 in the Translate Y.
Step 07: Adding more bounces
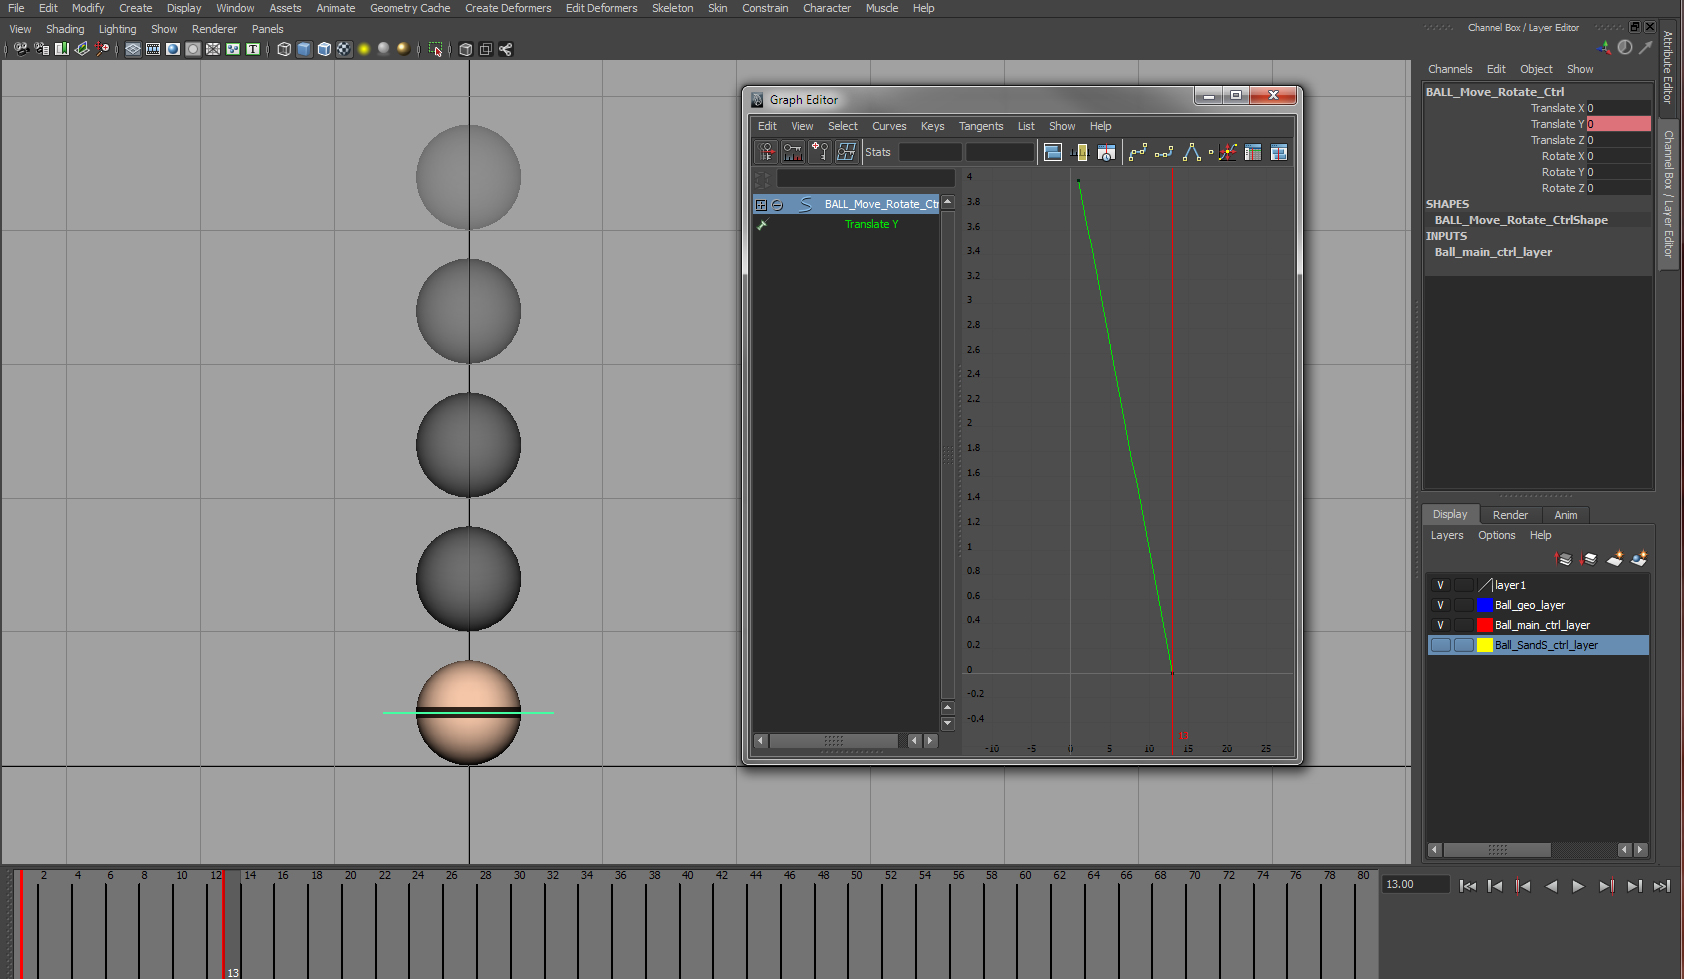
Next move to frame 23 and translate the ball up in the Y channel to a value of 2.3 and back to 0 at frame 33. Continue to do this until you have quite a few bounces. For each bounce, I made sure that it takes the same amount of frames to go up as it does to come down. This will give me bounces that are even and arcs that are clean. I also reduced the amount of frames that it took for each bounce by two frames to give the feeling that upon each contact, the ball is losing energy. When you have all your bounces, your animation will look pretty floaty and weightless. If you open up the Graph Editor, your see that the curve looks a bit like the Alps, but you should also be able to see how this curve relates to our keyframes in the viewport

Step 08: Adding Weight
In the Graph Editor, select all the keys on the curve and go Keys>Free Tangent Weight. Next select all the keys where the ball hits the ground and go Keys>Break Tangents. This will allow us to manipulate one side of the tangents without affecting the other. Now edit the shape of the curve so as we approach the frame where the ball makes contact, we get a sharper drop. By doing this we are changing the spacing to give us more weight and impact and our mountain range now looks more like the Loch Ness monster. You can also create a motion trail to check your arcs, select the ‘BALL_Move_Rotate_Ctrl’ and go Animate>Create Motion Trail (Options) Set the Time range to Time Slider and the Draw style to Line. If you’re using Maya 2012 or 2013, you can also use the Editable Motion Trails tool, which is like having the Graph Editor in the 3D viewport.

Step 09: Adding Rotation
Let’s now get this ball moving in the horizontal axis as well as adding some rotation to it. Go to frame 1 and set a key on the Translate X channel for ‘BALL_Move_Rotate_Ctrl’. Then go to the last frame of your animation, translate the ball over in the X and set another key. Play back the animation to check that you are happy with the distance it travels. To add rotation, using the same control, rotate the ball in the Z axis. For the first few bounces, I knew that I would be adding a small amount of squash and stretch later so I made sure that the ball landed on it poles. This would allow me to get clean deformation without the texture stretching in an odd manner. You can also add some subtle roll back on the ball so it feels a bit more natural.

Step 10: Squash and Stretch
Unhide the ‘Ball_SandS_ctrl_layer’ to make the squash and stretch controls selectable. Add some squash on the first few contact poses by pushing and pulling the controls either side of the ball. Remember not to go too wild with this as it can be easily overdone. Then go through and add some stretch as the ball goes in and out the contact poses. When the ball is at the apex of each bounce, there should be no squash and stretch acting upon it so make sure the controls all have a value of zero at this point. As the ball stretches, you also want to make sure that it is doing it along the arc. Use the ‘BALL_SandS_Rotate_Ctrl’ to help orient the controls to do this. Happy Animating.

Tip 01: Newton’s Laws of Motion for animators
- An object at rest will stay at rest and a moving object will keep on moving in the same direction and at the same speed… unless something comes along to change that uniformity.
- F= ma. Or in other words, when a force acts on a mass, acceleration is produced. The degree of that acceleration will depend firstly on the magnitude of the force that hits the object, and secondly on the mass of the object being hit.
- For every action there is an equal and opposite reaction.
Tip 02: Even Timing
When blocking out a shot, I always time out the poses in multiples of 2 frames. This allows me to have the ability to go in and add a breakdown pose bang in the middle between my two key poses. For example, key-pose 1 will be on frame 1 and key-pose 2 will be on frame 17. They are 16 frames apart so I can go in and add a breakdown pose at frame 9. We can then go in and add two further poses between frames 1 and 9 (frame 5) and frame 9 and 17 (frame 13). When it gets to the final clean-up of the animation, the timing may alter, but I find this a good start to the initial blocking stage.
Final Result
Here is the final rendered animation once we’ve added rotation and squash and stretch.
Support CAVE Academy
Here at CAVE Academy the beauty of giving and sharing is very close to our hearts. With that spirit, we gladly provide Masterclasses, Dailies, the Wiki, and many high-quality assets free of charge. To enable the team to create and release more free content, you can support us here: Support CAVE Academy