Search the wiki
06. How to animate a jump
Resources
The following zip file contains all the Maya scene files and some reference videos.
Step 01: Loosening up
Open up ‘00_start.ma’ to find the Box Boy rig and a rough environment. The environment is in a layer called ‘environment_geo’ so we can show and hide it if needed. Let’s create our first pose and make the character a little more comfortable. Relax his arms and fingers, add a slight angle to his hips and oppose that angle in the shoulders. Move his hips to rest slightly over one leg and rotate his head so it seems as if he is looking at the gap in front of him. Also, put a slight angle in his feet and bend in his knees as otherwise they feel too tense.
Step 02: The squash and stretch pose
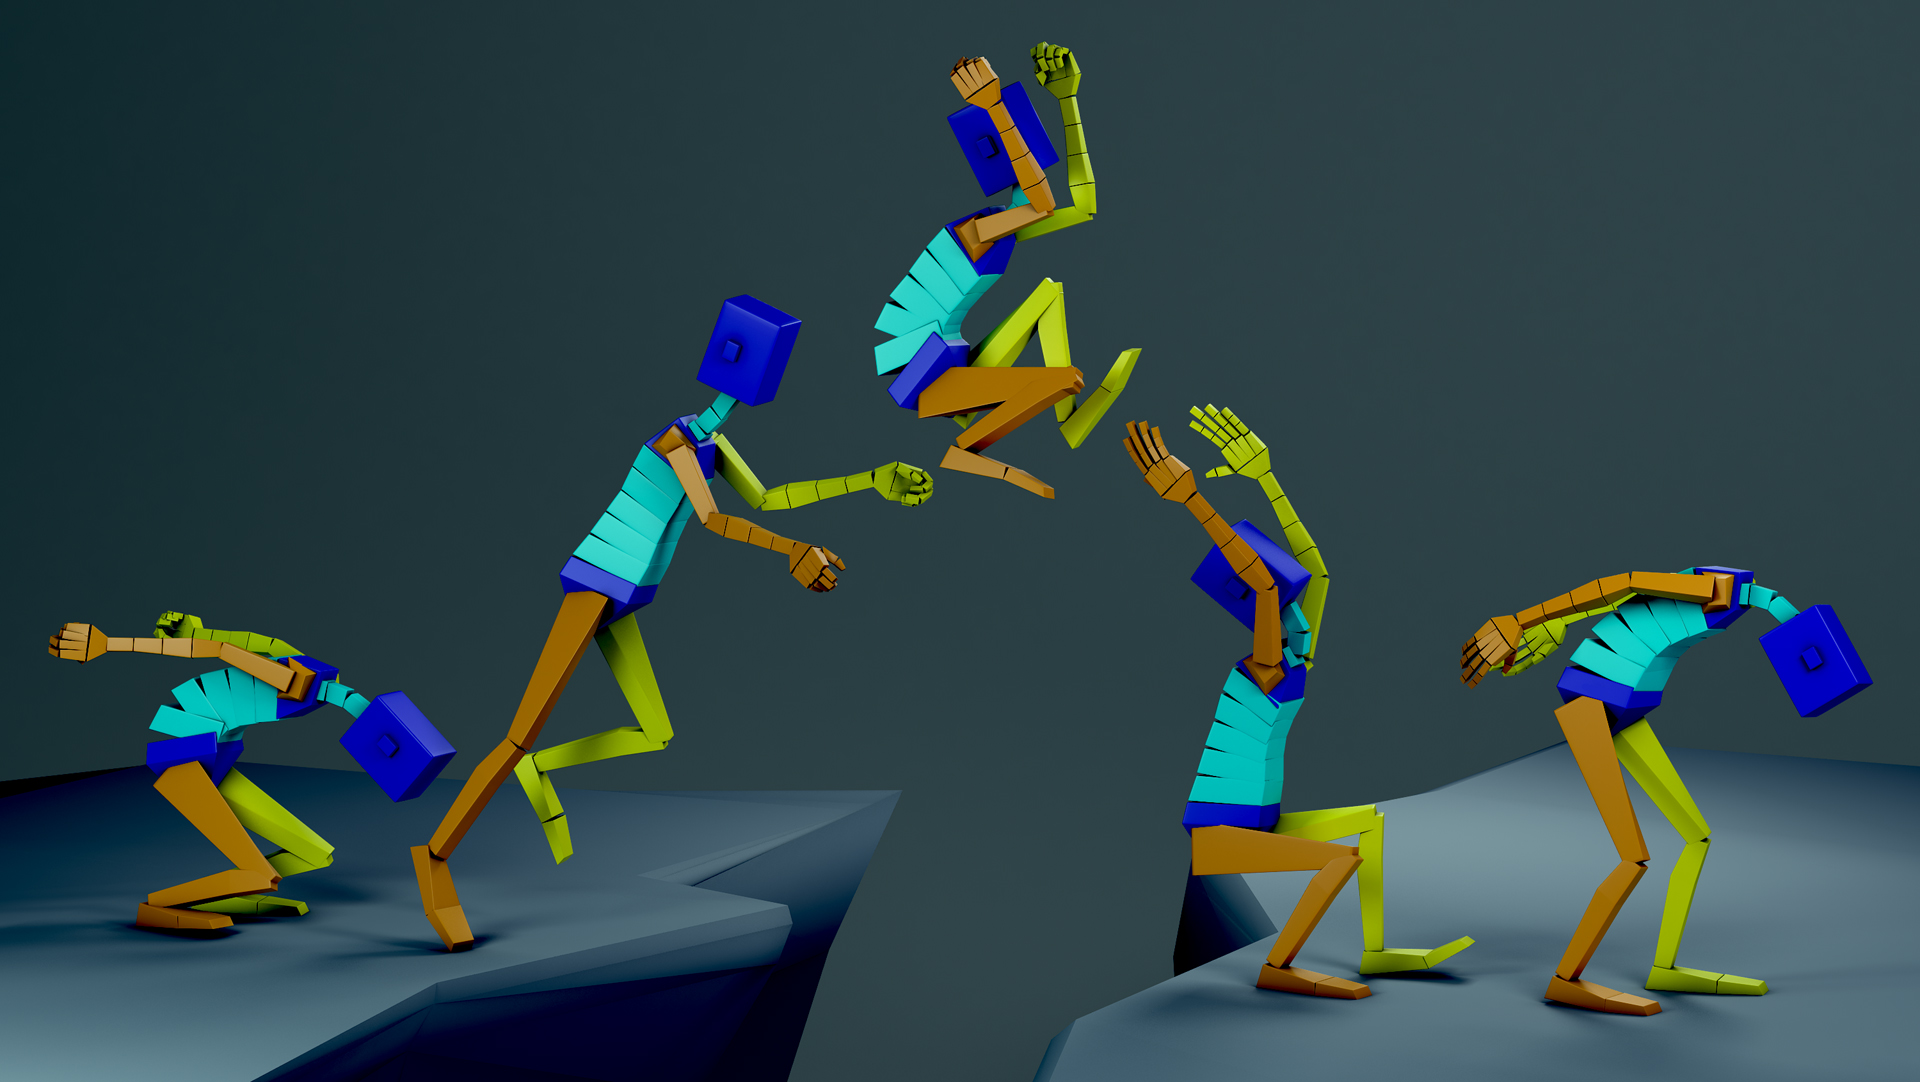
Now we’ll create the first two of our extreme poses: the squashed and stretched. Begin with the former by really compressing his body down. Try and get a huge c-shape running down the spine and up the neck and head. Swing the arms out as we prepare to push off. For the stretched pose, try and straighten the leg and start bringing those arms through. Have the back straighter as this will produce a nice contrast to the c-shaped squashed pose.
Step 03: The apex and landing
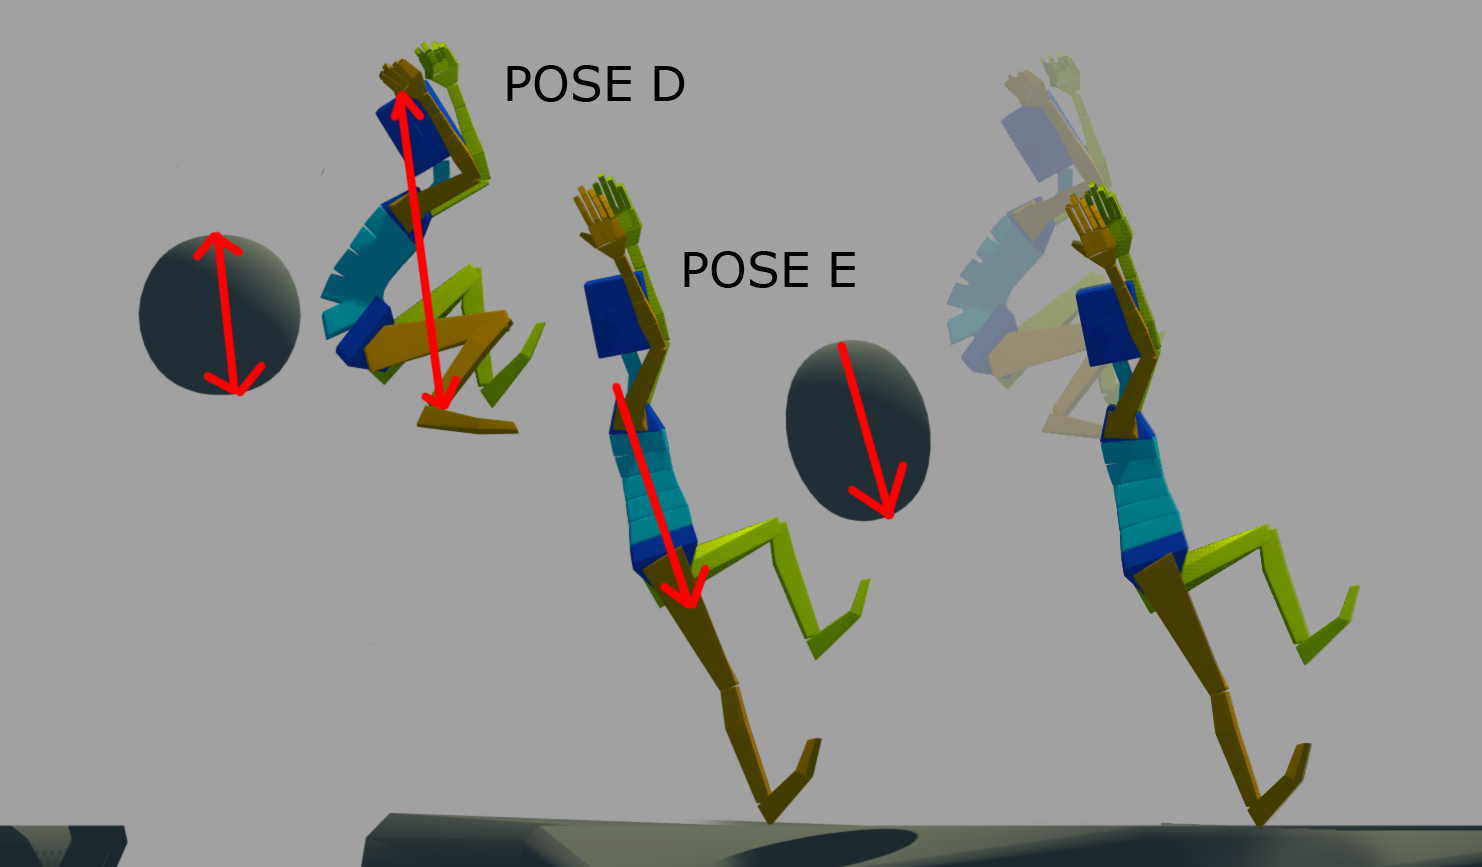
Once he is off the ground and in the air, try and think about what is leading and what is following. Rotate the core (here the hips) as you would the bouncing ball, and think about how the speed of him reaching the apex of the arc should be the same as the speed of him coming back down again. As a result, the spacing should be more bunched at the peak of the jump and spread apart further either side of the apex as he pushes off and lands. Delay one leg and offset the arms slightly so we don’t have any issues of twinning. You can already start to indicate the effects of drag on the fingers and toes as he begins to fall if you wish
Step 04: Landing safely
As he lands, have him go down as you would squash the bouncing ball. Really compress his body to take the impact and push the spine into a strong c-shape to once more contrast with the previous stretched pose and its straight spine. Going from these big to small shapes and back again will also really add to the appeal of the animation. Really push these early poses making sure they are as clear as can be. Spend time here to make your poses readable and, if needed, create a ‘playblast’ and draw over it in Kinovea so you are not restricted by a rig.
Step 05: Rework the timing
So far, if we follow the timing set by our bouncing ball animation, everything will be a bit too fast. Since we are using ‘stepped’ mode, we can easily go into the Graph Editor or the Dopesheet and start pushing these keys around in order to re-time the shot. When you are all set, select all the curves in the Graph Editor for every control and go Tangents>Auto or Spline. Also go to Window>Settings/Preferences>Preferences and change the Default out tangent to Auto or Spline in the Animation tab. If we hit play now, you may have quite a flat, weightless animation.
Step 06: Anticipation and weight
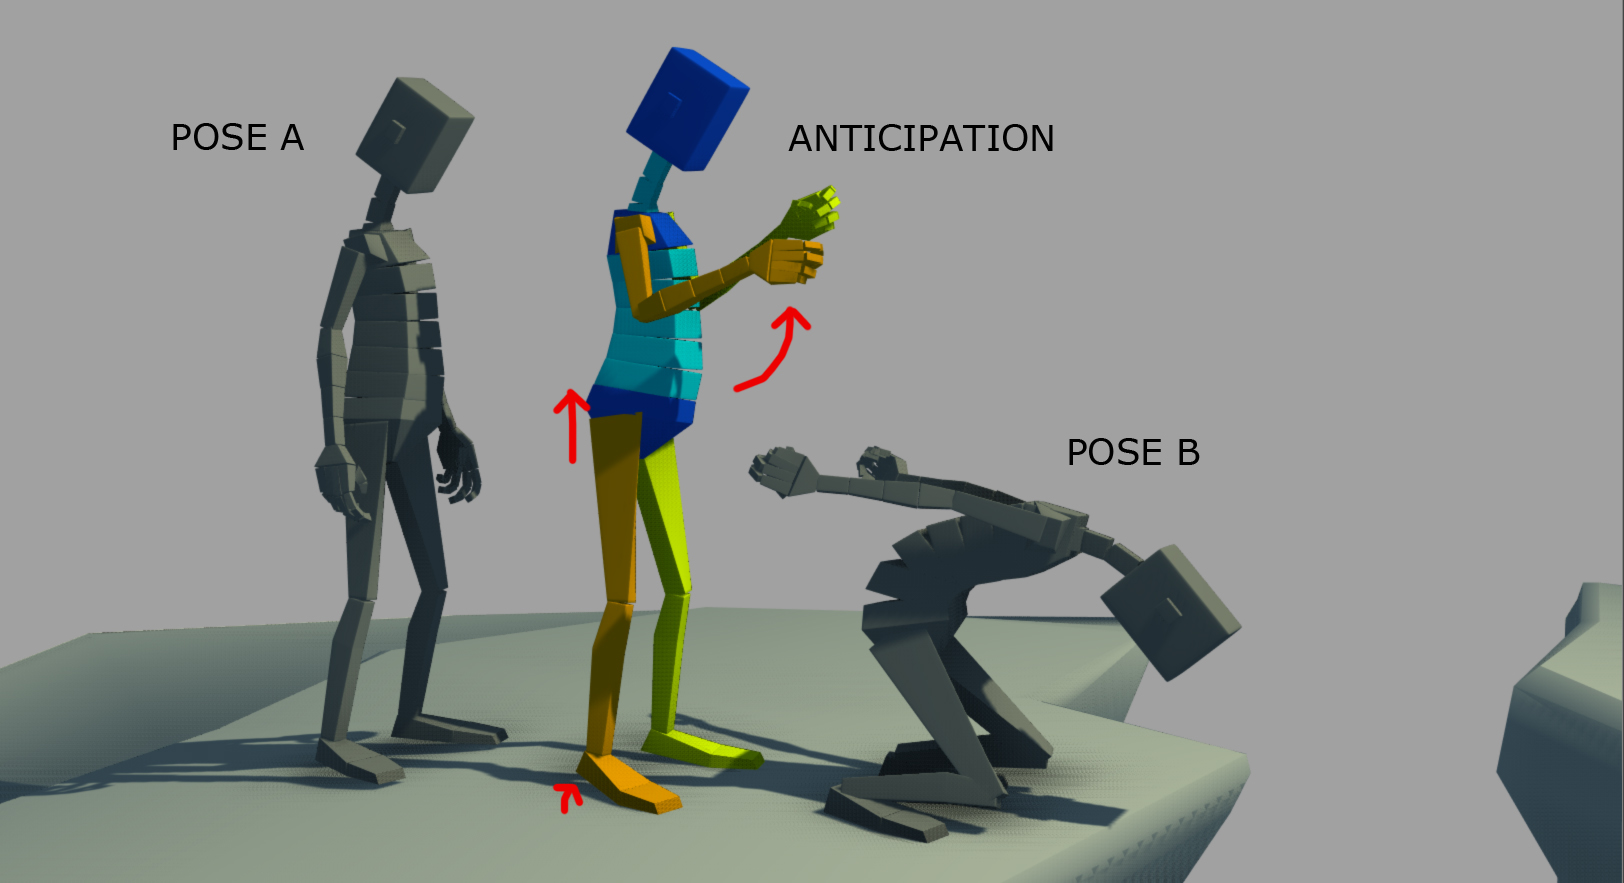
Once the main poses are in, we can now start adding some anticipation. Add a key between pose A and B and slightly lift the character up on the balls of his feet. Have him bring his arms up also, ready to swing them back into the extreme squashed pose. Then, as he lands on the other side of the jump, push him down further than the squashed pose and as his hips lift up have his spine continue to go down. The opposing action here will help soften the potential rigidity of him standing up as one lump mass.
Step 07: Arcs, arcs and arcs
At this stage, we should really start thinking about getting our arcs as clean as possible. Again, we’ll work from the core outwards as changes to that region will have a knock-on effect on all four limbs and the torso. Try and mimic the parabola that we would expect to see on a bouncing ball. To help with this, select the ‘root_ctrl’ and go Animate>Create Editable Motion Trail. Once you have the hips worked out, move onto the feet. As they are set to IK, you will most probably, need to set quite a few more extra keys to reduce the linear transition from one key to another that will be created by default.
Step 08: Focusing in on areas
Animating the entire character at once can sometimes become overwhelming, and fixing one area can lead to issues in another. Having the ability to hide parts of the geometry can really help you focus on the areas that need cleaning up. For example, you may want to get the spine working well without viewing how the arms are affected. Then you can unhide the arms and focus on them, knowing that the spine is how you want it. If a hide/unhide feature is not part of the rig, you can generally achieve the same effect by selecting the geometry that you want to hide and go Create>Sets>Quick Select Set. You can then easily find that geometry in the Outliner and hit ctrl+H to hide the pieces. When you want to unhide them, again, select them from under the set in the Outliner and hit shift+H.
Step 09: Drag and overlap
To make the jump more fluid, let’s add some drag and overlap. Start by adding some delay to the spine, neck and head. Offset each section by a couple of frames and you should quickly get a more natural looking animation. Then work your way down the arms to the hands. For this exercise, I also added drag to the fingers so they flow into the path-of-action. Add some drag and overlap to the toes also as they go through the jump. Then on the land, have them slam down in a couple frames to help add some weight and impact to the landing
Step 10:Moving holds
At the moment, when our character hits his final pose, he stops dead. This really screams out “CG” so to reduce this, we’ll add a moving hold. To do this, copy the same pose another ten frames ahead. Now make some minor changes but try to have the movement flow in the direction of the pose before. So if the arm was swinging from screen left to screen right, continue that movement from left to right. I have made this quite subtle, but feel free to experiment and see what works best for you. Happy animating.
Final Result
Here is the final rendered animation:
Support CAVE Academy
Here at CAVE Academy the beauty of giving and sharing is very close to our hearts. With that spirit, we gladly provide Masterclasses, Dailies, the Wiki, and many high-quality assets free of charge. To enable the team to create and release more free content, you can support us here: Support CAVE Academy


