
Search the wiki
05. Animate a character lift weight
Resources
The following zip file contains all the Maya scene files and some reference videos.
Introduction
In this tutorial, we’re going to be looking at how to create a believable interplay between a character and a heavy object, and in so doing, convey a sense of weight. Our character is going to lift a heavy ball from the floor and place it on a plinth. Not an everyday activity, I grant you, but if you wish any character to interact with its environment: open a door, make a cup of tea, then sit down and read a copy of CG Artist, you’re going to have to be able to master the fine art of animating weight.
So firstly we’ll consider the physics behind what we’re trying to achieve: we’ll look at the centre of gravity of an object and a character and see how the latter shifts during their interplay, and we’ll also revisit Newton’s Third Law of Motion, which states that every action has an equal and opposite reaction. We’ll then – as ever – move on to the essential step of gathering and analysing good reference. After that it’ll be time to block out the key poses. Sorry to disappoint but we won’t be seeing too much of the Graph Editor this month as by the end of the animation I’ll have keyed in poses every 2-4 frames in order to help transitions from pose to pose and to add subtle detail, which the computer by itself cannot achieve. However, that’s simply the way I have approached the exercise, and it’s by no means the only way to skin this particular cat, so please find your own preferred way. Just before we start though, I’ll be using Maya, but obviously the same techniques can easily be transferred to the 3D package of your choice.
So the centre of gravity, as you’ll all remember from school, is the average position of weight distribution in an object or character. In this exercise, the ball’s centre of gravity will be its geometric centre, while the centre of gravity for our friend the Box Boy at the beginning of the animation when he’s standing upright will be around the height of his box belly button. As he lifts the ball though, the centre of gravity shifts but has to remain over his base of support otherwise in reality he’d fall flat on his box bottom. So a successful animation meant to convey the lifting of a heavy weight will have to demonstrate an understanding of how the centre of gravity travels in order to be believable.

We also need to keep Newton’s Third Law of Motion very strongly in mind. If every action has an equal and opposite reaction, then in order to move a heavy object, the force exerted on the object must be greater than the force exerted by that object. The ball in our example is very heavy, therefore the effort exerted by the Box Boy must be seen to be very great in order to convey that sense of weight.
We’ll move on now to the all-important gathering and analysis of reference. Once you find solid reference, watch it over and over again to get a good feel for the motion of the body and the mechanics of lifting a heavy weight. Analyse the arcs in the back and the wave-like motion that runs from the hips and up the spine as the weight moves upwards. Observe how the weight is taken not just by the arms but by the whole body. Notice which parts of the body lead and which follow. I have found that looking at power-lifters is extremely useful as those guys really know what they’re doing. Rob Orlando from Hybrid Athelitics (www.hybridathletics.net) kindly allowed me to reproduce his material. It proved invaluable reference and you’ll find it on the CD accompanying this magazine. See the subtleties involved in this great exertion: watch the hands shift around the ball in search of a strong grip, observe the feet shuffling to attain better balance. These small details add such texture to the final look. Always bear in mind through, reference is a guide rather than a template, as the proportions of the character are going to be different.
For this exercise, as I have done in previous tutorials, I took the reference footage into Kinovea and drew over it, the results of which also accompany this magazine. The yellow drawings indicate the key poses that I will want to make clear throughout the animation and will be part of my first pass when blocking out the shot using pose to pose method. The red drawings show the break-down and in-between poses that will then come with the second and third passes with the curves set to spline.
As we get into the animation process, consider always the crucial roles of spacing and timing in creating the illusion of weight. In lifting a ping pong ball, spacing would be large and timing fast as the effort is negligible. In this exercise to create that sense of weight, the precise reverse will be true: spacing will be tight and timing slow. Keep that weight consistent as the ball travels upwards or the illusion will be broken.
You’ll have to also think about how you plan to approach the animation. Will you constrain the ball to the hands or vice versa? We need to determine what is leading and what is following. In reality the ball will be following the hands but technically it would be easier to constrain the hands to the ball. As I want the freedom to have the hands to be on and off the ball and do not want to be faced with the hassle of setting keys on the extra attributes for the constraints, I will simply parent two locators to either side of the ball and point snap my IK hand controls to them.

As you animate, break up the motion as the body does not move as one lump mass; have the spacing different on the hands, for example so one hand leads quicker than the other. Vary the tempo, delay some movement as this will reduce any twinning of the poses where the left and right look mirrored. Remember to use your reference as a guide only; push the poses further if you wish to achieve a cartoony effect. Yet constantly ask yourself if your pose is clear. If it isn’t, don’t lose heart, just start it again and make it stronger
So we’re ready to start once the admin is out of the way: I’ll be working in PAL (25fps)and as we will beginning in pose to pose I’ll set my Default out tangents to Stepped. Also, I’m going to be putting all four limbs in IK mode because it’ll allow us to edit the position of the hips and spine without affecting the hands.
Step 01: Taking in the reference
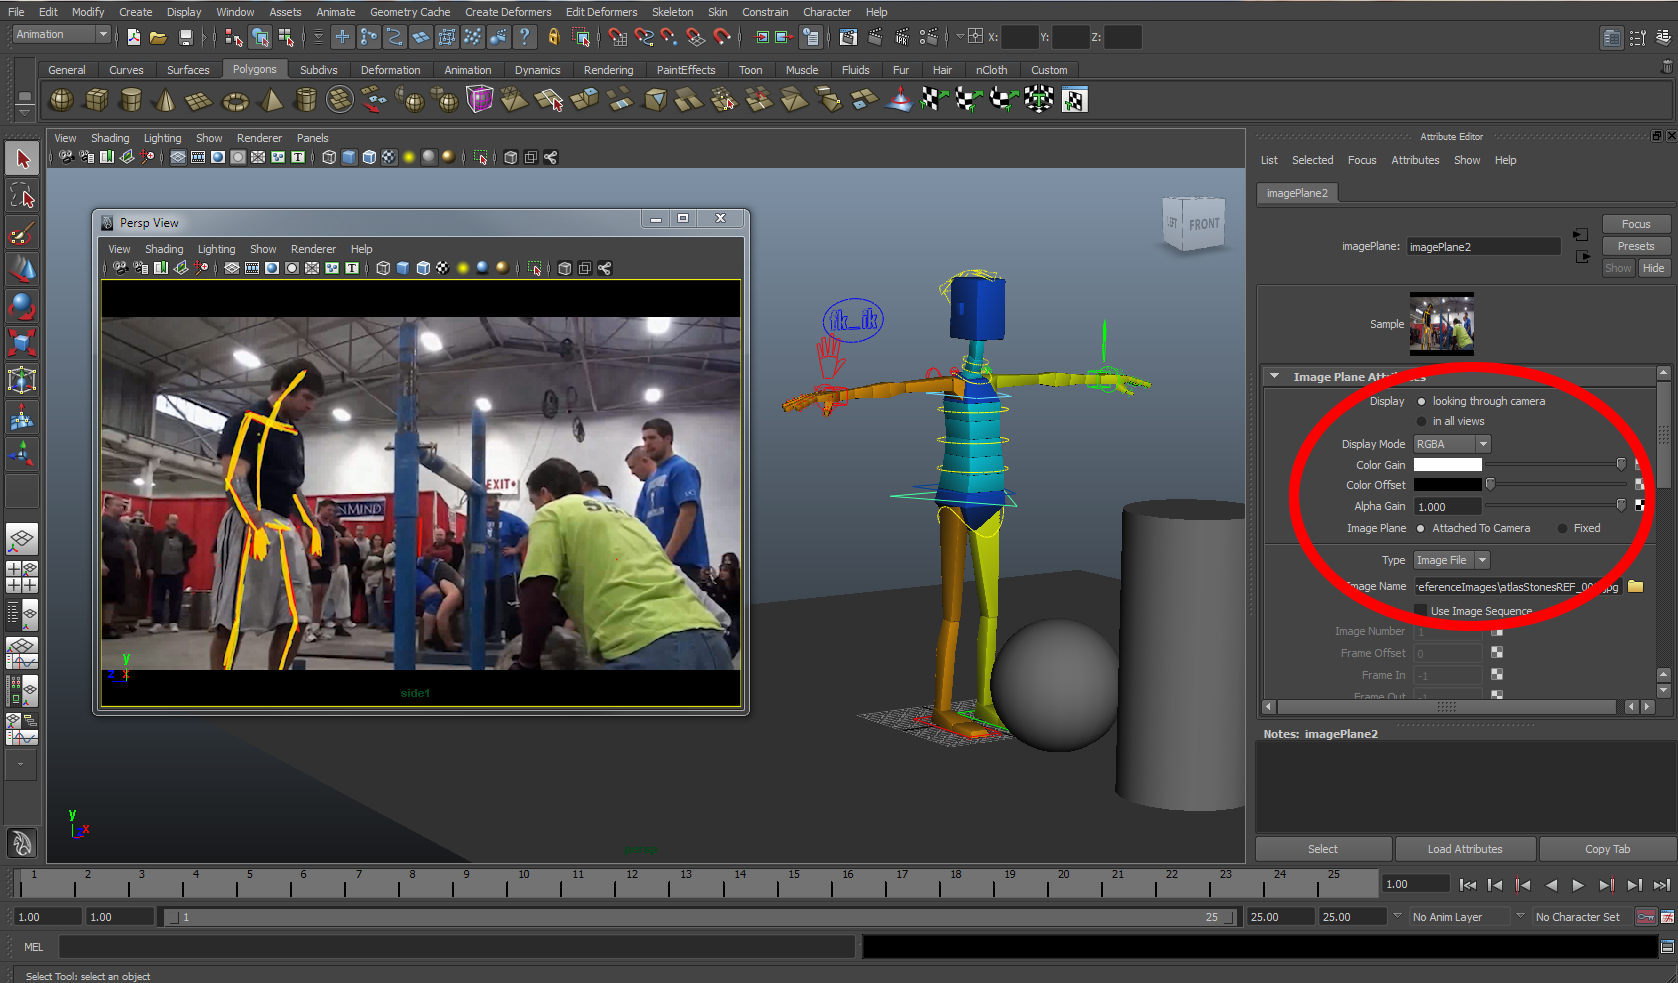
Open up ‘00_start.ma’ to find the Box Boy rig, a sphere, a pillar and a ground plane. I’ve popped the pillar and ground plane onto a layer called ‘environment’ so we can show and hide them if needed. Go to Panels>Orthographic>New>Side to create a new camera and call it ‘referenceCam’. With the new camera active, go to View>Image Plane>Import Image and select ‘atlasStonesREF_000.jpg’ from the ‘referenceImages’ folder that accompanies this tutorial. Under Image Plane Attributes, edit the Display to ‘looking through camera’ and also check Attached to Camera. Now translate the reference camera away from the main scene and also have the view as a floating window by going Panels>Tear Off.
Step 02: Setting up a camera
Go to Create>Camera>Camera and rename that new camera ‘renderCam’. Position it and when you are happy with the view, lock all the translate and rotate attributes. This will be the view that we will mainly work with to check our animation and also do all our playblasts from. Although I recommend that you check the poses from every angle, working with a camera will also allow us to cheat some things to get stronger silhouettes if needed. For example, the arm further away from the viewer is slightly distorted, which was a deliberate move to get a better silhouette. Now go to View>Camera Settings and turn on Resolution Gate. This will help you frame your animation as well as making it clearer what is in and out of the shot. You could also change the Image Size under the Render Settings if you so desire. I have my Image Size set to HD 720 and changing this will update the resolution gate within the viewport. If you have a second monitor, you can place both the ‘referenceCam’ and the ‘renderCam’ onto it to reduce the clutter on the main screen.

Step 03: Weighing it up
Begin by loosening up the main character and breaking away from the default T-pose. Add some weight to the initial stance by moving his weight to one side, relaxing the fingers and adding some curvature to the spine. This is the first pose the audience will see so let’s make sure it has some interest. Then start adding in the first set of key poses, using the reference as a guide to help with the timing. Analyse how one hand moves faster than the other and observe the slight roll of the ball towards the character as he begins to weigh up the challenge.

Step 04: Going down
As he moves down to get closer to the ball, think about where his centre of gravity is. Move his hips out to help his balance and stop him from toppling over. Once you have him at his lowest point, really wrap his body around the ball and get the strongest c-shape through the spine that you can. Spread his knees to really bring the ball closer to his hips and get both holds firmly below the ball. Remember the principles of the bouncing ball exercise and consider this to be the squashed pose that will nicely contrast the big stretched pose coming up.

Step 05: Moving up… slightly
Before you have him lift the weight up, slightly lower him to anticipate this move. Then begin the up movement, leading with the hips working down the spine and running down the arms. Continue to keep the ball close to his chest but also straighten the arms slightly to help sell the weight of the ball and the effort needed to move it. I’m translating both IK hand controls and the ball together and setting keys so as not to cause any ‘floatiness’ between them. Having him rest the ball on his knees will also help to reinforce the idea that this is a heavy ball, as will the character’s need to rest and reorganise his grip for the final push. Try also to bend the legs as much as possible to again contrast the straight legs of the approaching stretched pose.

Step 06: Pushing off
So with the ball resting on his legs, we should now be ready for the big final push. You could also reorganise his feet slightly to show the audience that he has to redistribute his weight to manage this large mass on his legs. Once his hands are firmly placed, again lower the body slightly and really get his hips under the ball before moving up to anticipate this big move ahead. Continue to add contrast by switching from the c-shaped spine to a u-shaped spine and begin to use the legs to help lift this ball by straightening them out slightly.

Step 07: Wave motion
With the hips leading and pushing the ball up, we now want to create a wave-like motion running up the spine that rolls the ball up as opposed to purely lifting with the arms. Really arc the spine backwards and straighten the legs, slightly lifting them onto the balls of the feet. We’re really using the entire body now to get this ball up so we can bring it down onto the pillar. This should be the pose where the body is at its most stretched. We’re using this broad shape here while before we saw the small squashed pose to really add contrasts and texture to the animation. Also, think about the line of action: is the pose clear and strong?

Step 08: Adding the breakdown poses
At this stage, the timing should be firmly set and the animation reading well. If not, I recommend you re-jiggle the poses till you are happy as it will be more difficult to make the any broad changes later. Next, open up your Animation Preferences and change the ‘Default out tangent’ to either Spline or Auto. Then select all the controls and open up the Graph Editor and convert the stepped curves to Spline or Auto. Now go through the entire animation again, adding in the breakdown poses. Here you can add further anticipation to the poses if needed and also start delaying parts of the body. Have one hand move faster than the other for example, or delay the head as he brings the ball down on the pillar. Adding these small touches and timing changes will really help make the piece feel more organic and less mechanical.

Step 09: Check your arcs
When checking the arcs, I usually start at the hips and work my way out as most of the motion for the entire character will feed off from there. Bear in mind that any changes we make to the hips will generally have a knock-on effect on the rest of the body. As we are using Inverse Kinematics for both the arms and the legs, it will be important to check our arcs as IK will have a linear interpolation from one pose to the next. Also, check the arcs created by the ball itself and if the path of action is clean. To do this, select a control and go Animate>Create Editable Motion Trail (Create Motion Trail in 2011 or earlier).

Step 10: Cleaning up
At the final stage, you really want to check for issues such as sliding of the hands on the ball and hands penetrating the ball. To keep the hands firmly on the ball, I created two locators and holding down the ‘V’ key on the keyboard, I point snapped them to the hand controls wherever they need to hold the ball firmly. Then I parented these locators under the ball geometry so they follow the ball correctly and then point snapped the hand controls to these locators. This helps reduce the odd sliding that can occur. Also, when dealing with the hands, try and keep them fairly close to the ball – almost penetrating if need be; sometimes it’s better to penetrate the ball rather than have the hand slightly floating off the ball. Finally, add some rotation to the ball so it feels as if it is being rolled up the chest with more conviction. Happy animating.

Expect the unexpected: using anticipation
Anticipation let’s the audience know that something is about to happen. Before a pitcher releases the ball, he pulls his arm back first. A car rolls backwards ever so slightly before it pulls away. In essence, anticipation ensures that your point won’t be lost as the audience will be ready.
Squash and stretch
As I animate I am constantly thinking of when to add squash and stretch, as wise use of these two concepts adds a great deal of interest to a piece by varying its form. In this exercise the squash is when the character bends to actually pick up the ball; the stretch is when the ball is at its highest point. In both these examples, the character isn’t physically squashed or elongated as it’s not a cartoony feel I’m after, but both poses form an aesthetically pleasing contrast to the default standing pose by taking the body to its limits.
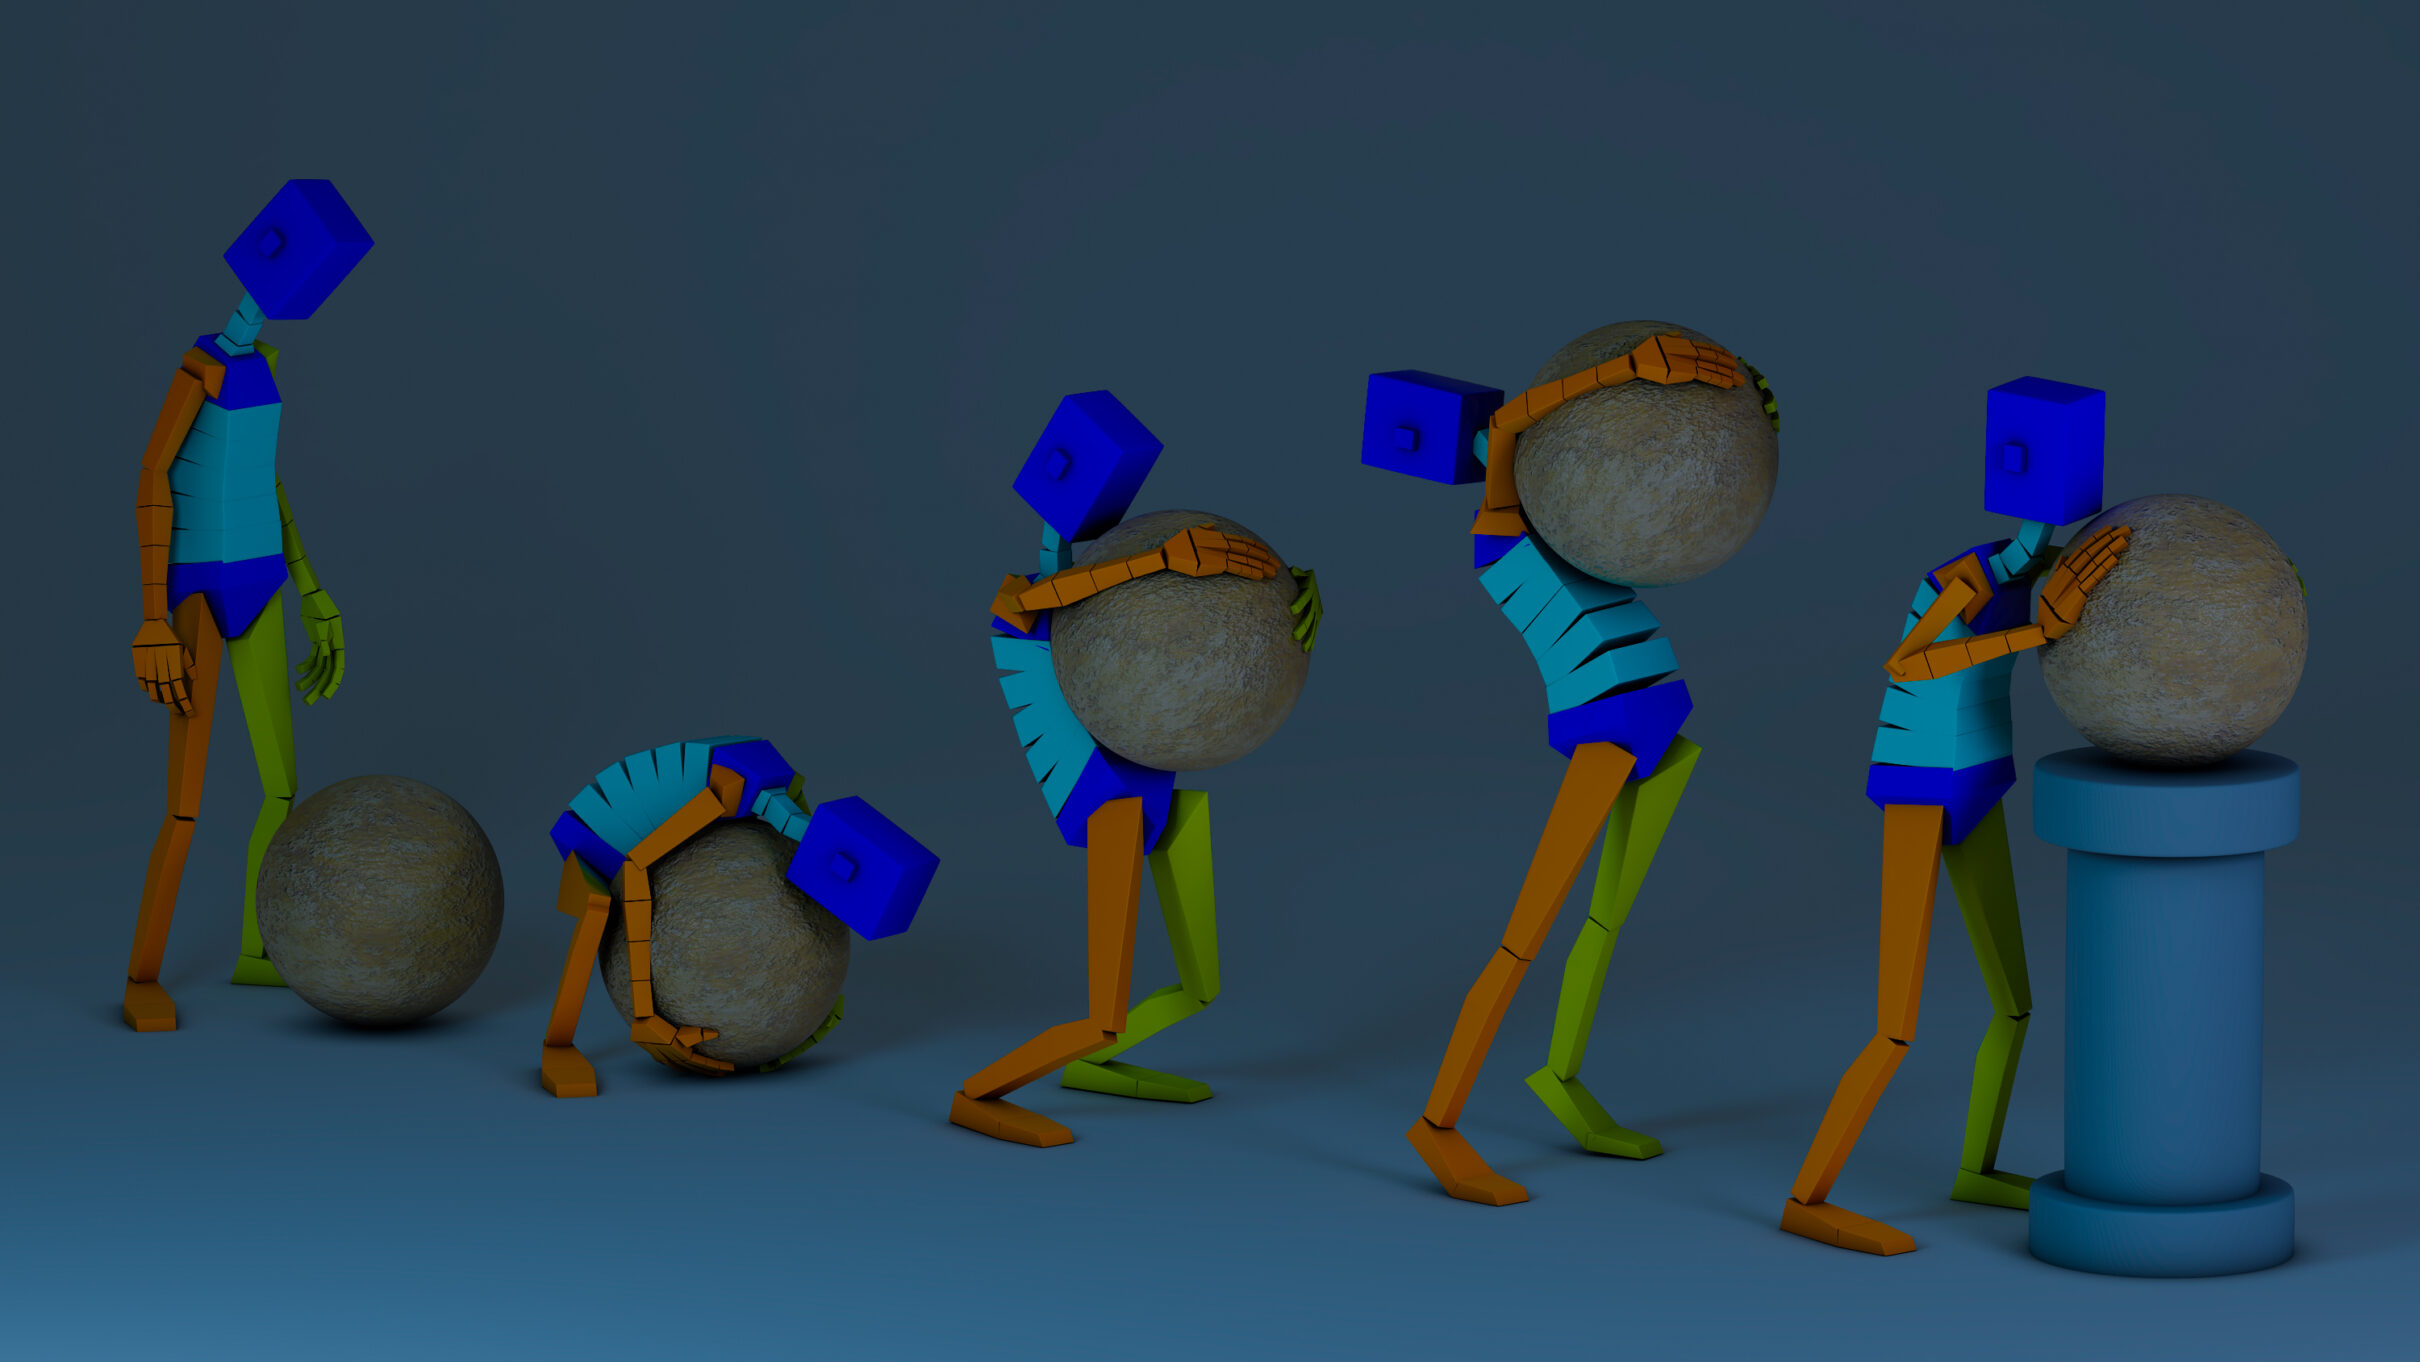
Final Result
Here is the result of the weight lift.
Support CAVE Academy
Here at CAVE Academy the beauty of giving and sharing is very close to our hearts. With that spirit, we gladly provide Masterclasses, Dailies, the Wiki, and many high-quality assets free of charge. To enable the team to create and release more free content, you can support us here: Support CAVE Academy
i want that file
i want that full project file
Hi devendhar,
The resources for this lesson are at the top of this wiki page. Also, you forgot to say please!
Thanks
J