
Search the wiki
04. Animating a walk cycle

Resources
The following zip file contains all the Maya scene files and some reference videos.
Introduction
In this tutorial we’re going to create a walk cycle. We’ll be using the principles of animation that we looked at for the bouncing ball animation exercise, and taking them a few steps further – no pun intended. Once again, I’m going to be using Maya, but obviously feel free to use whichever software package suits you best.
Last month we met the Graph Editor, and in this exercise it’ll be our main tool. We also used motion trails, and they’ll be used here to check for arcs and figure 8s at different points of the body. We’ll be focussing on timing, spacing, weight shift, drag and overlap; all the principles of animation identified by the Disney masters in the 1930s will be in action here, which is why the walk cycle is such a valuable exercise.
The creation of a walk cycle may seem relatively simple but is deceptively tricky. We have many of the same issues that we faced with the bouncing ball here too, but now we have to contend with limbs, a head and a neck, and how they work together as a single unit is of huge importance. Moreover, I suppose because we are used to seeing people walk every day of our lives, a clunky walk cycle sticks out like a sore thumb.
So in order to get it right, as ever, the first step is to gather good reference. Watch people walk: watch kids toddle, the elderly hobble, watch skinny legs stride, watch stout legs waddle. Walk around the house yourself. Work out how many frames are needed to take a step. Get a feeling for what part of the body is leading and which are following (eg the arms will follow the movement of the torso). Gauge how and when weight is transferred from one leg to another. Look for the subtle details such as the slight bob of the head, as these small points add such a lot of depth to the finished piece.
For this exercise, I have kindly been given permission to use reference material from Endless Reference, which is a treasure trove of reference for animators. As with the bouncing ball exercise, I’ve taken the footage into Kinovea to breakdown and analyse. You’ll find videos and images with the resources at the top of this page.
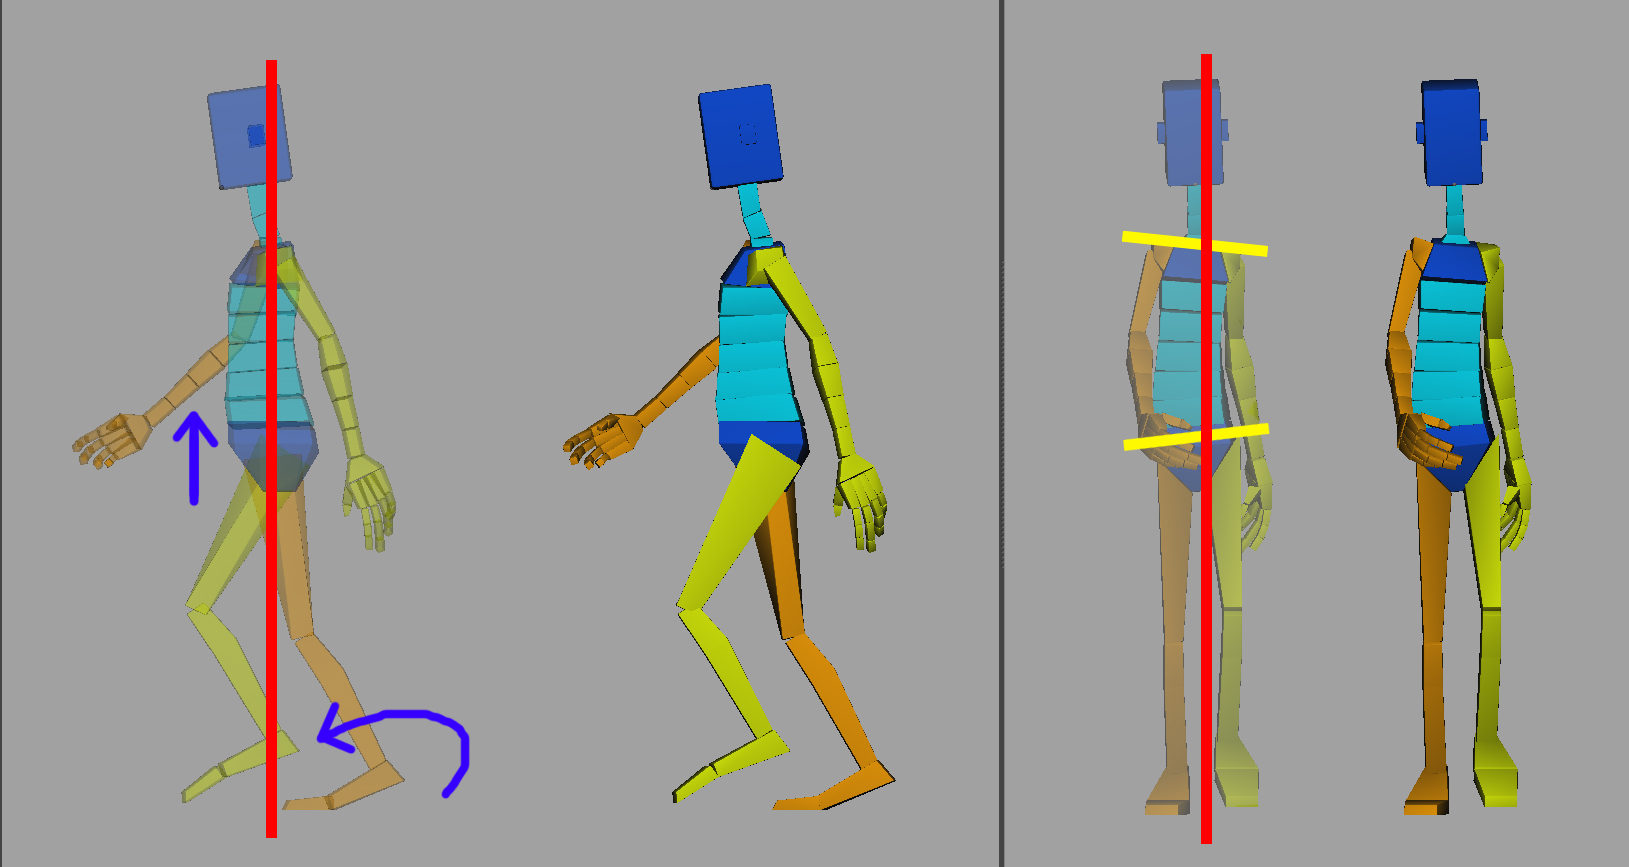
When you’re studying the reference, look for your key poses. These key poses can then act as a guide for your walk cycle. However, please bear in mind that these poses should be a guide only and by no means should they be set in stone. Reference cannot be followed 100% as the camera is only a representation of the real world. You may find that the poses will need to be pushed further in order to produce a walk that actually looks natural or which is aesthetically pleasing. As an animator, you have to go in there and make your selections and feel what’s real “behind” the reference; use your instincts and experience to set the poses. Look at your reference also for contrasting lines from the hips and the shoulders, and the beautiful curvature of the spine. Figure out the angle of the feet: feet which are too straight, with no rotation at all will give you the “March of the Penguins”.
Moving on to the process more directly, so as to simplify working from reference, I’ve taken a few images from Kinovea into Maya and used them as a backplate. By so doing there is no need to switch back and forth between two different applications, which makes life easier.
We’ll be using pose to pose animation, though if you prefer to go straight into spline mode, then do whatever suits you. I think it’s really important to keep your work as organic as possible, rather than making your animation a mechanical process in order to keep things interesting. Either way, we’ll be working to ensure that each pose is clearly readable. Additionally, we’ll want to add contrast and change to every pose because if poses are held, the result can be a staccato effect. Think about what’s leading and what’s following – the poses should be set working from the root outwards as whatever you alter in the root will affect the rest of the body. So start with the hips, go down to the legs, up the spine to the neck and head, then finally out to the arms.
Once your poses are in place, we can move on to splining the keys and going through the refining process. Again, refining will have to be from the root outwards. Please don’t leave the computer to decide how it’s going to transition from pose to pose as the result will be poppy and lack weight. You’re going to have to go in there and manually refine each curve. There may be times when you need to work frame by frame to get your curves moving well. For example, we’ll be using IK for the legs to keep them planted on the floor, but the disadvantage of IK is that it works in a linear fashion from a to b, so no arc is created. As a result, there’s no choice but to go in frame by frame and create some arcs. Fear not though, the arms will be easier: we’ll use forward kinematics, which uses rotation, to create some natural arcs. As you refine, don’t be too precious about making changes, sometimes I delete whole sections rework them to produce some delectably clean arcs.
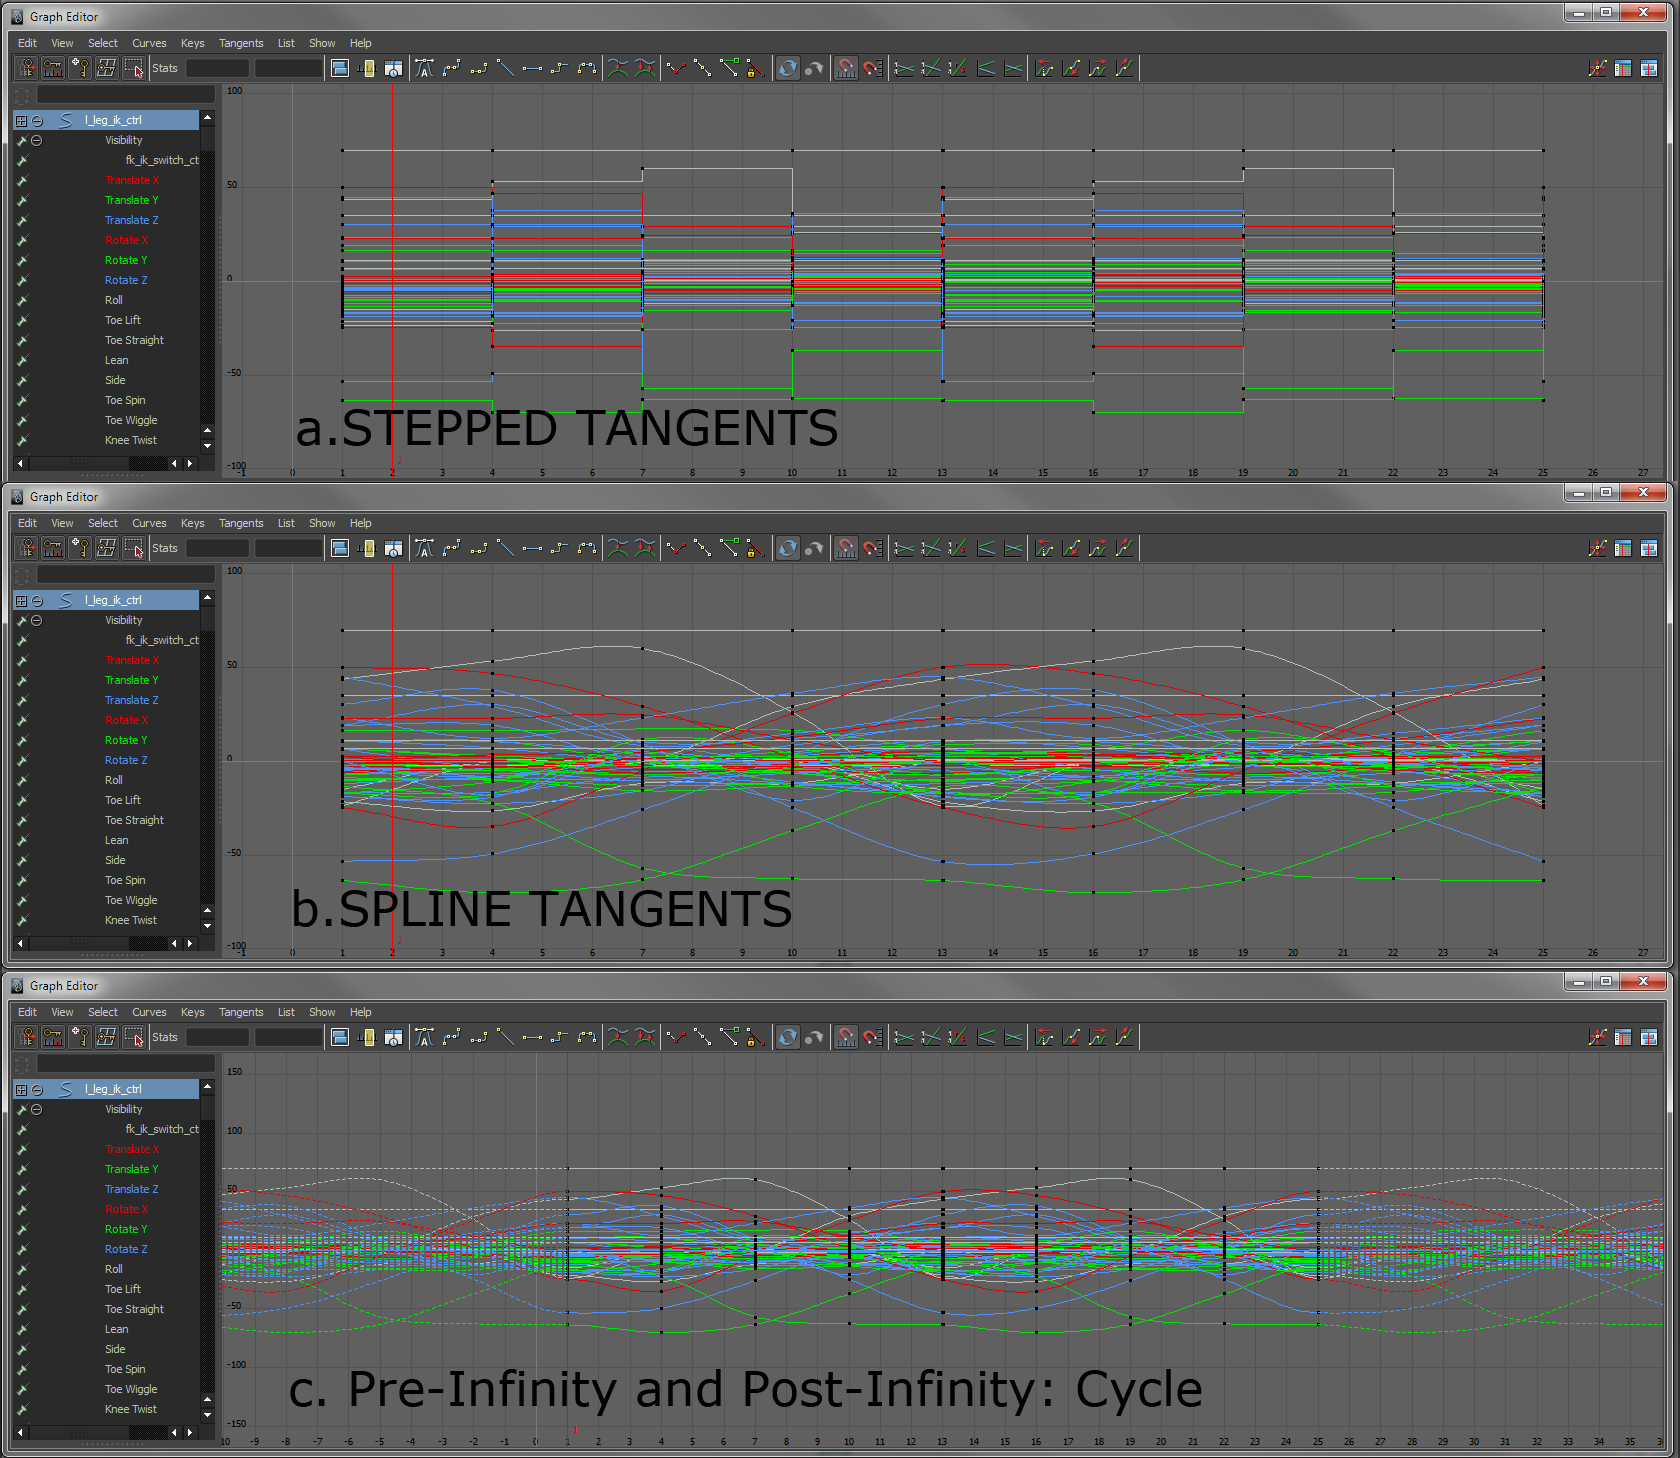
Before beginning the animation, make sure to check your animation preferences. Again, I will be working in PAL (25fps) and as we will be working Pose to Pose, I will also set my Default out tangents to Stepped. You will find this setting under the Tangents tab in the Animation category. This will hold each pose until we hit the next key without any interpolation between. Finally, make sure the arms are in FK mode and the legs are in IK mode. A final point of admin: for this walk cycle, every step will take 12 frames, making the full loop 24 frames.

Step 01: Bringing in the reference
Open up scene file: 00_boxBoyRig.ma and let’s begin by bringing in our reference. Go to your Panel bar on the viewport and create a new camera by going Panels>Orthographic>New>Side. In the new cameras Panel bar go View>Image Plane>Import Image. Select ‘frame1.jpg’ from the sourceImages folder. Next go to the Attribute Editor for the camera and scroll to the imagePlane1 tab. For Display, check ‘looking through camera’. Go down to Image Plane and check ‘Attached To Camera’ and then turn on ‘Use Image Sequence’. You can now translate the camera out of the way from the main action as well as splitting your layout into Two Panes Side by Side enabling you to work alongside your reference.

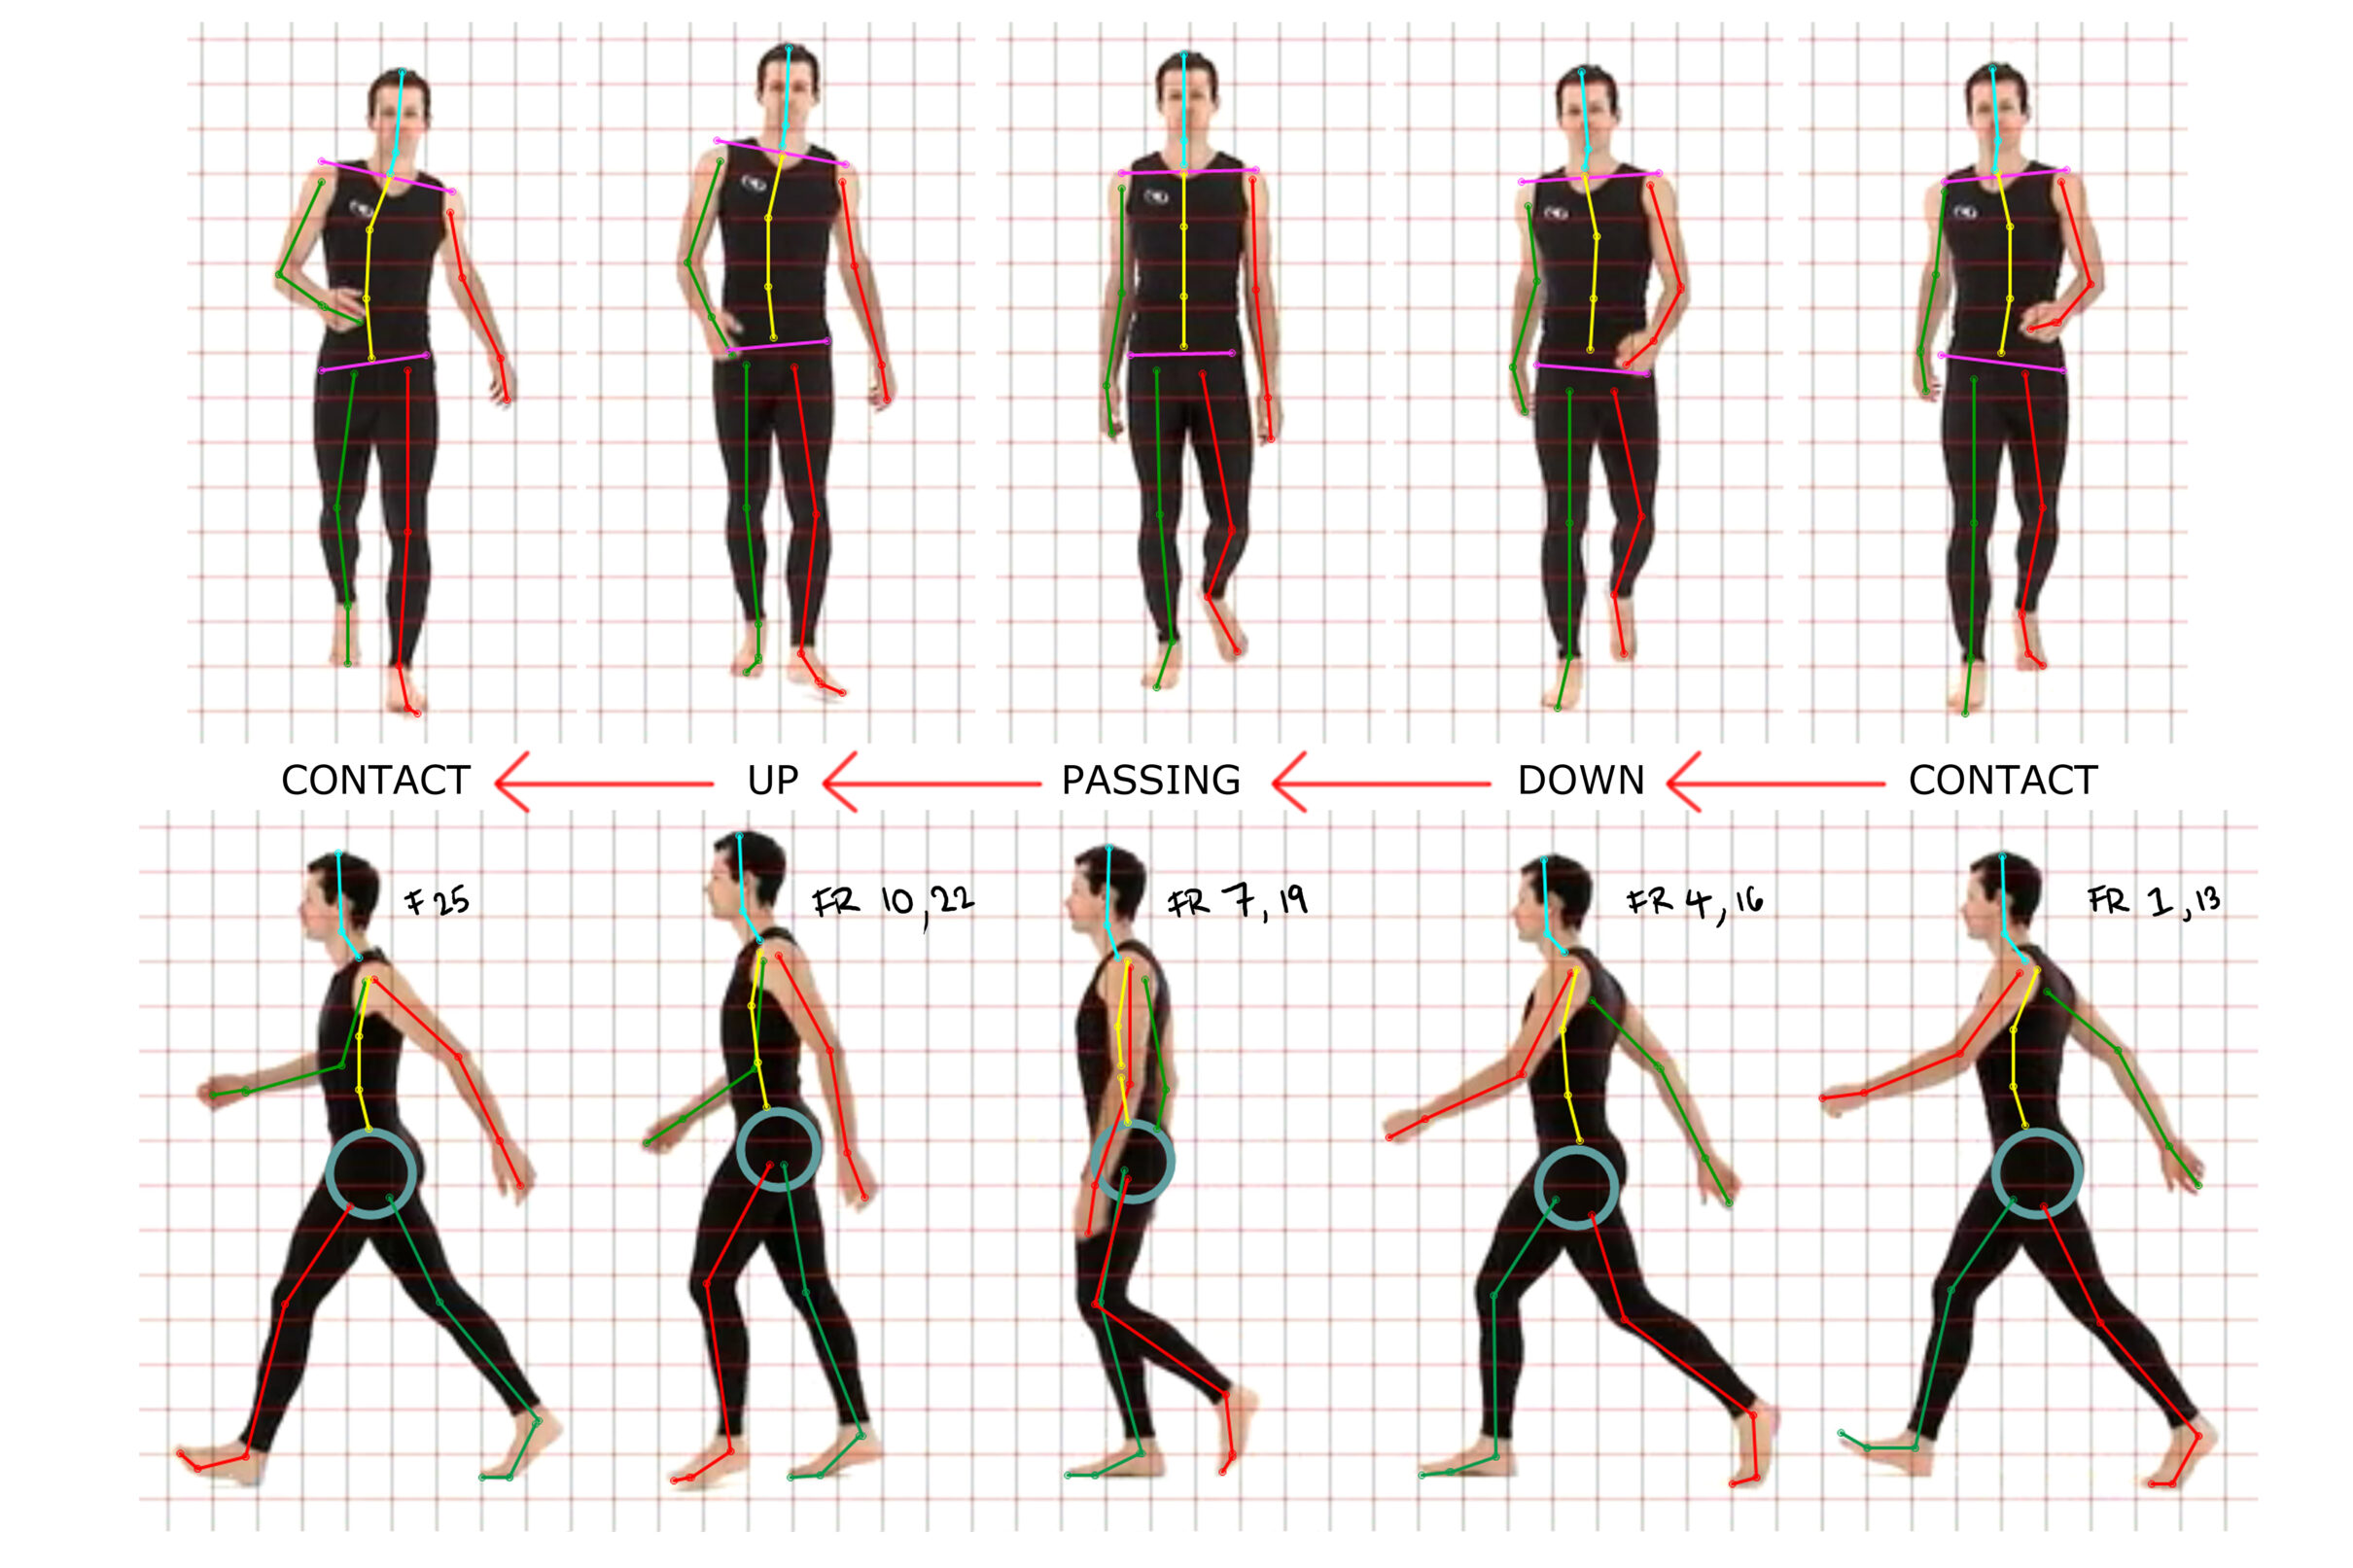
Step 02: Contact pose
For the contact pose, we want to make sure that the hips are evenly spaced between the legs. To translate the hips, I will be using the ‘root_ctrl’ and to rotate the hips, I will be solely using the ‘hip_ik_ctrl’. For the front leg, use the ‘Roll’ attribute on the ‘leg_ik_ctrl’ to roll the front foot onto its heel. Use the same attribute on the back leg to rotate the foot onto its ball. Slightly rotate both feet outwards also so we don’t end up doing the “March of the Penguins” and add some rotation to the hips to favour the forward leg. Next work your way up the spine to get the angle of the shoulders contrasting with the hips. Add the swing of the arms to oppose the legs and also indicate the effects of drag and overlap in the hands. Create this pose at frame 1 and 25 (to complete the loop) and then create its opposite at frame 13.

Step 03: Passing pose
Now move to frame 7 to create the first passing pose. The front leg should now be directly beneath the body, straightened up and the body’s weight should shift onto the side of this supporting leg as well as slightly moving up. Have the back leg coming through and add some drag in the toes using the ‘Toe Wiggle’ attribute on the foot control. Straighten up the spine as well as the hips and shoulder. This will give a nice contrast going from the c-shaped spine in the contact poses to the straight spine in these passing poses. Next rotate the arms down to the side, working from the shoulder down to the hands. Once you are happy with the pose, create the mirrored pose at frame

Step 04: Down Pose
Go to frame 4 for the down position. Have the hips go down as the weight is taken onto the leg and make sure the forward foot is flat on the floor. Use the ‘Roll’ attribute on the back foot to bring it onto its toe ready to come off the ground. Add more drag to the hands as they try to catch up with the rest of the arm. Use the reference images as a guide but push this further if you wish to do a more exaggerated walk. We need to again mirror the pose at frame 16.

Step 05: Up pose
Now comes the up pose. Step to frame 10 and begin by translating the root slightly up and adding some roll onto the back foot. I don’t like to push the root up too much here as it can look quite forced and unnatural. We generally don’t lift too much off the ground but again this will be down to your personal taste and also the type of walk you are trying to achieve. Add some rotation in the hips to favour the forward moving leg and also do the opposite in the shoulders to get that contrast. You can add some drag to the toes of the forward moving foot also and when happy, create its opposite pose at frame 22. Make sure we only have 24 frames on the timeline now as frame 1 and 25 should be identical and we do not want to view the same frame twice as we play back.
Step 06: Stepped to Spline
Select all the control curves in the viewport and open up the Graph Editor. Go View and turn on Infinity. Now select all the curves in the Graph Editor and go Tangents>Spline. With the curves still selected, go Curves>Pre Infinity>Cycle and Curves>Post Infinity>Cycle. If you hit play now, your animation may look pretty ‘floaty’ and also have quite a bit of popping happening. If you look at the tangents of your curves as they come in and go out at frames 1 and 25, you’ll notice that it can be pretty sharp in places. This will all need to be smoothed out by editing the tangent handles to allow the loop to work smoothly. You can also go through and delete any curves that have no influence whatsoever. These will be the curves that are totally straight.
Step 07: Refining from the root
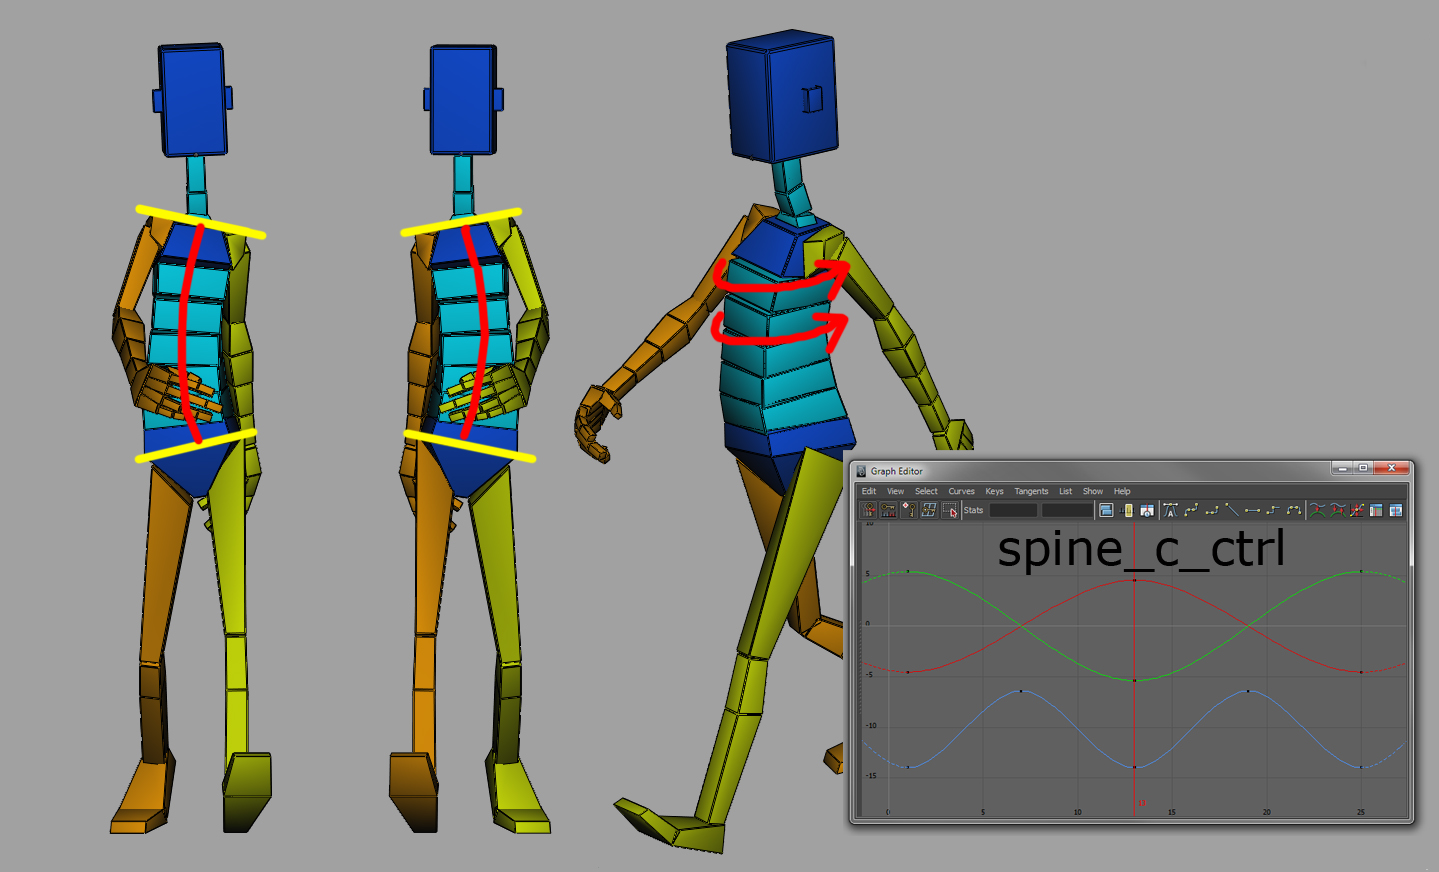
Before continuing, go Window>Settings/Preferences>Preferences and highlight Animation in the left column. Go to the Tangents tab and change the Default out tangents to either Spline or Auto. Whenever we add a new key now, we will get the interpolation in the curves. Now we start refining and again, we’ll start at the core and work our way out. Use your graph editor as much as possible from now and go in and massage each curve. For the hips, what we should end up with is that they create a figure of eight as the weight shifts from one leg to the other. At this stage, I like to use motion curves as much as possible. Select the ‘hip_ik_ctrl’ and go Animate>Create Editable Motion Trail (Create Motion Trail in 2011 or earlier) and use it as a guide to help create a nice transition from one leg to the other.

Step 08: Down to the legs
Currently for the legs it takes four frames to have the foot completely flat. To add more impact and weight, take the ‘Roll’ attribute to 0 two frames after the contact pose. Also add some delay in the toes to slap down around a frame later. Whilst the foot is flat on the floor, it is also important to make sure it translates back at a constant speed. This is to help reduce the slipping and sliding of the foot should we end up moving this character through space as opposed to on the spot. Again, use motion trails to create decent arcs and if you have to, go in and animate frame by frame to do so. The legs can be the trickiest part to get right. Make sure you spend time here to iron out any severe popping as well as getting the coordination between the hips and the legs right.

Step 09: Working up the spine
Getting the spine to work well shouldn’t take too long. We mainly want to focus on getting the movement clean without any jerkiness. I like to take out the majority of the key frames that are not adding too much and really smooth out the curves. Add some twist also to oppose the hips and gradually increase the amount of twist to propagate up the spine. Moving onto the neck and head, add delay to these parts so it feels as if they are always playing catch up. An easy way to do this is to take the keys for the neck and head and shift them back two frames. Then select the keys for the head and shift them back a further one or two frames.
Step 10: Arms and hands
Finally we get to the arms. Start the refining process from the shoulder and work your way down to the hands. Select the controls and again, create the motion trails to help you create those arcs that naturally occur as we rotate our joints. Add some subtle movement to the fingers also so they don’t feel rigid. Use the technique of shifting keys back to add delay to the lower arm and also the palm. This will add more fluidity to the walk and make it feel less mechanical. From this point, it’s a case of going through again with a final level of polish. Check each curve for every control and check that the transition in and out of each curve is smooth. This will reduce any popping as the cycle loops. The basic backbone of a generic walk should now be there. Have a go at adding some personality to it now. Happy animating.

Tip 01: Playblast, Playblast, Playblast
Playing back your animation in the viewport is never the best way to check for timing. Depending on how heavy the scene is, it may play too slow or too fast. A playblast will create a quick video of your animation allowing you to view it at the correct speed. Throughout the animation process, from blocking to the final polishing pass, it is vital that you playblast your animation often. To do so, hold the right mouse button over the timeline and click on Playblast. You can also bring up the frame count to give you an indication of the viewport playback speed. To do so, go Display>Heads Up Display>Frame Count. Also try playing your animation in reverse to see how it works: it’s like flipping a painting and finding those small, hidden issues.
Tip 02: Getting Personal
By the end of the tutorial, you should have a fairly generic, vanilla walk. From here, you could start adding in some personality, because as Samuel L. would say “personality goes a long way”. See what happens if you bring the feet up higher on the Up pose. Does it make the character feel angrier? What happens if you reduce the swing on the arms and rotate the head lower? Does he now feel a little depressed? Go ahead, make your walk a “Royale with cheese”.
Final Result
Here is the result of a walk cycle (although using a different character). I’ll be re-rendering Box Boy soon!
Support CAVE Academy
Here at CAVE Academy the beauty of giving and sharing is very close to our hearts. With that spirit, we gladly provide Masterclasses, Dailies, the Wiki, and many high-quality assets free of charge. To enable the team to create and release more free content, you can support us here: Support CAVE Academy